Keeping track of tasks for various projects can be hard to do, especially if you haven’t set up a reminder system for it. But if you’re using Notion, adding or setting reminders in the tool is a straightforward process.
If you want to know how to add or set reminders in Notion, keep reading and stay on top of your tasks.
Table of Contents
How to Set Reminders in Notion
Receiving reminders is crucial to incorporate your work into your daily schedule. You can add or embed a calendar in Notion, but receiving alerts without glancing at your calendar app is a better way to remind yourself.
There are two ways how you can add or set reminders in Notion, depending on where you’re adding them.
Set Reminders in Notion Database
In Notion, databases can be viewed in various ways: table, board, list, calendar, timeline, or gallery. Regardless, adding or setting reminders in a Notion database follows the same process.
1. Select a property you want to add a date to.
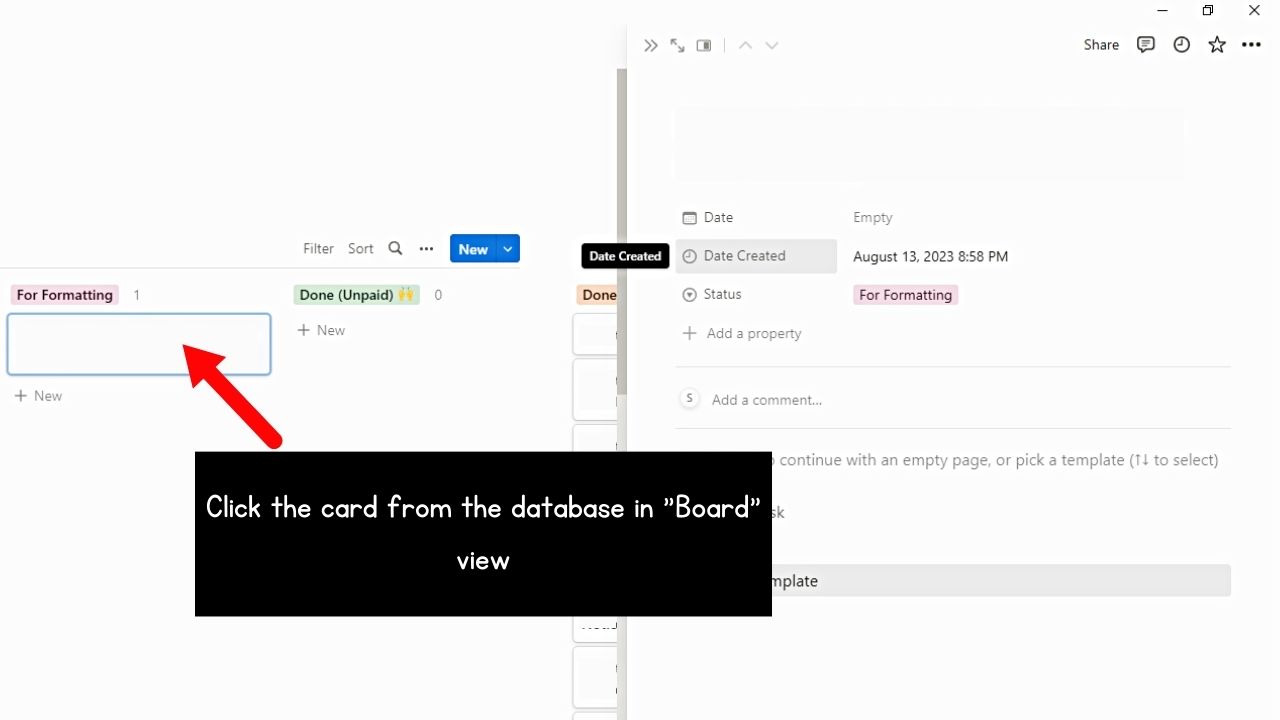
If you’re in the table view, go directly to the “Date” property of your database. If you’re on the board view, expand a card by clicking on it.
2. Click the “Date” field.
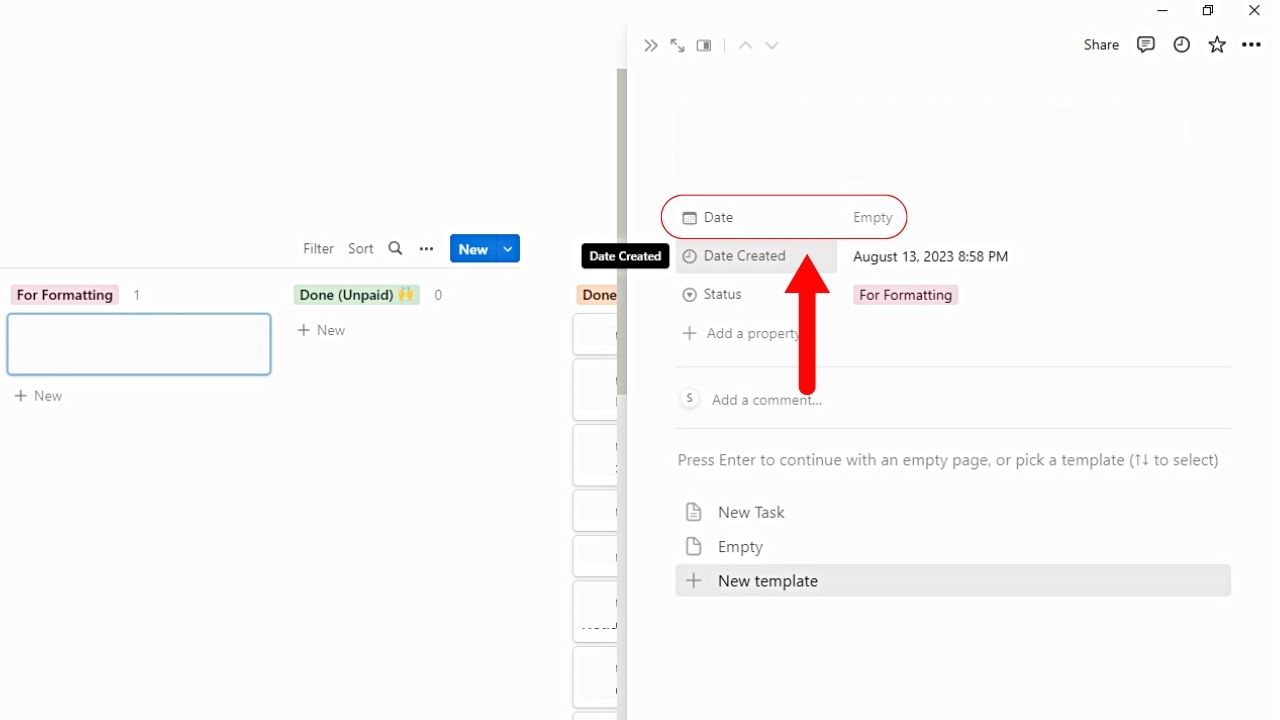
You’ll see the “Empty” on the field beside it.
But in case you want to add a separate “Date” property, click “Add a property” > “Date” and rename the new property.
Then select “Date” again to proceed with the next step.
3. Choose the date and time format.
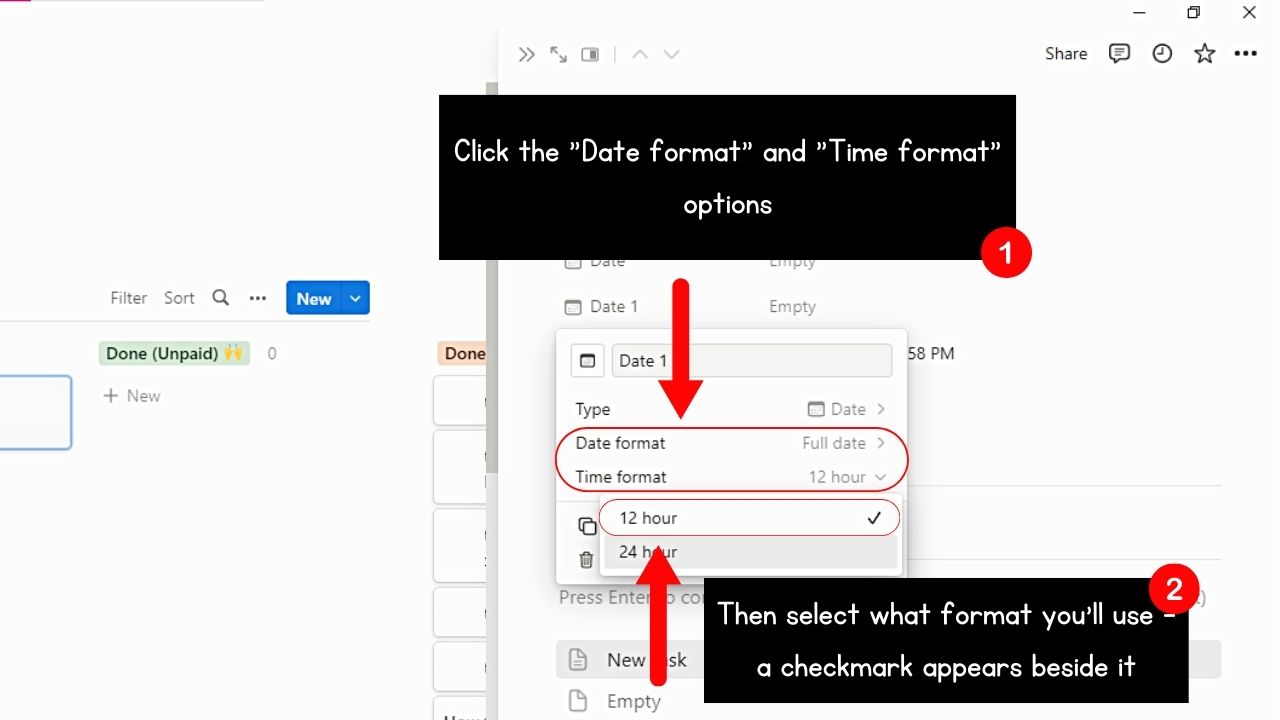
Click on the “Next” buttons beside the “Date format” and “Time format” options to choose the format you’ll use. Once an option is selected, a checkmark appears on its right side.
Then click the “Close” button on the window’s upper-left corner. The new property added to the list should be seen by now.
You can also click “Date format & timezone” at the bottom of the calendar window later.
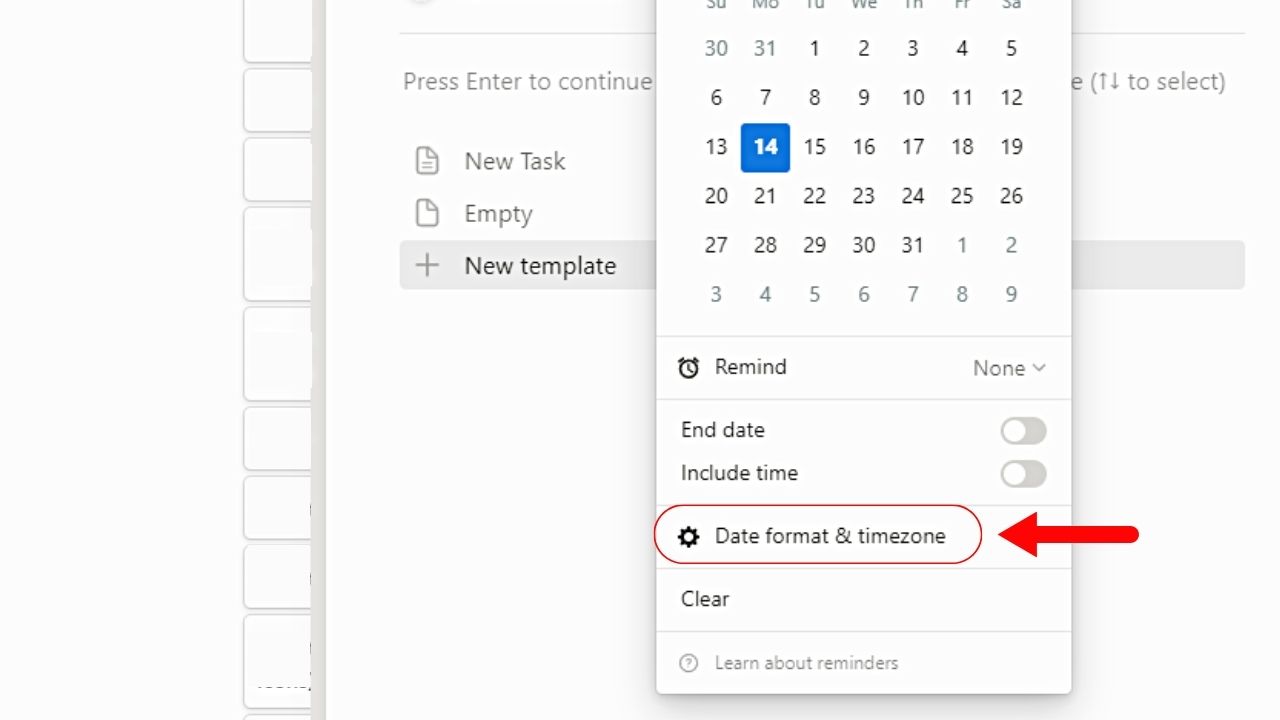
Skip this step if you’re using the existing “Date” property in the database.
4. Set the time and date for the reminder.
A calendar pop-out window appears.
The shortcut for setting a reminder is to click on a date on the calendar. Then type the time of the reminder beside the date.
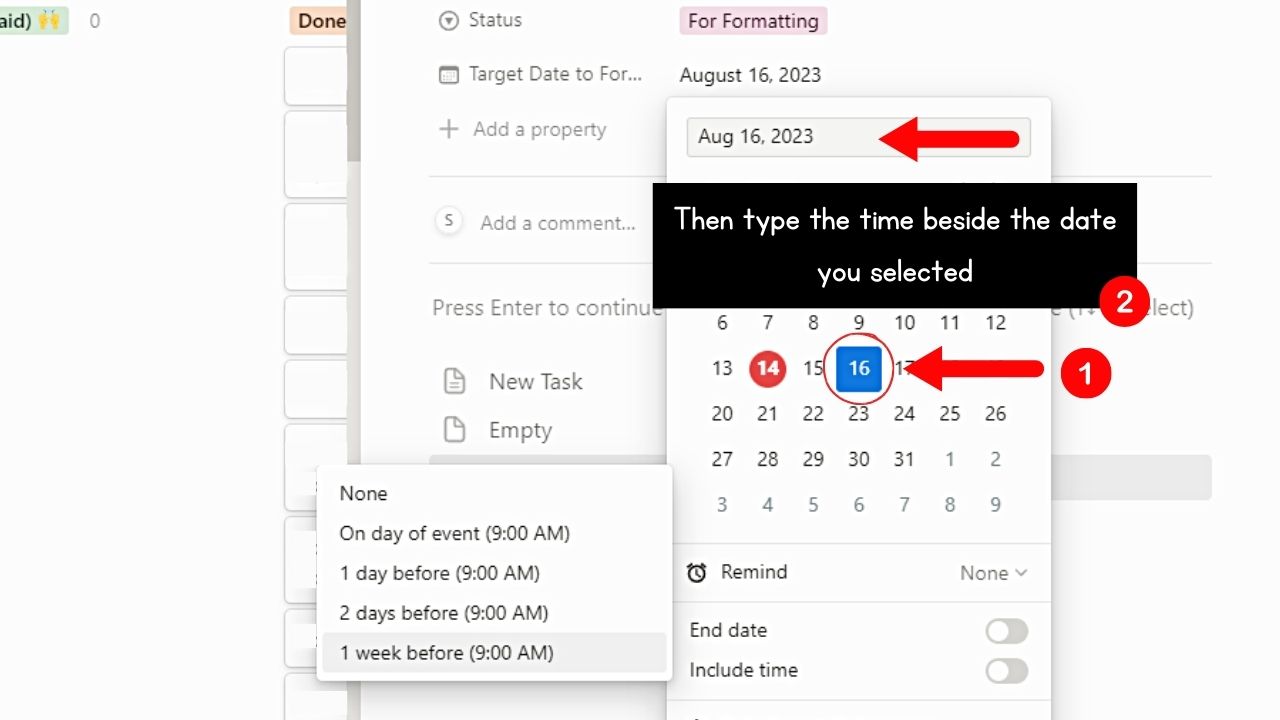
The long method is to select the “Remind” button after clicking on a date. Then choose when you want to receive an alert for the task or event.
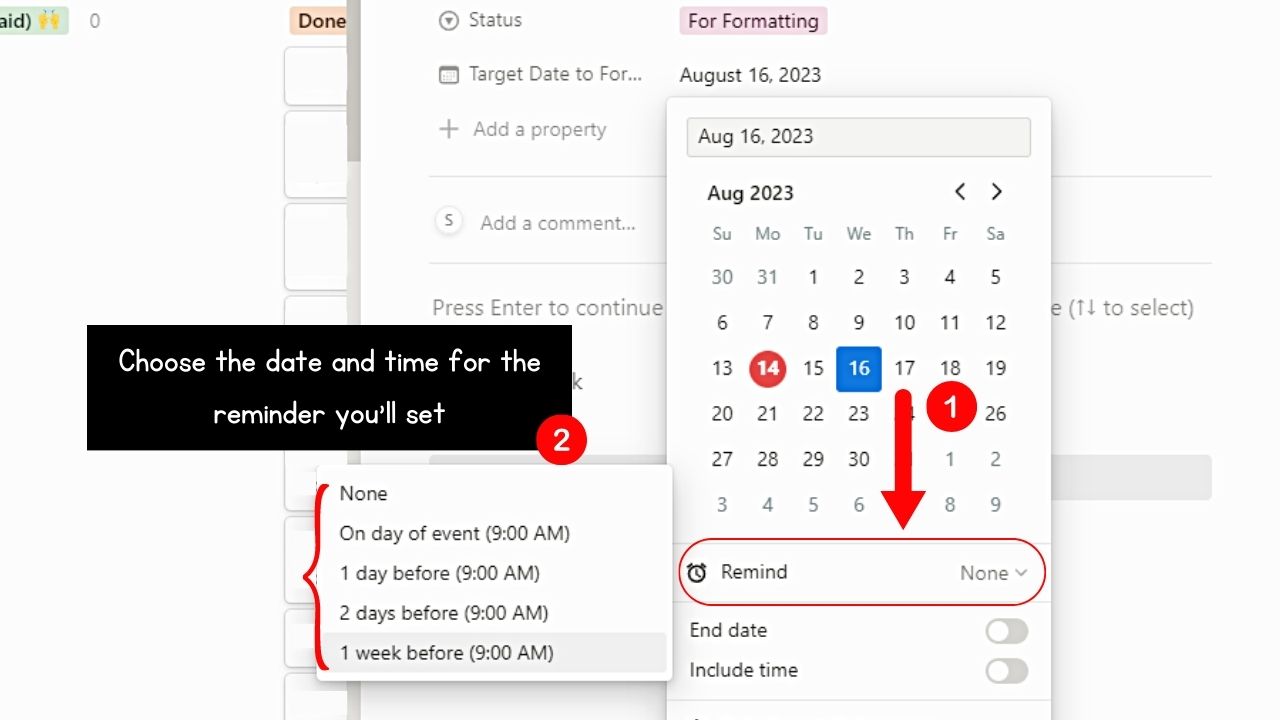
Once you have selected the date and time, you will see the date and time added beside the “Date” property in blue text.
5. Click the toggles for “End date” and “Include time.”
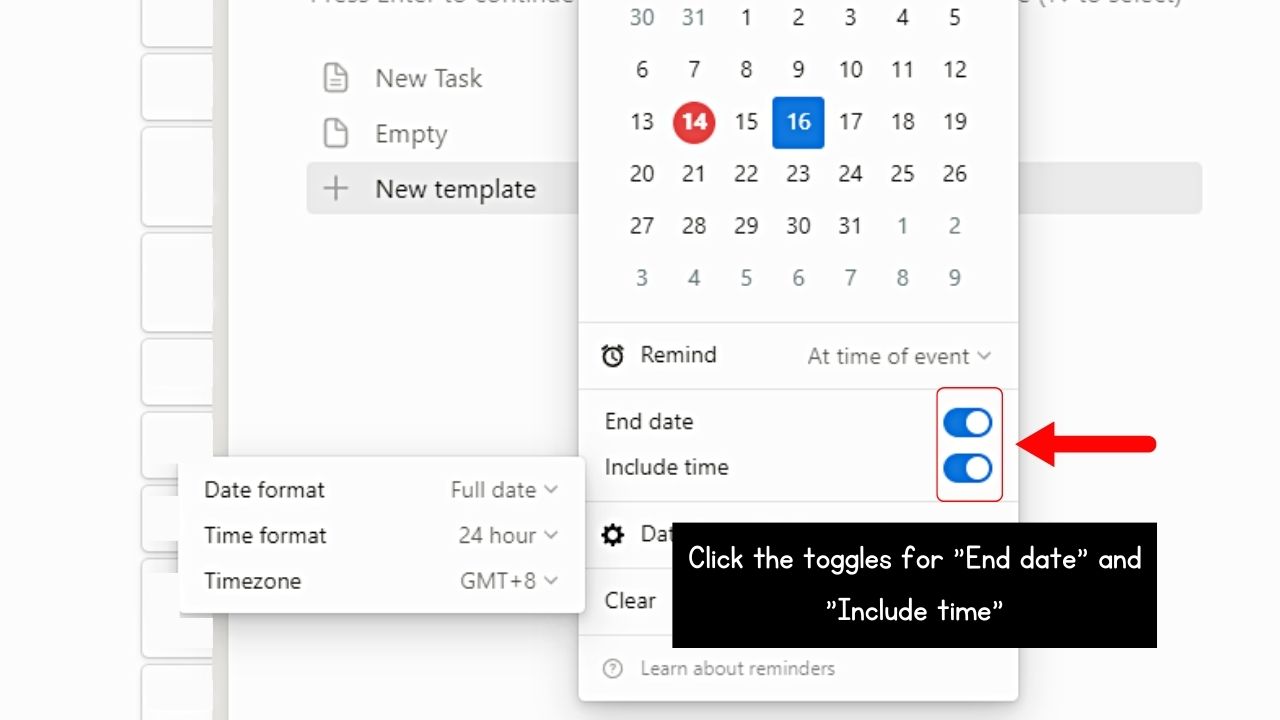
This is optional if you prefer seeing the end date and time details. It is best used if the reminder is set up for more than a day.
Then click anywhere outside the “Calendar” window to exit it. By now details of the reminder in the “Date” property should be seen.
Set Reminders Directly on a Notion Page
This option works best if you have added a “Reminders” section or list to your Notion page and just want a quick reminder for a task.
Granting that you have opened the Notion page you’ll set a reminder on, do these steps.
1. Click on a part of the page that is blank.
This places the blinking cursor where you want to add your reminder.
2. Type the “@remind” command.

This opens a “Reminder” embed block where you can further type details about the reminder.
3. Type the date and time for the event or task.
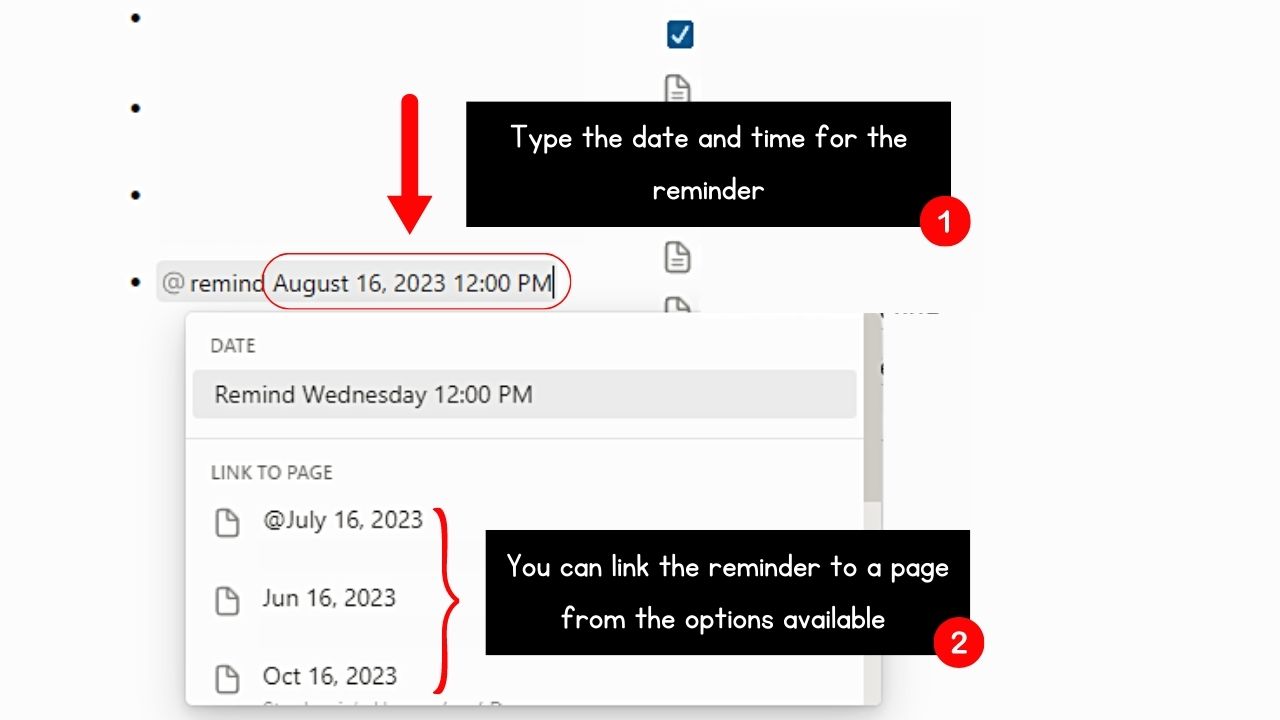
You can link this reminder to a page if you want to by selecting any of the options available in the dropdown menu.
4. Press “Enter.”
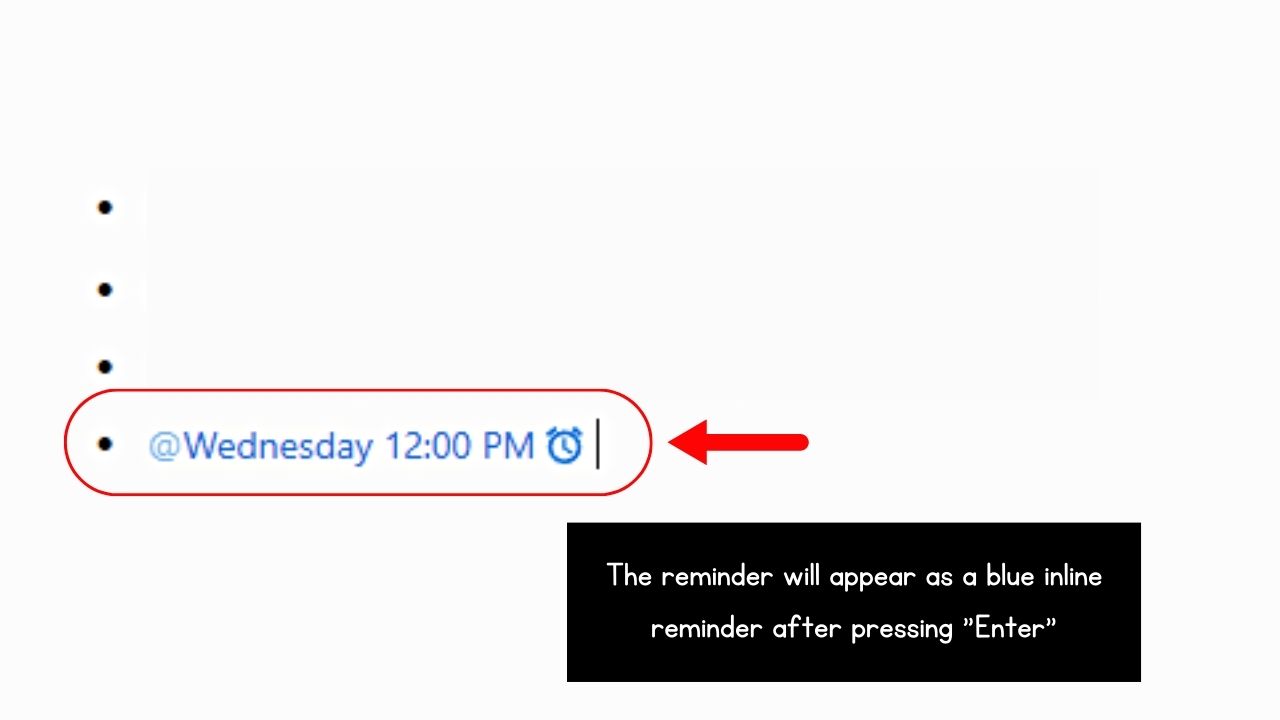
This will save the newly-created reminder. You should now see a blue inline reminder on the page.
Once the inline reminder’s past its due, the text will become red.
How to Add Recurring Reminders in Notion
Recurring reminders are the kinds of reminders that repeat daily, weekly, or monthly. But instead of manually adding the same tasks for the upcoming day, week, or month, set them as recurring reminders.
How? There are two ways how you can achieve this feat.
Add Recurring Reminders Using Templates
The easiest way of adding recurring reminders in Notion is by duplicating templates. Whether you’re using grocery list templates, workout templates, or templates for students, adding recurring reminders to templates is easy.
For example, we’ll duplicate the “Ultimate Tasks for Notion” template to our own workspaces. Once done, follow these steps next.
1. Select a date on the calendar.
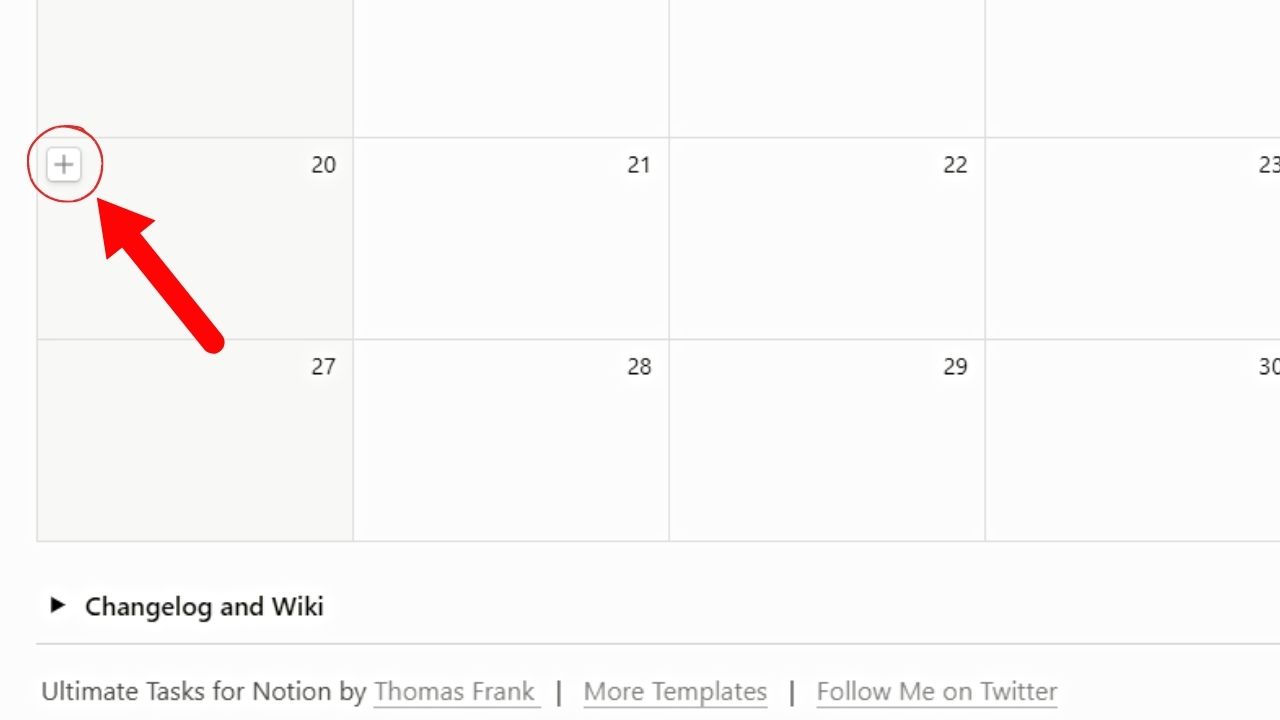
Do this by clicking the “+” button on the upper left corner of that date block on the calendar.
A new task card then opens up on the Notion page.
2. Edit the details for the task page.
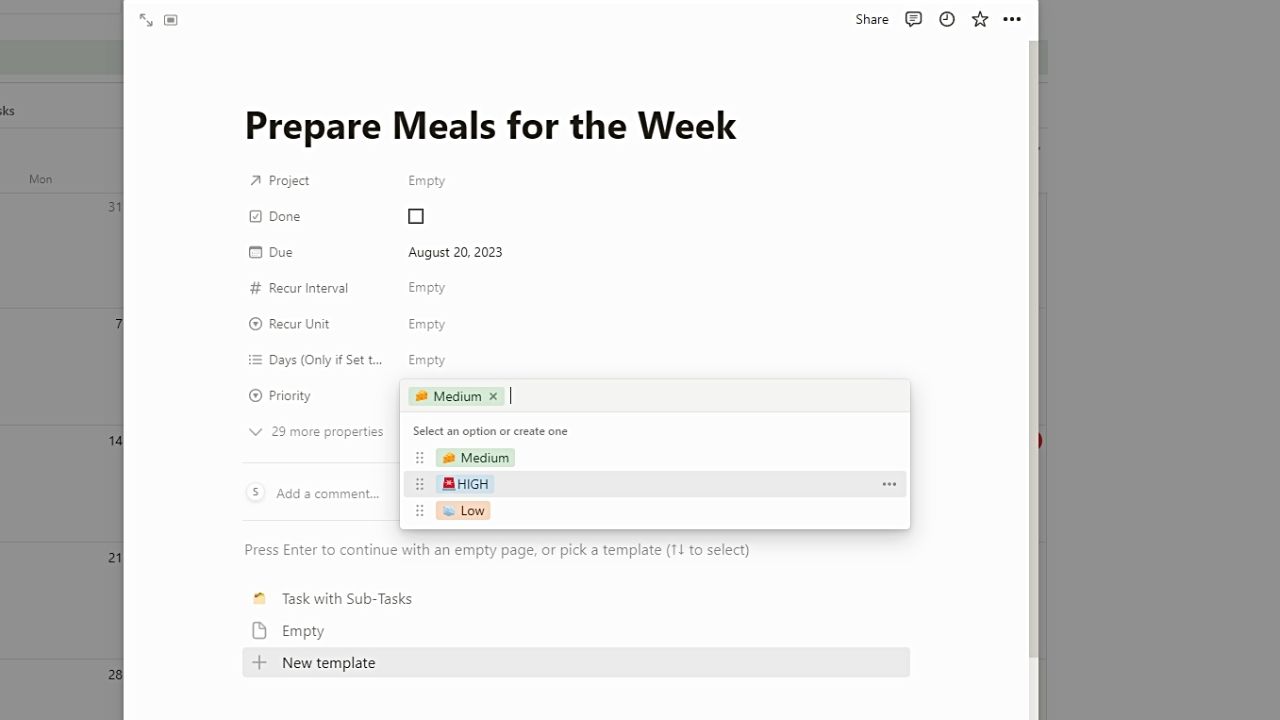
Add the task’s title and subtasks if applicable. You can also edit the due date part if is a time-bounded task.
You can also change the priority status of the task in the “Priority” section.
3. Click the “Recur Unit” property and set the unit to be used.
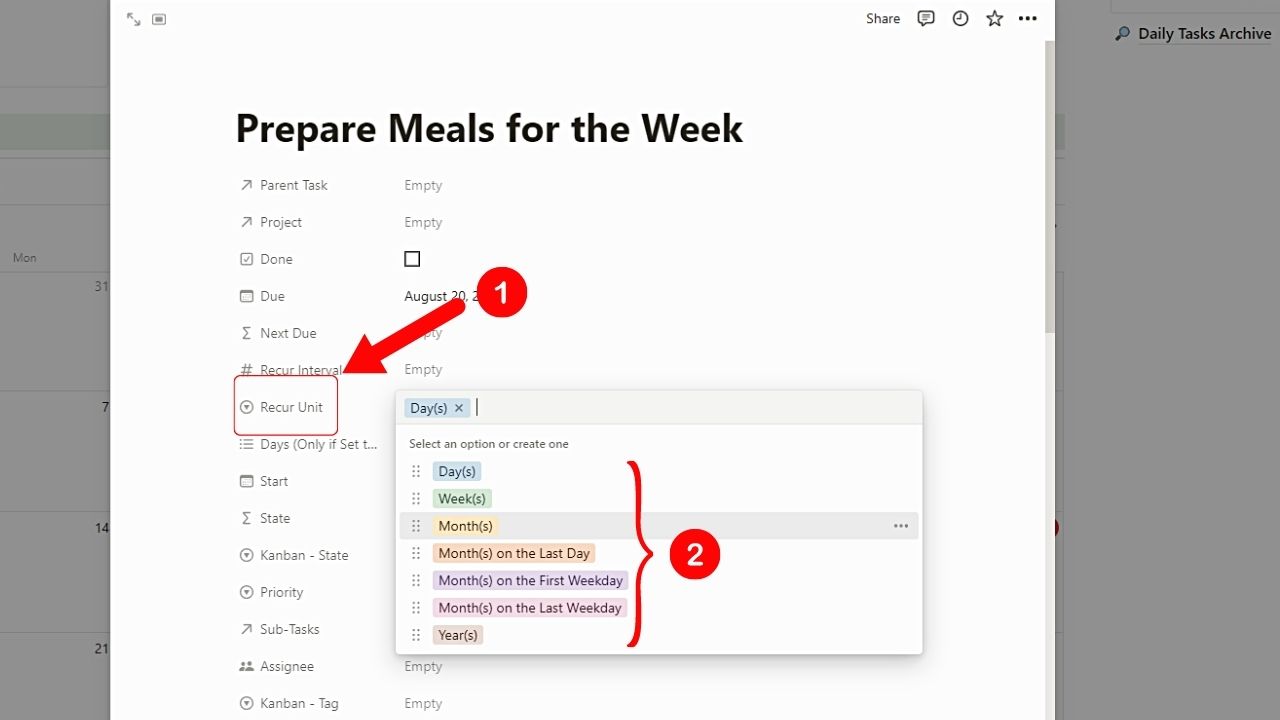
These units are Notion tags, which help filter the tasks based on these tags. These are the tag options you can choose from:
- Days
- Weeks
- Months
- Months on the Last Day
- Months on the First Weekday
- Months on the Last Weekday
- Years
4. Click the “Recur Interval (unit)” property and type the number.

A blank field then appears, allowing you to type the number in this section. As soon as you press “Enter,” the “Due” and “Next Due” sections are updated.
5. Click anywhere outside the page to exit it.
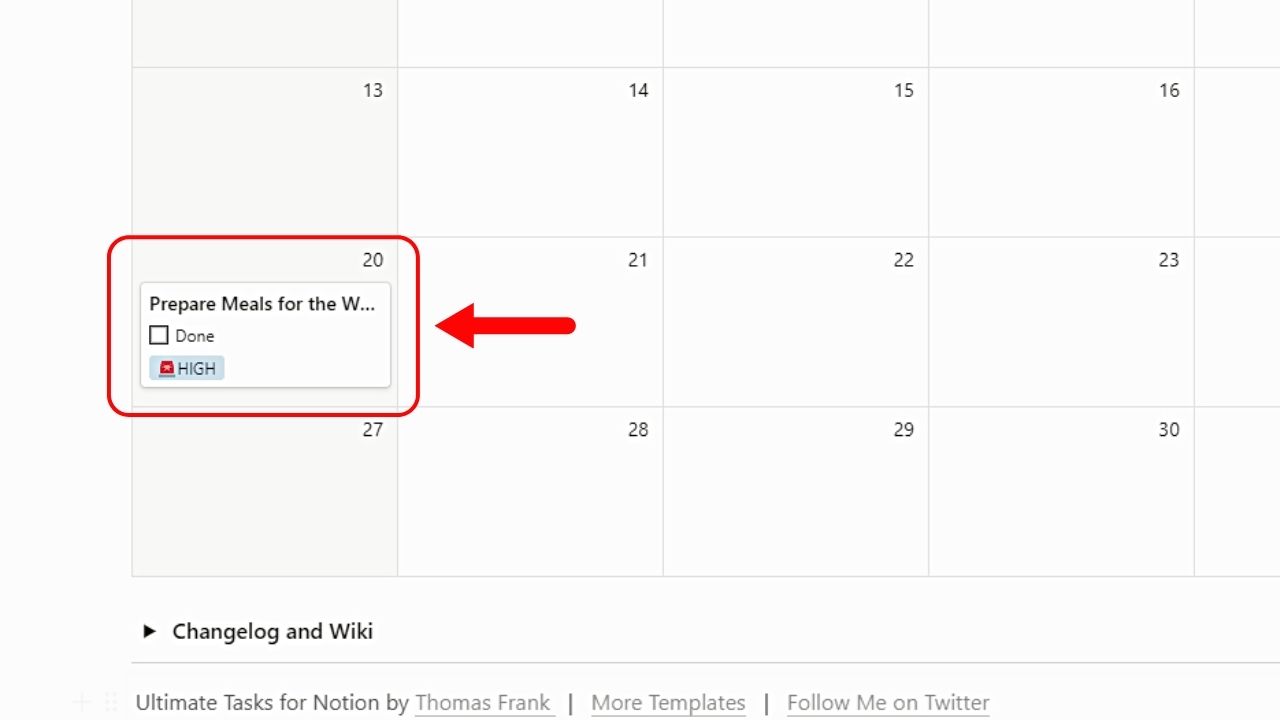
You should see the task card on the date you selected earlier in the calendar.
Add Recurring Reminders From Scratch
Even if you have created your own database for tasks and projects, you can add recurring reminders to it.
1. Create a new Notion database.
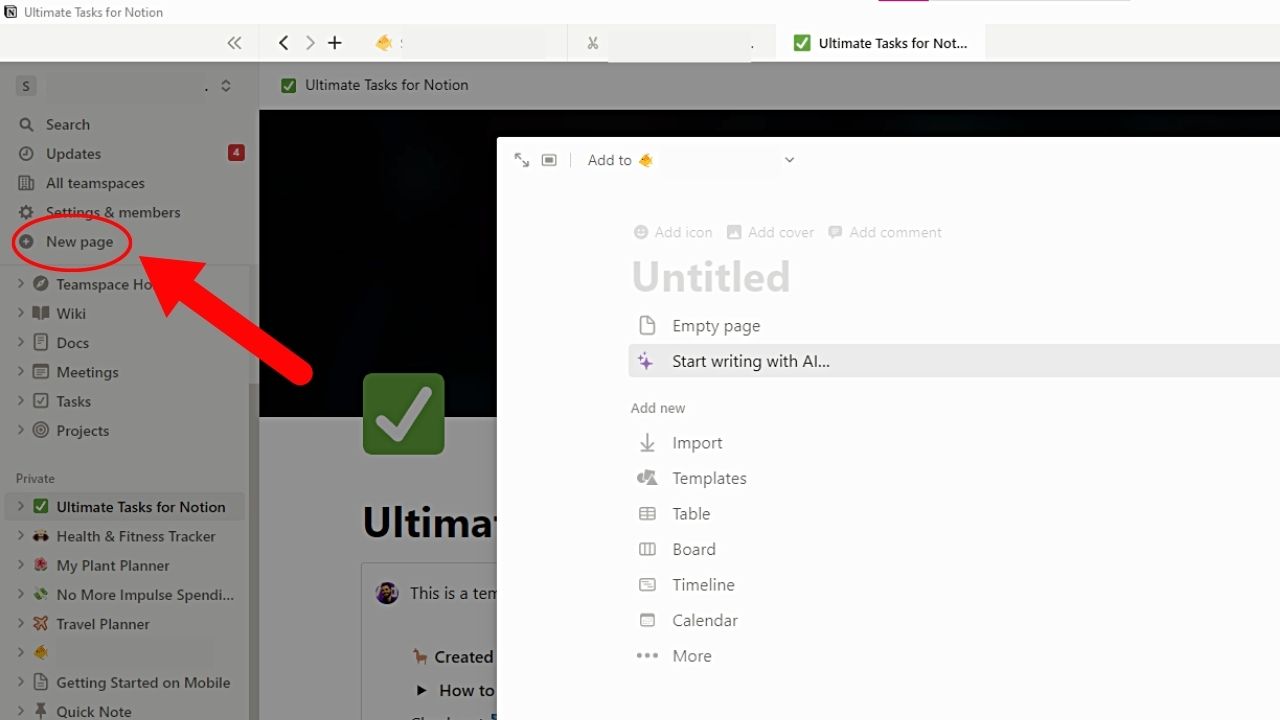
Click “New Page.” A new page then opens in the middle of the screen.
2. Select “Table.”
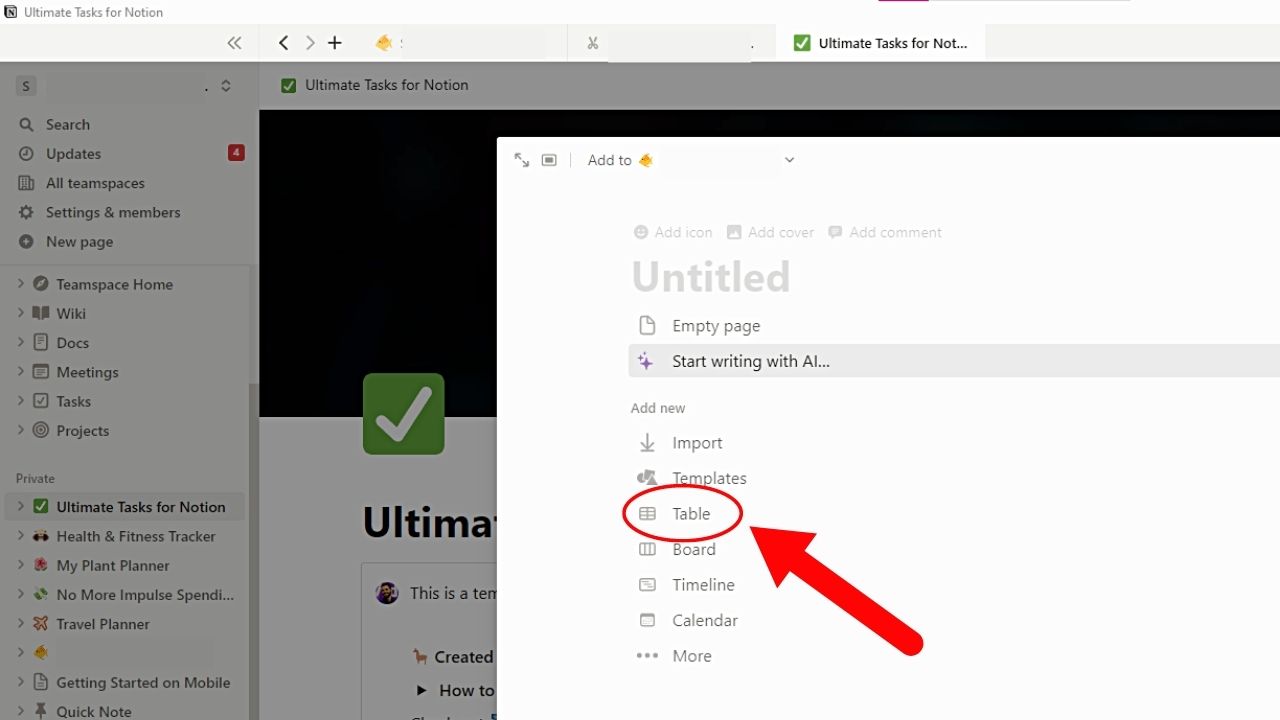
You’ll see this as the third option under the “Add new” section. A new database or table page then opens.
3. Click “New Database.”
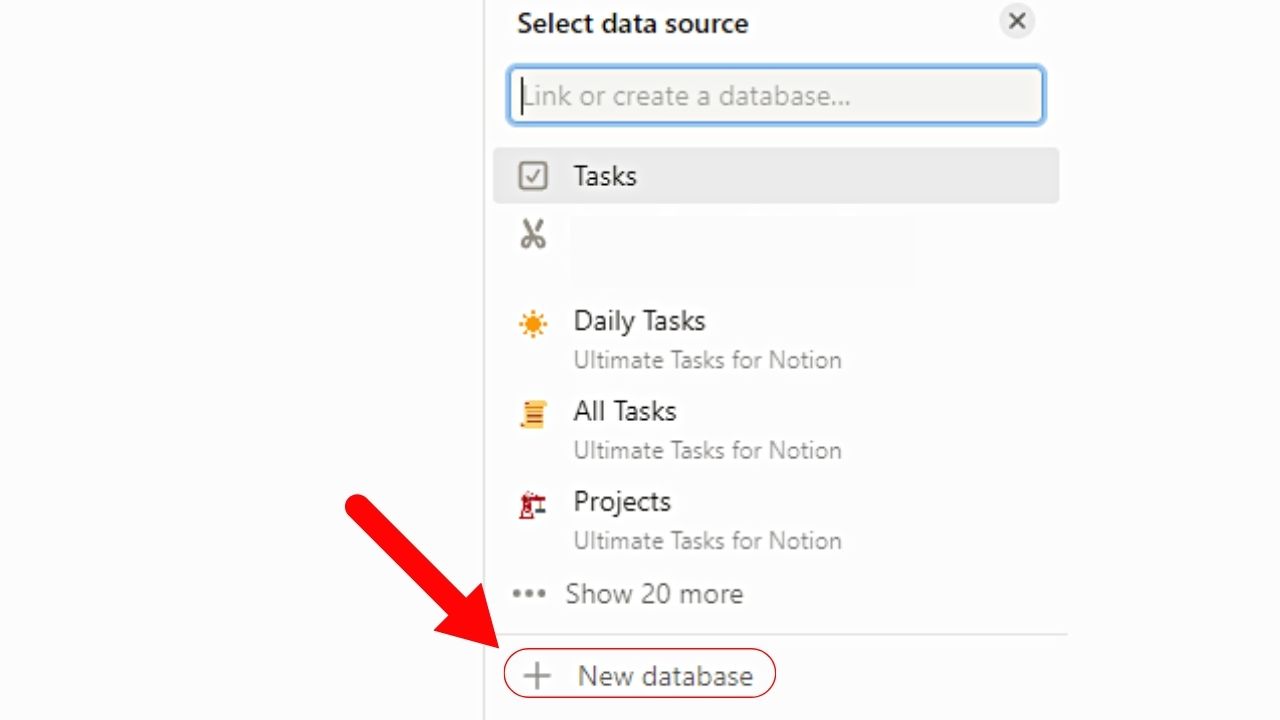
This is the last option in the “Select data source” panel.
4. Edit the new database.
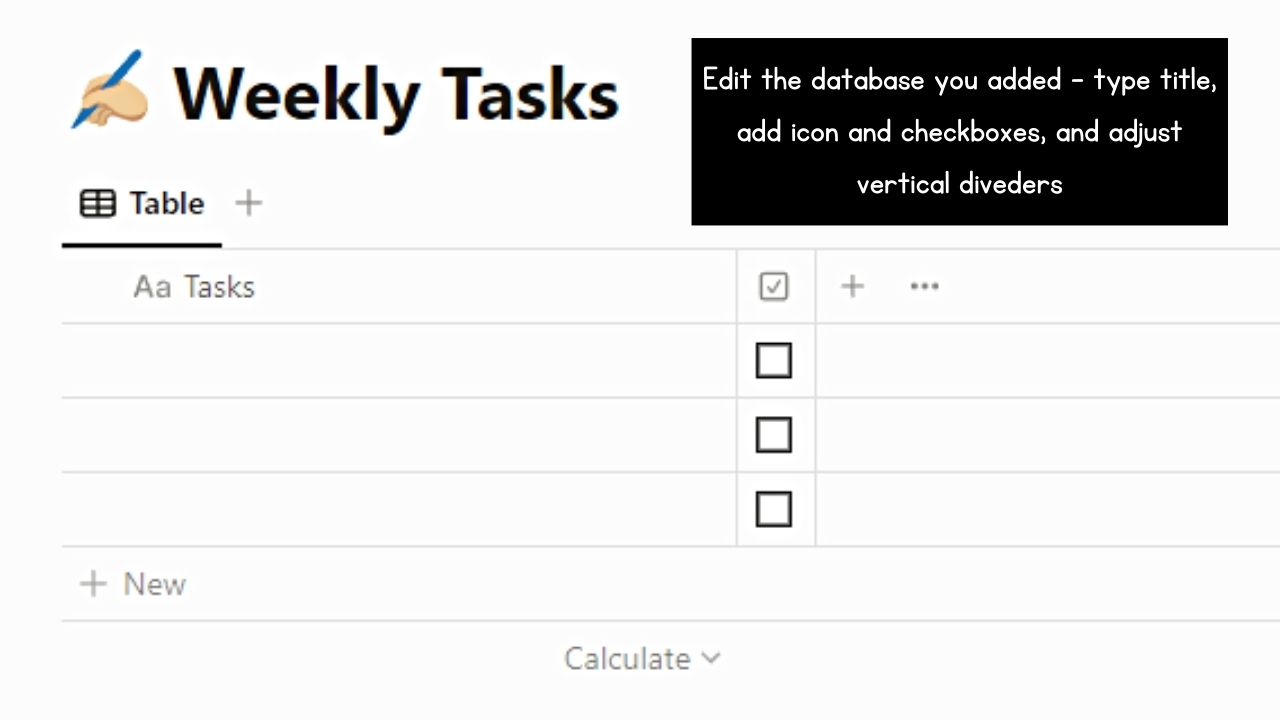
Give the database a title, rename the properties, add an icon, or even convert an existing property into a “Checkbox” property.
Then adjust the vertical divider between the columns to change the size of the cells.
5. Select the “New” button.
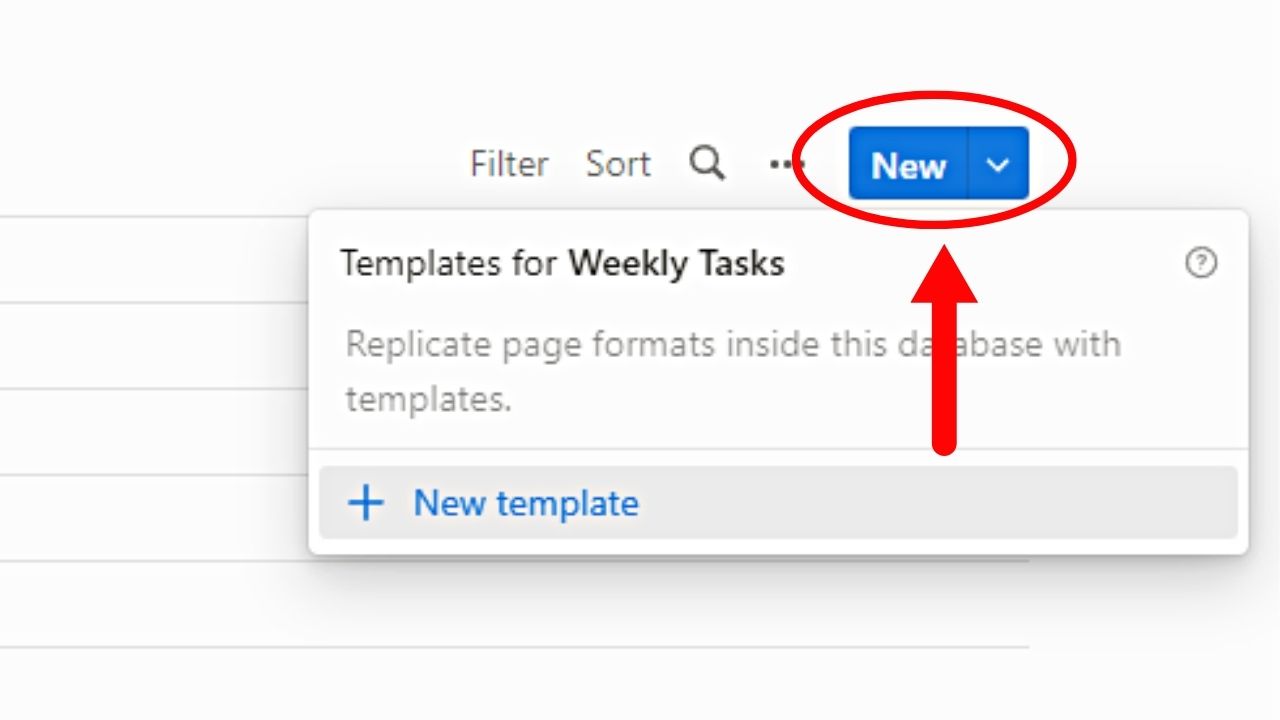
This is the blue button on the upper right of the database after the 3-dot icon.
6. Click “New template.”
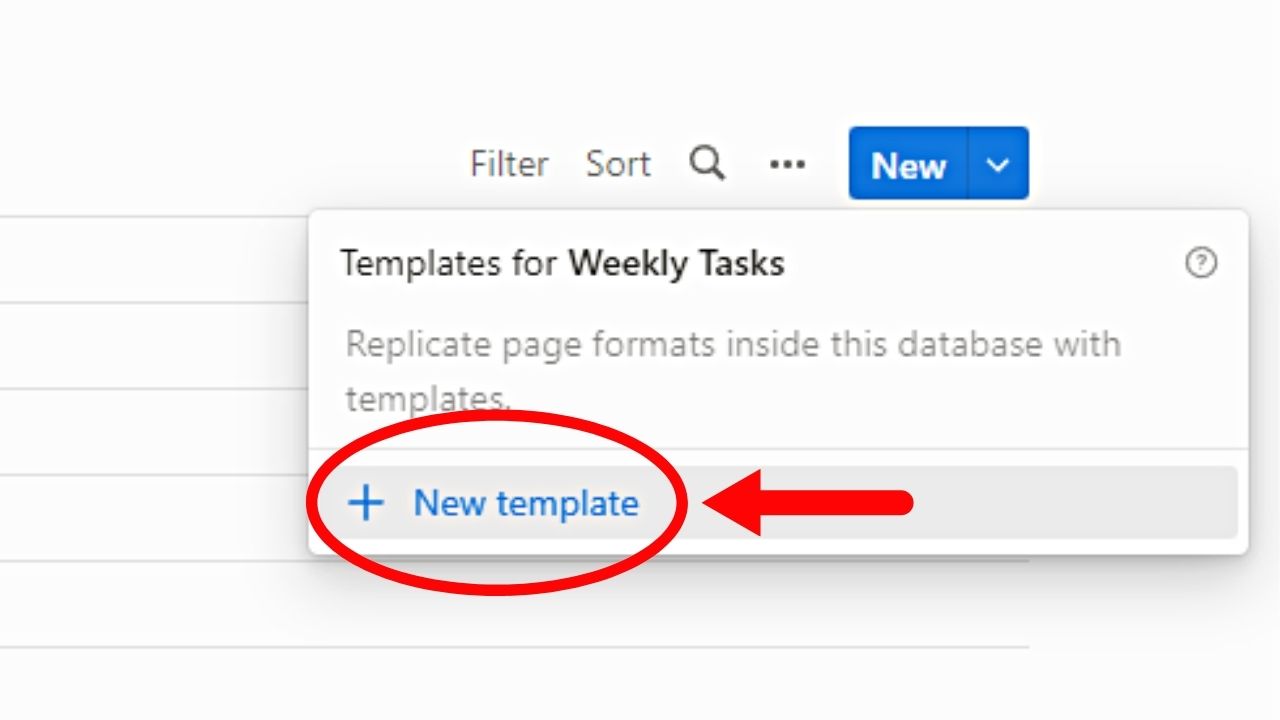
This is the last option on the “Templates for [database name]” panel that appears. A new template page appears.
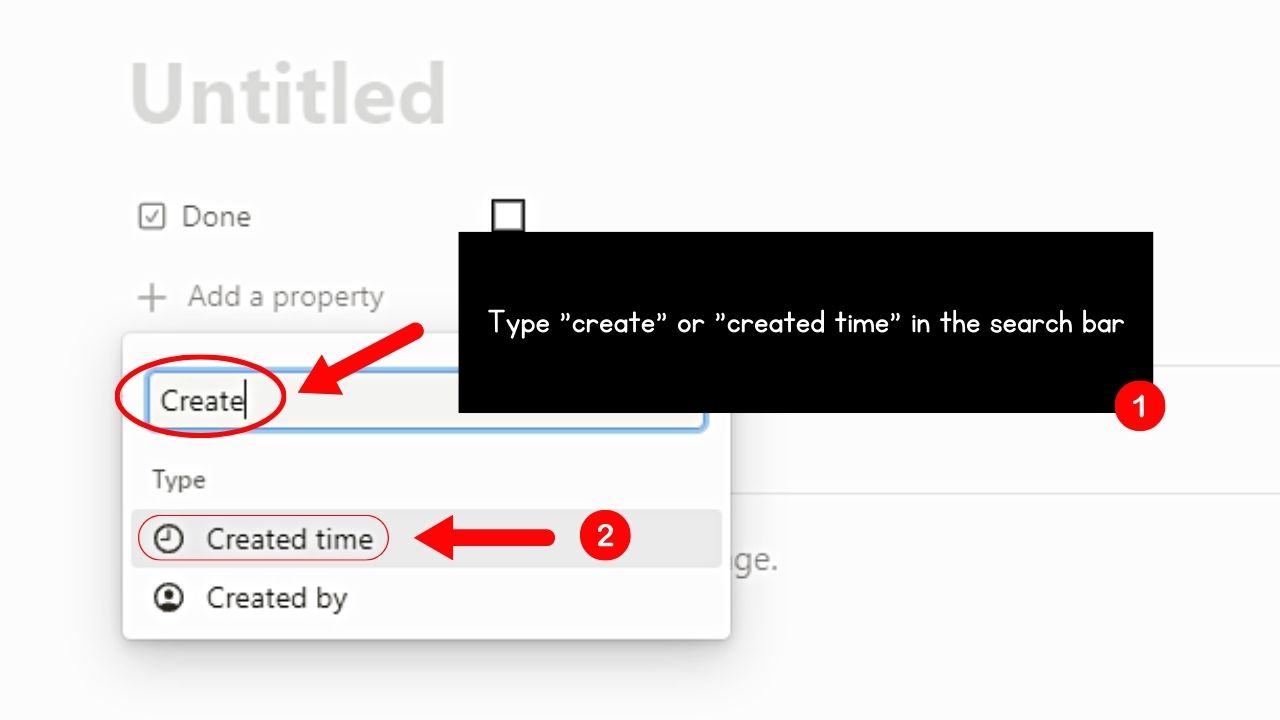
7. Add a “Created time” property.
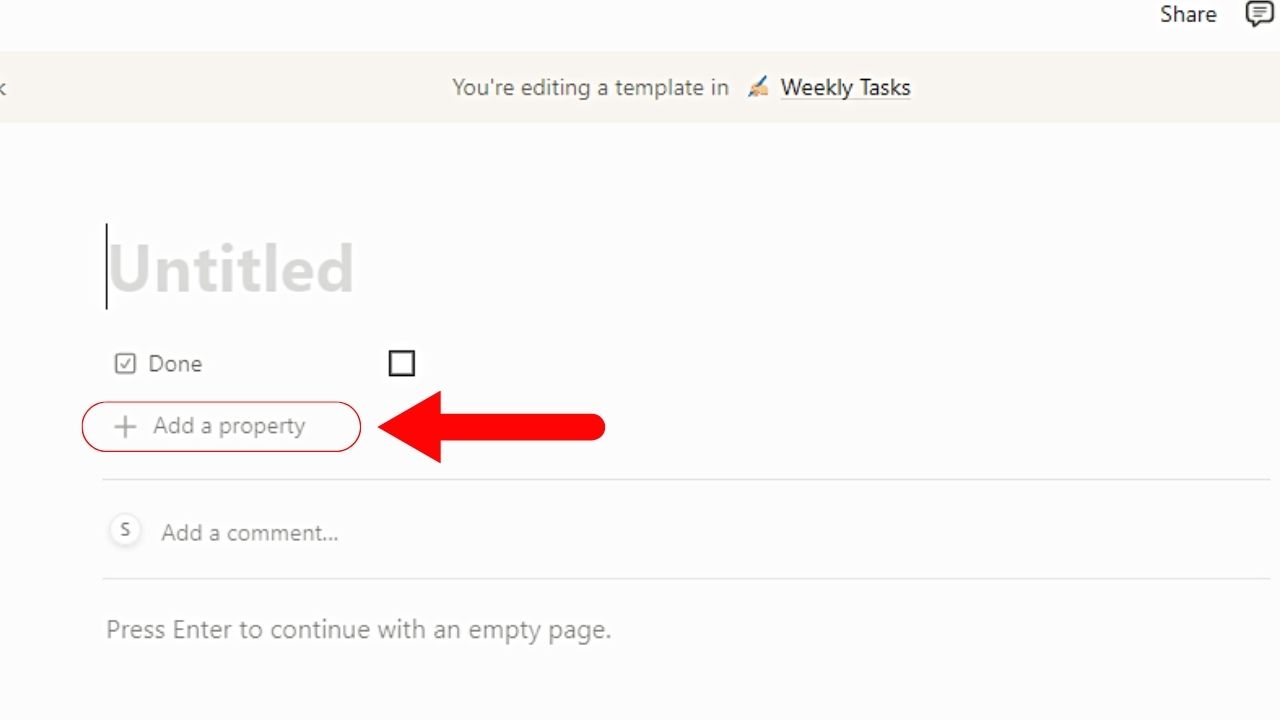
Click the “Add property” option on the new template page.
Then select “Created time” for it to appear on the template page.
8. Edit the “Created time” property.
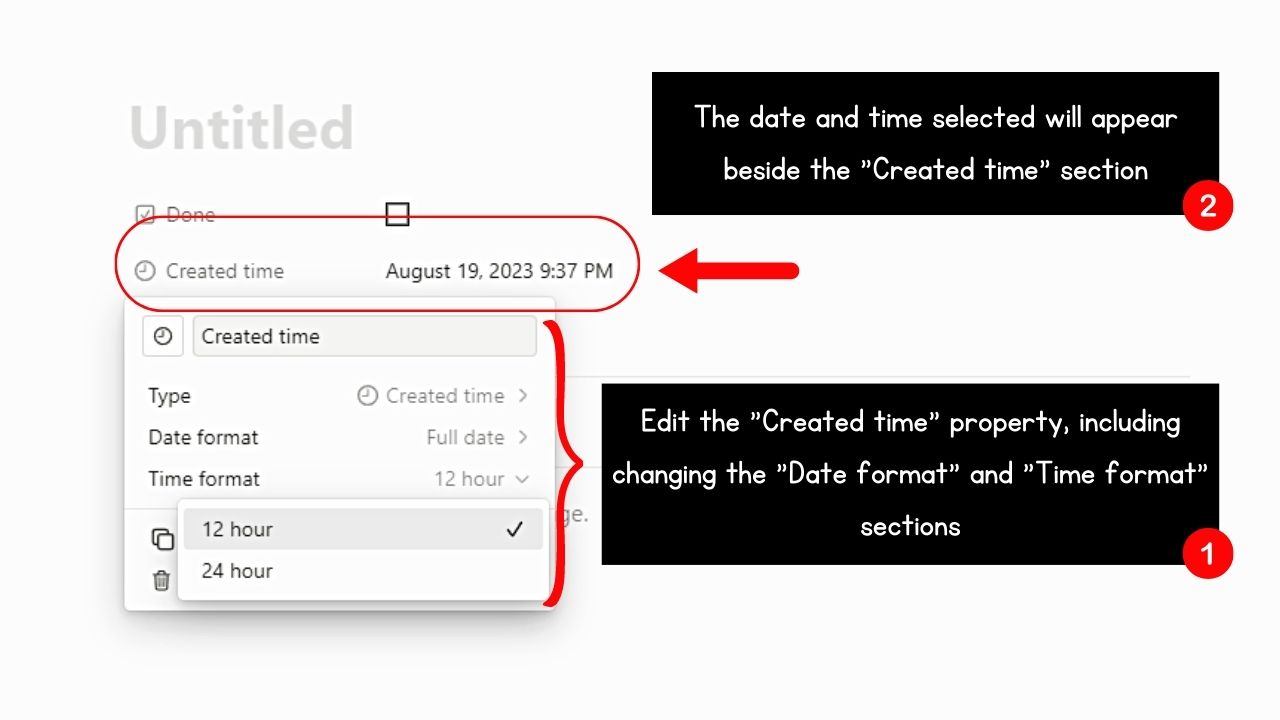
Click “Created time” and select the “Down” buttons for “Date format” and “Time format” to choose the way the time and date entries look.
9. Edit the new template page.
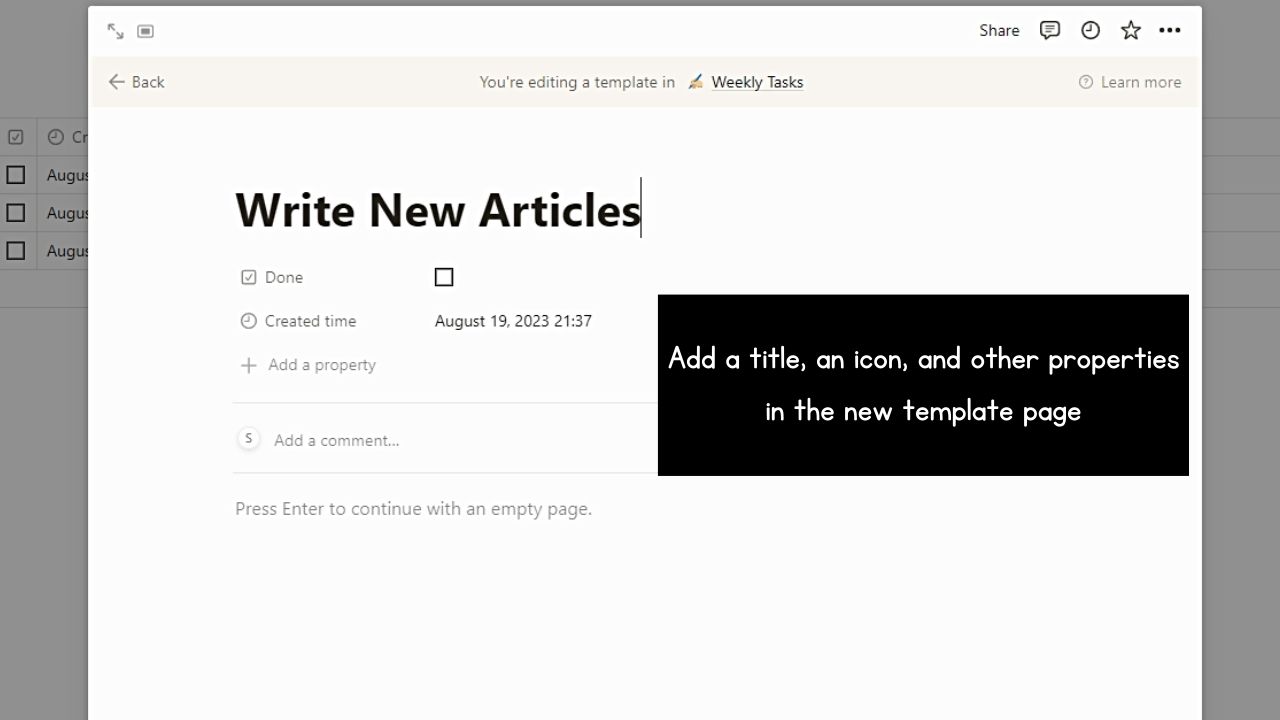
Add a title, arrange the properties you added, or even add an icon to make your new entry aesthetic.
10. Exit the new template page.
You can click anywhere outside the template page window.
11. Select “New” again.
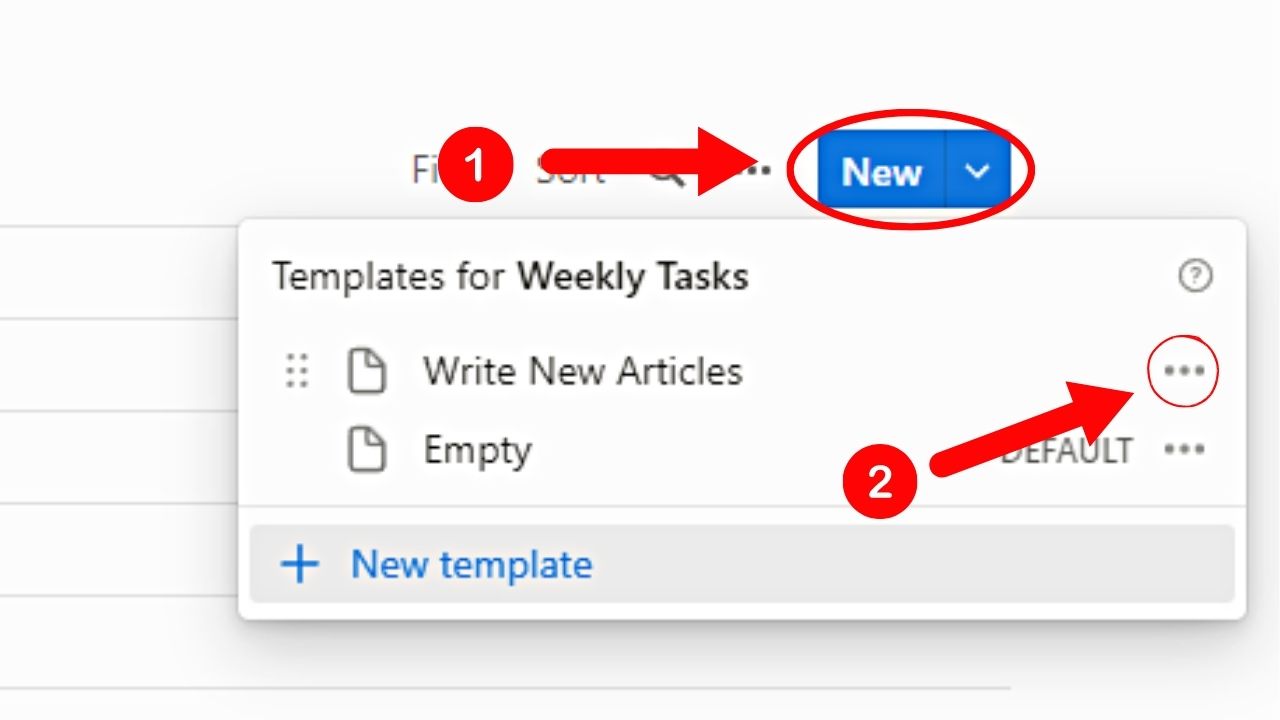
A dropdown menu then appears. Find the new template you created and click the 3-dot icon beside it.
12. Select “Repeat.”

By default, this option is not activated. Clicking on this option opens the editing window for “Repeat.”
13. Choose the frequency of the task repetition.
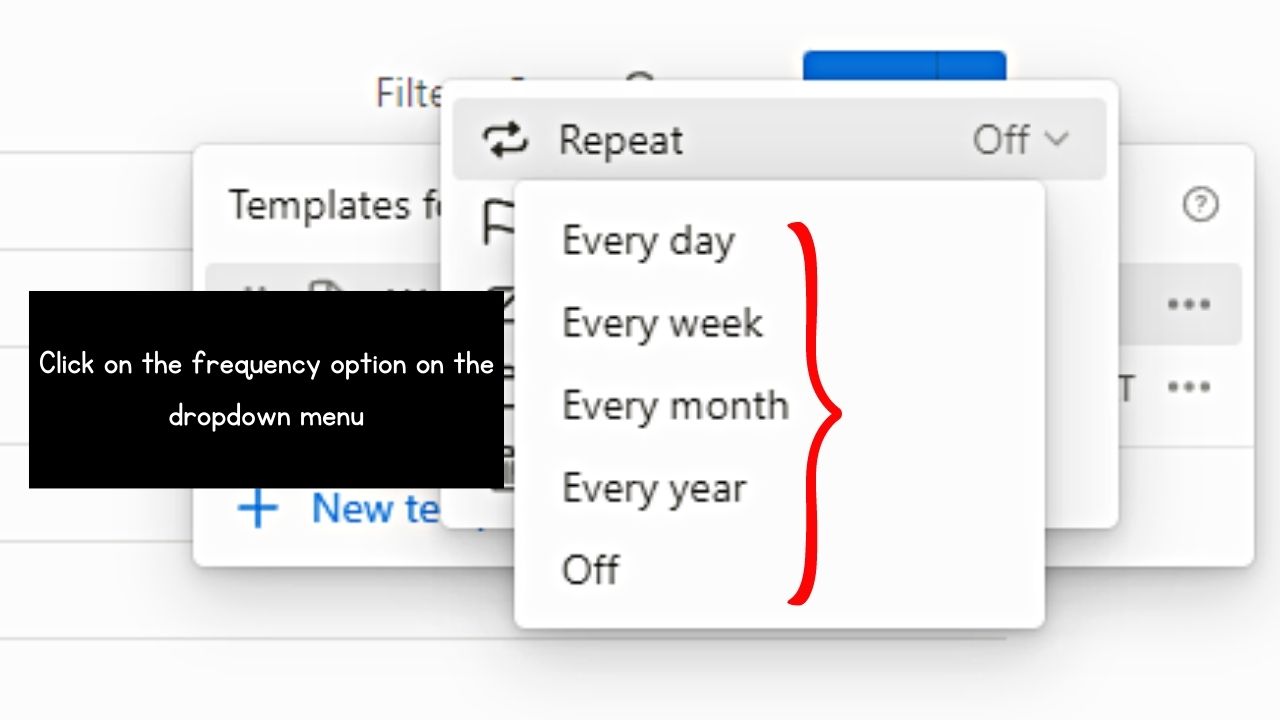
There are four options available: “Every day,” “Every week,” “Every Month,” and “Every Year.”
14. Edit the details of the task repetition schedule selected.
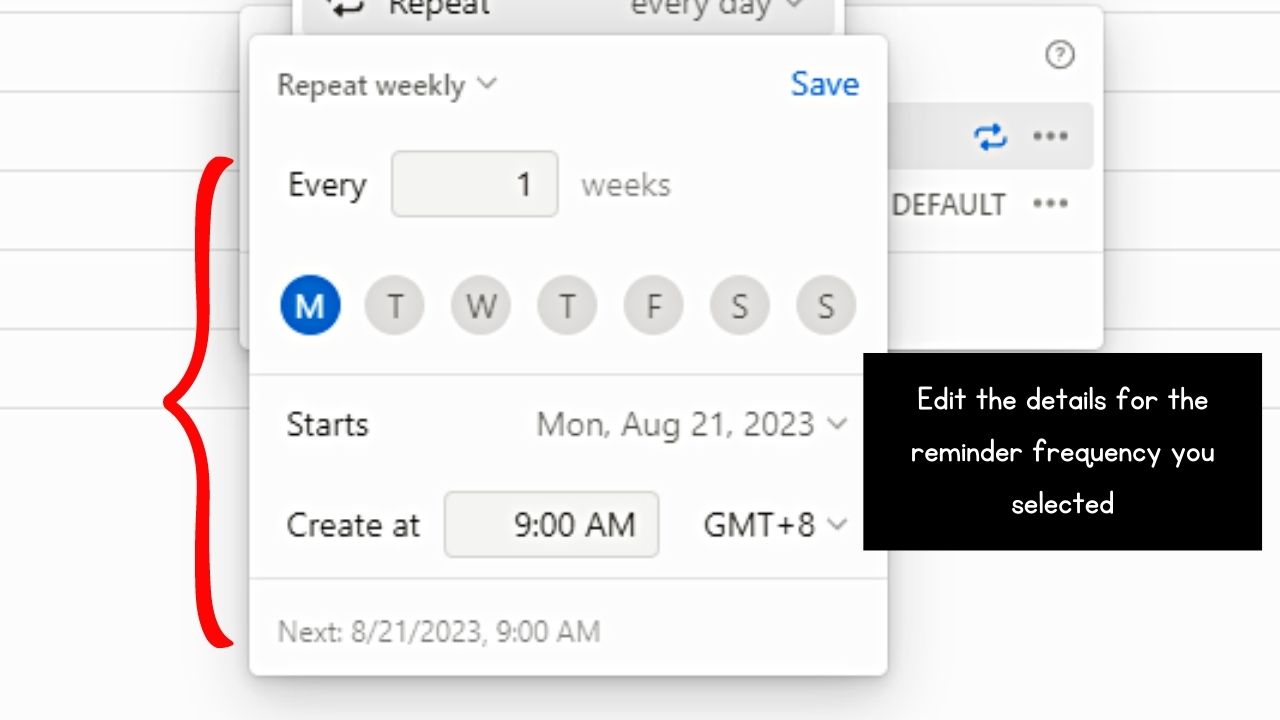
Whatever task frequency option you choose edit the following details:
- Number of days/weeks/months/years the task is to be repeated (interval)
- For “Every week,” you can choose what day the task repeats
- Date the task will start
- Time the task starts
- Timezone
15. Click “Save.”
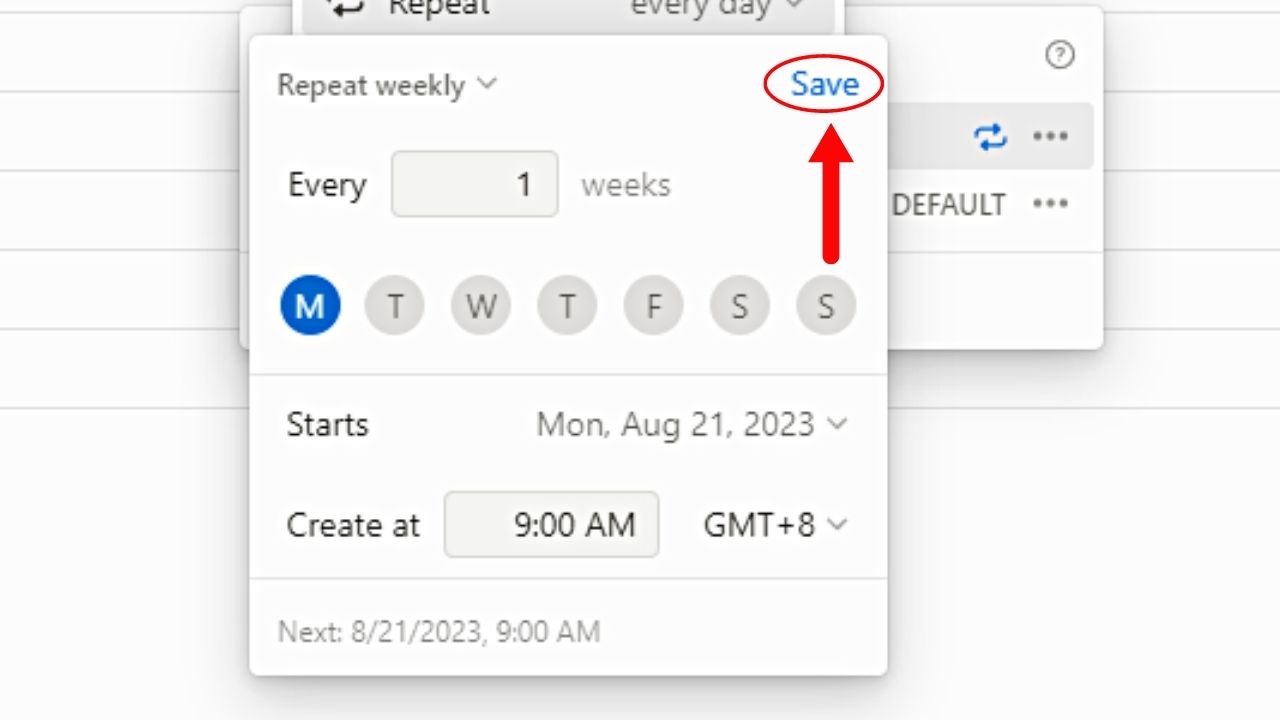
The schedule you added is then saved. The task then appears on the database on the date and time you set earlier.
But if you want to add Notion calendar reminders, go to the next section.
How to Set Notion Calendar Reminders
To add Notion calendar reminders, you first have to create a database. If you want it to be a recurring reminder, make sure you have activated the “Repeat” feature.
Then follow these next steps.
1. Select the “+” button beside the “Table” view.
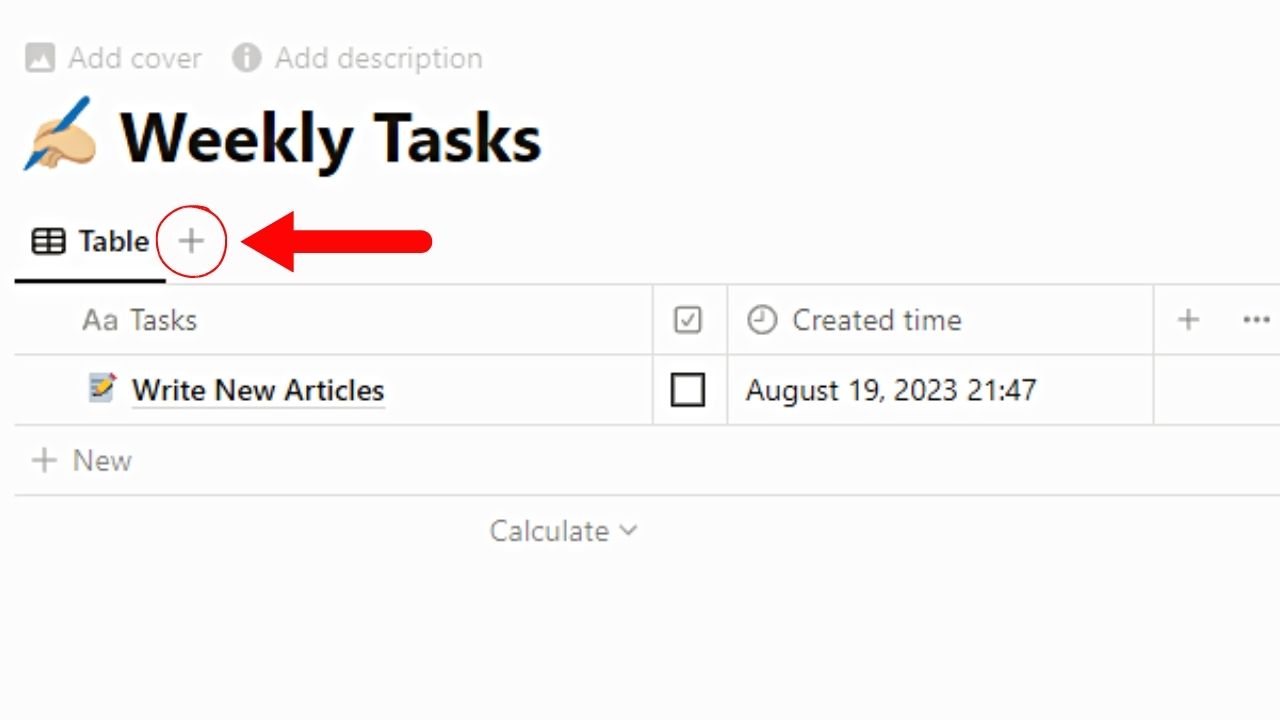
The “New view” panel appears to the right of the database.
2. Click “Calendar.”
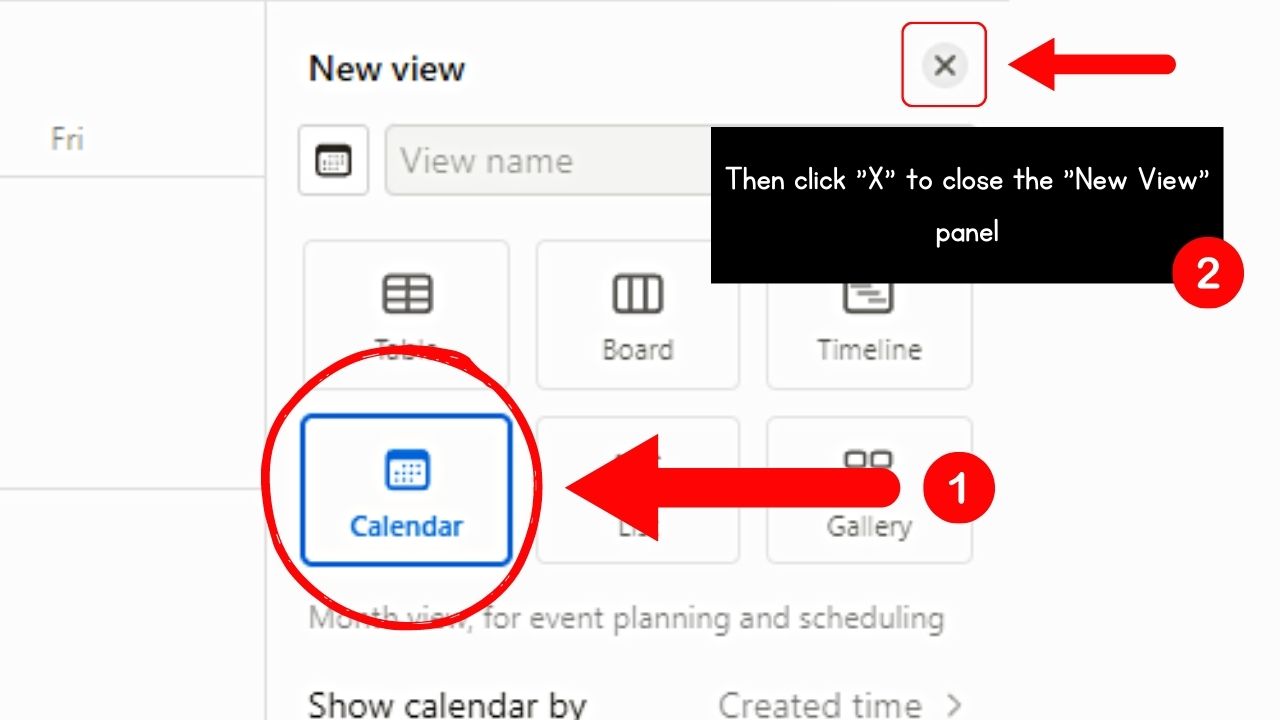
This is the option below the “Table” view option. The calendar view of the database you added is then shown.
Then select “Close” to exit the “New View” panel. You should now see the reminder you added to the calendar.
3. Select the 3-dot icon and click “Properties.”
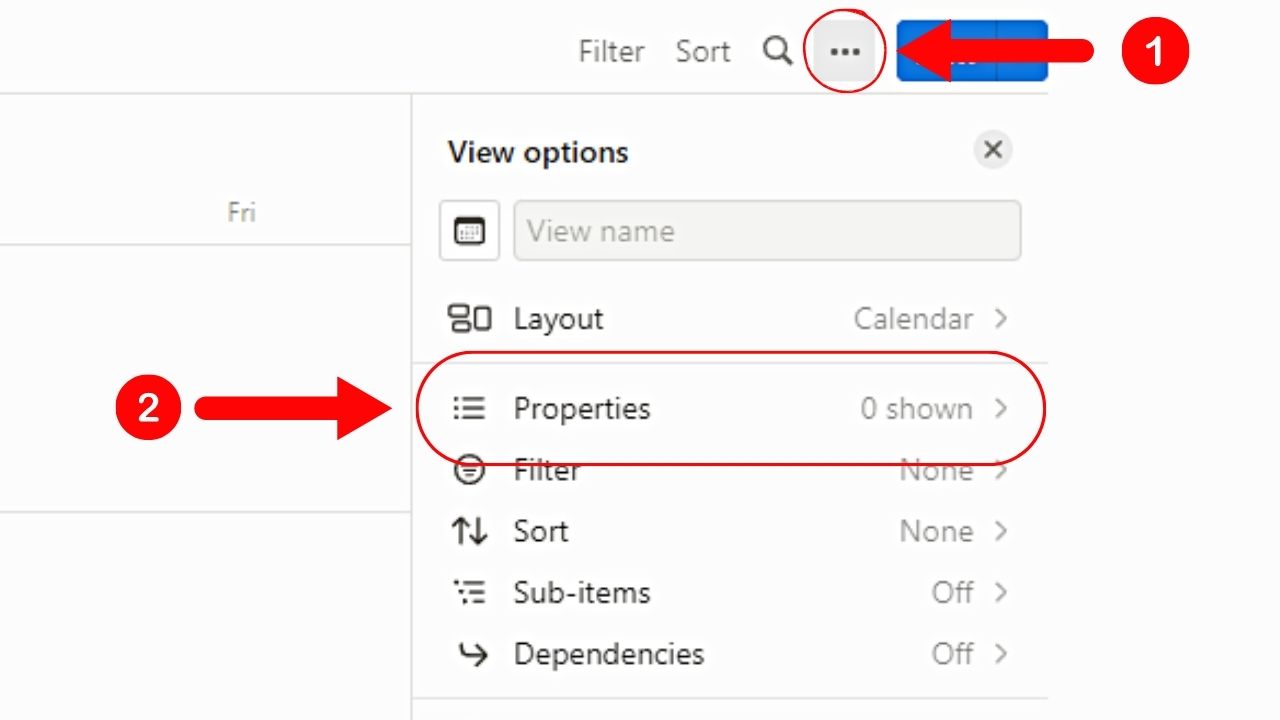
The “View options” panel then appears. Selecting “Properties” allows you to show the columns you want to be shown on the calendar.
The process is similar to making the checkboxes show on a table.
4. Click the eye icon beside the property name.

This allows the checkbox or other property to appear on the reminder card on the calendar.
Once done, select the “Close” button to view the new reminder on the calendar with the checkbox added.
5. Hide the reminder card after clicking the “Done” checkbox.
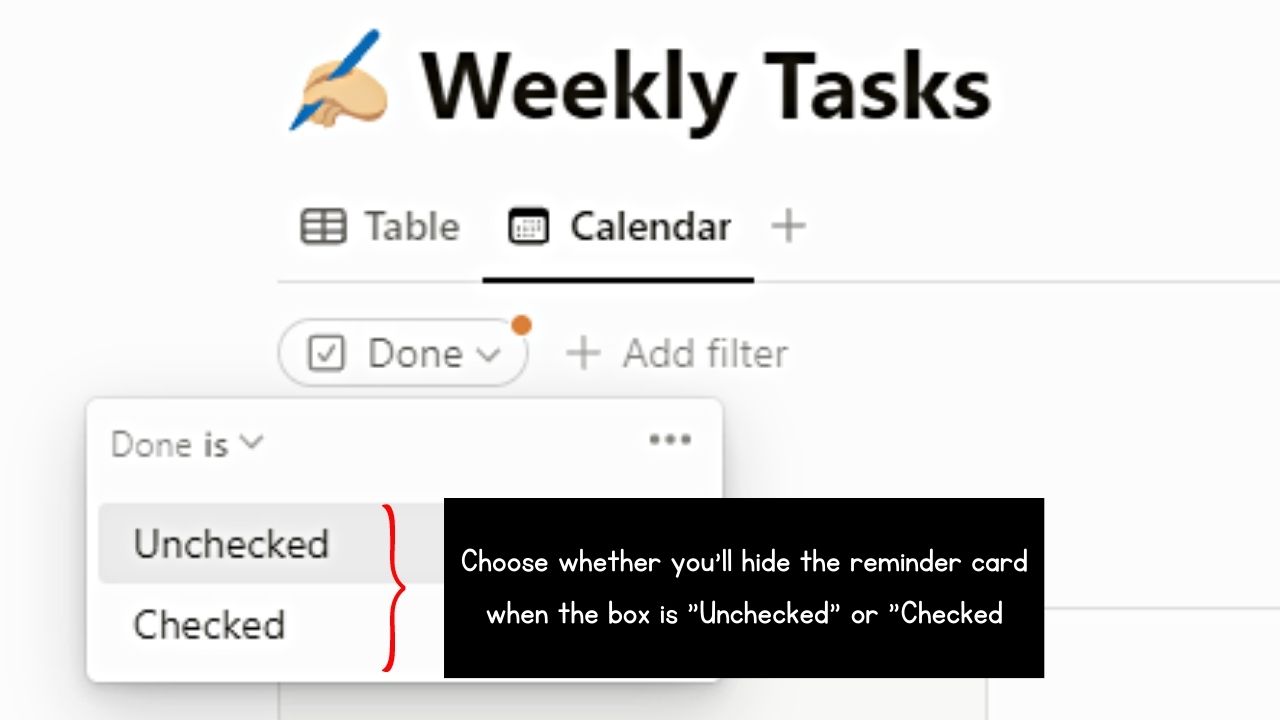
To achieve this, select the “Filter” tab. Then select the checkbox property and choose the condition on the succeeding dropdown menu.
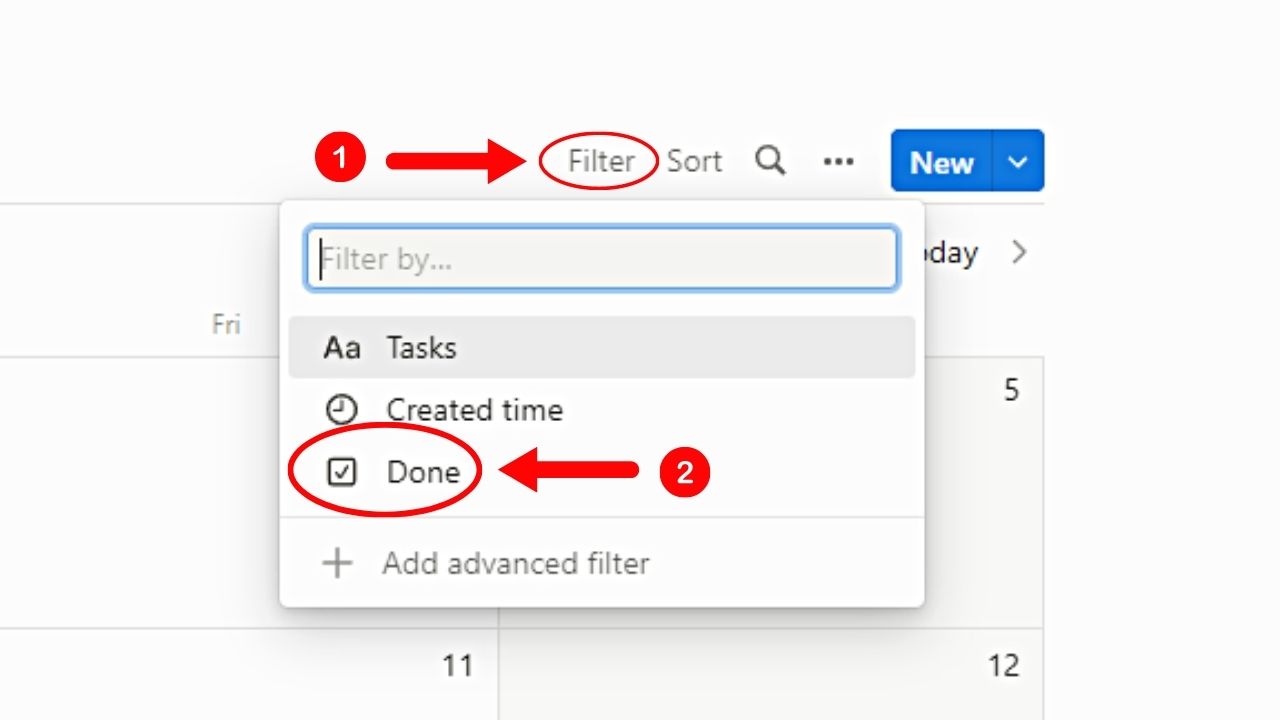
In this way, checking or unchecking the checkbox will make the reminder disappear from the calendar.
How to Set Reminders to Team Members in Notion
If you’re using Notion for work collaborations, you can set a reminder for a particular team member without leaving the tool. The process works similarly to how you add a reminder inline but with a twist.
1. Click anywhere that is blank on the Notion page you opened.
This places the blinking cursor where you want the reminder text to appear.
2. Type “@[name of team member] and “@remind” successively on the same line.
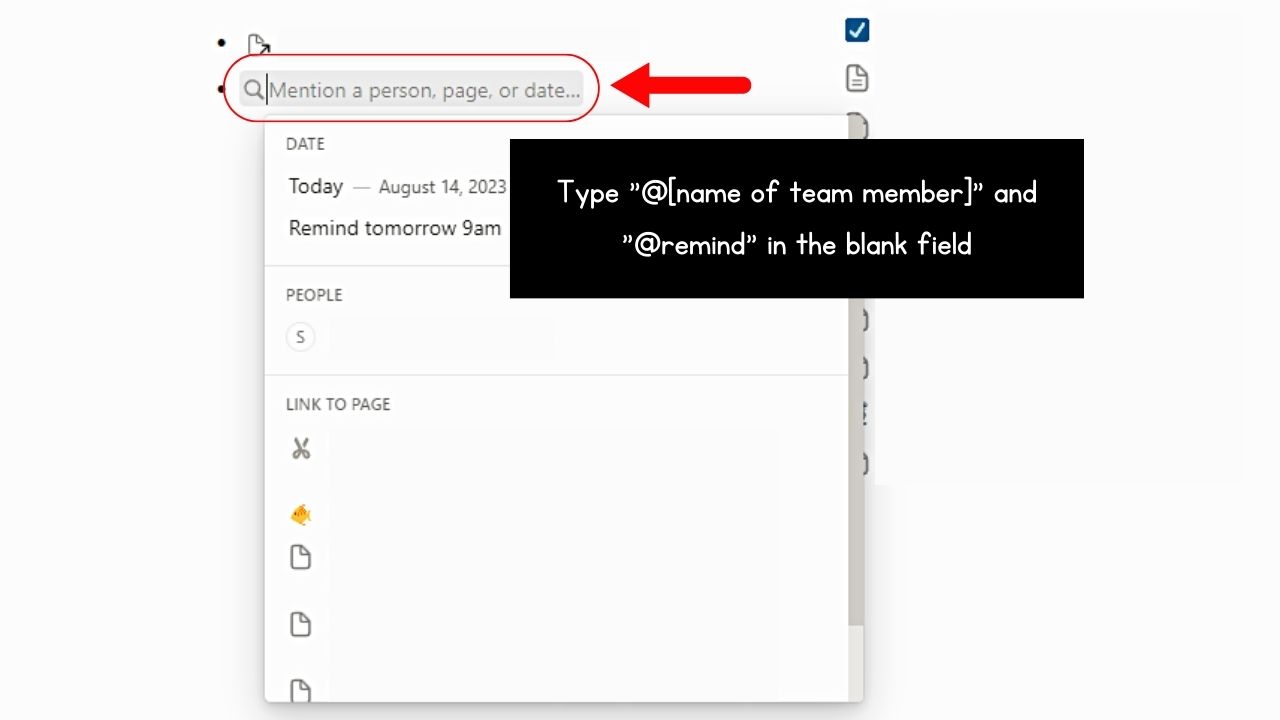
This sets the reminder alert for that person on the date or time specified.
Then that team member will receive a notification about the reminder. He can view that notif in the “Updates” section and even reply to it, too.
How to View Reminders in Notion
Once a reminder is set in Notion, the person who will receive the alert or notification. If you’re not using the tool on a desktop, an alert is also sent to your mobile phone 5 minutes later.
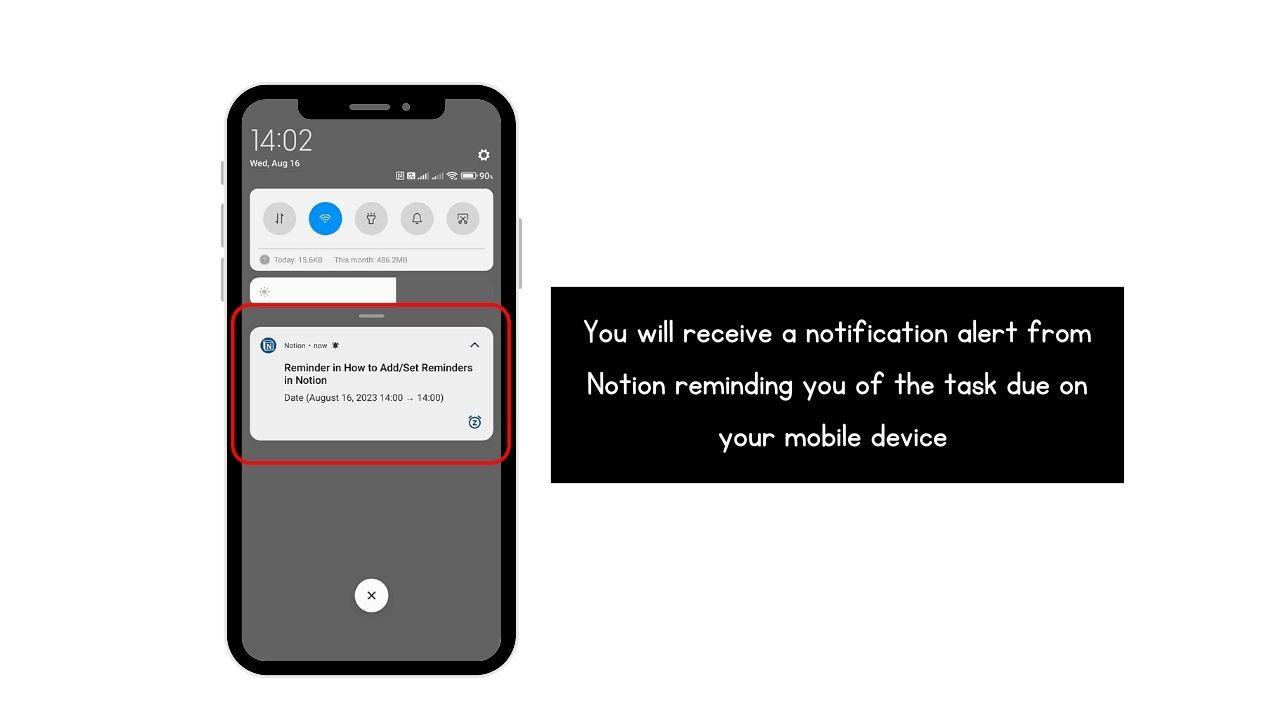
If Notion isn’t open on both desktop and mobile, you’ll also receive an email for that reminder.
Granting that you want to see all the reminders you received, view them with the following steps.
1. Click “Updates.”
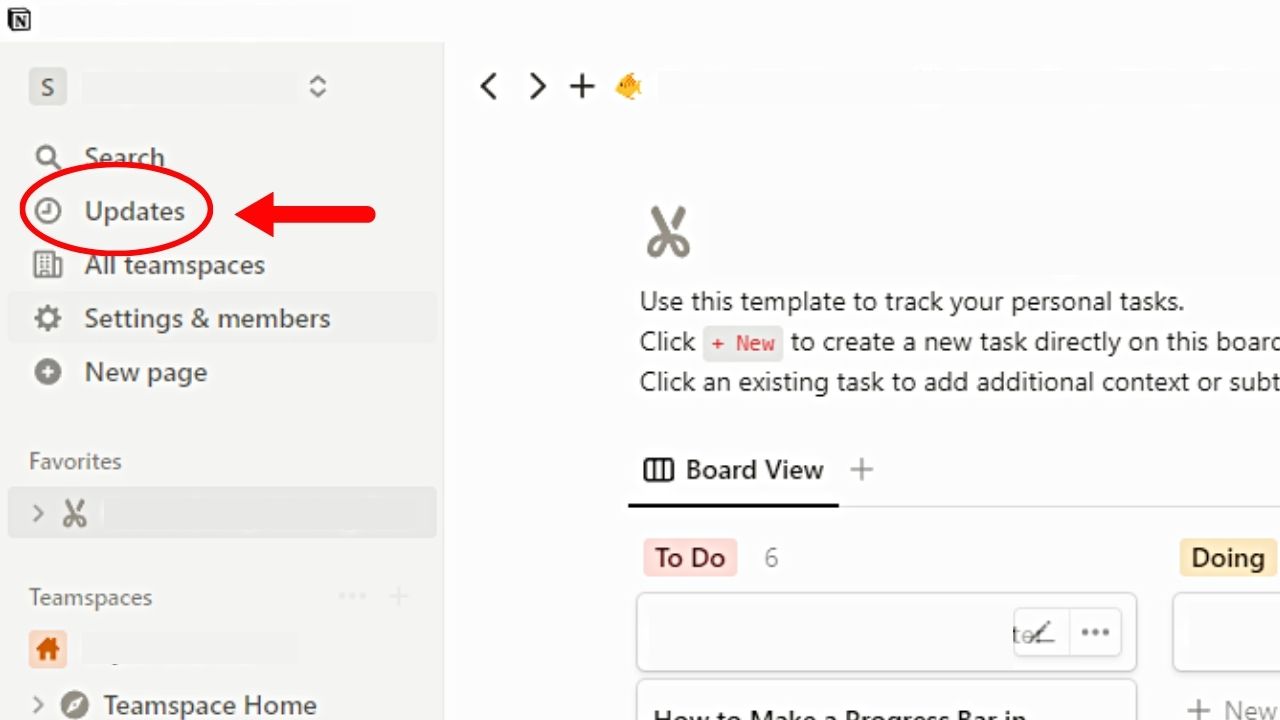
You’ll find this option on the left-side menu of the Notion page, between “Search” and “All teamspaces.”
2. Select the “Inbox” tab.

By default, the “Inbox” tab is the one you’ll see first. All the recent reminder alerts can be seen in this section.
3. Click the “Archived” or “All” tabs.
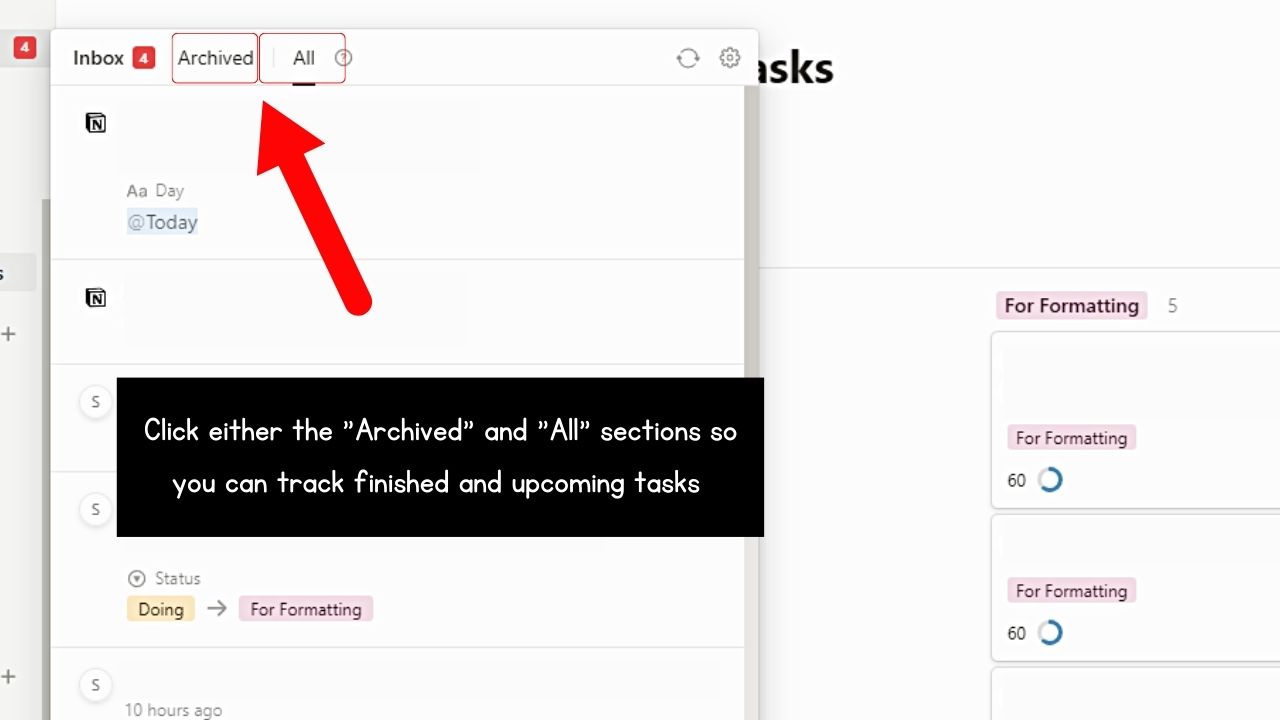
Go to the “Archived” tab to see all the past alerts you have received. Head to the “All” tab for a chronological view of all — past and present — reminders.
Conclusion
Knowing how to add or set reminders in Notion enhances your productivity by providing timely alerts for any task you’ve set. Even if Notion isn’t open on your device, you’ll still receive alerts on your mobile phone.
This way, you can seamlessly blend your workflow with your schedule and never miss a deadline or forget important tasks again.
