Do you want to have a Notion workspace that is both organized and looks pleasing? If you do, then make a gallery view in Notion.
The gallery view in Notion allows for displaying databases like images in a grid layout. And the best part is, you don’t have to leave Notion to display images in gallery view.
Table of Contents
How to Make Gallery View in Notion
From the name itself, the gallery view in Notion is a way to display the page entries or a database in a grid layout. It’s like an album that shows those entries as pictures.
Depending on your purpose, you can make a gallery in Notion in various ways.
How to Make a Full-Page Gallery in Notion
A full-page gallery shows all the entries of that page in gallery cards. You can then click on the individual cards to show more information about the image shown.
To make a full-page gallery in Notion, follow these steps:
1. Open a new page in your Notion account.
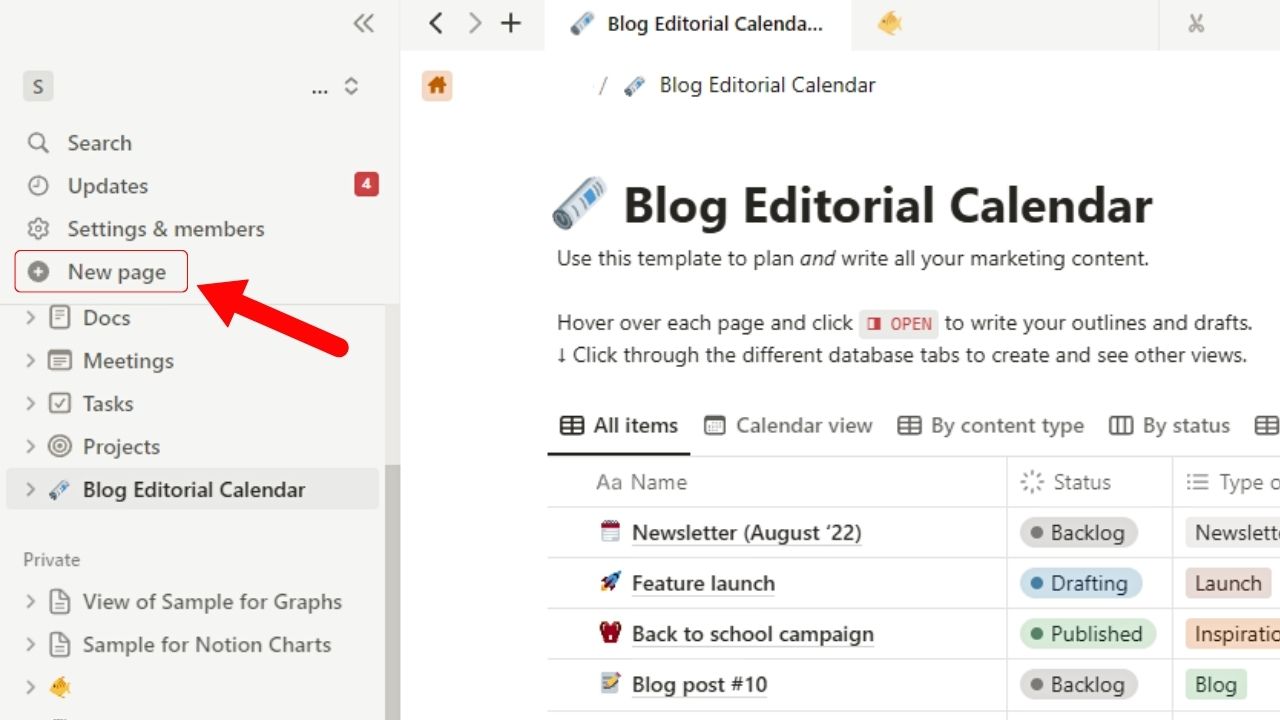
You’ll find this option after the “Settings & Members” option on the left-side panel.
2. Select the “Gallery” option.
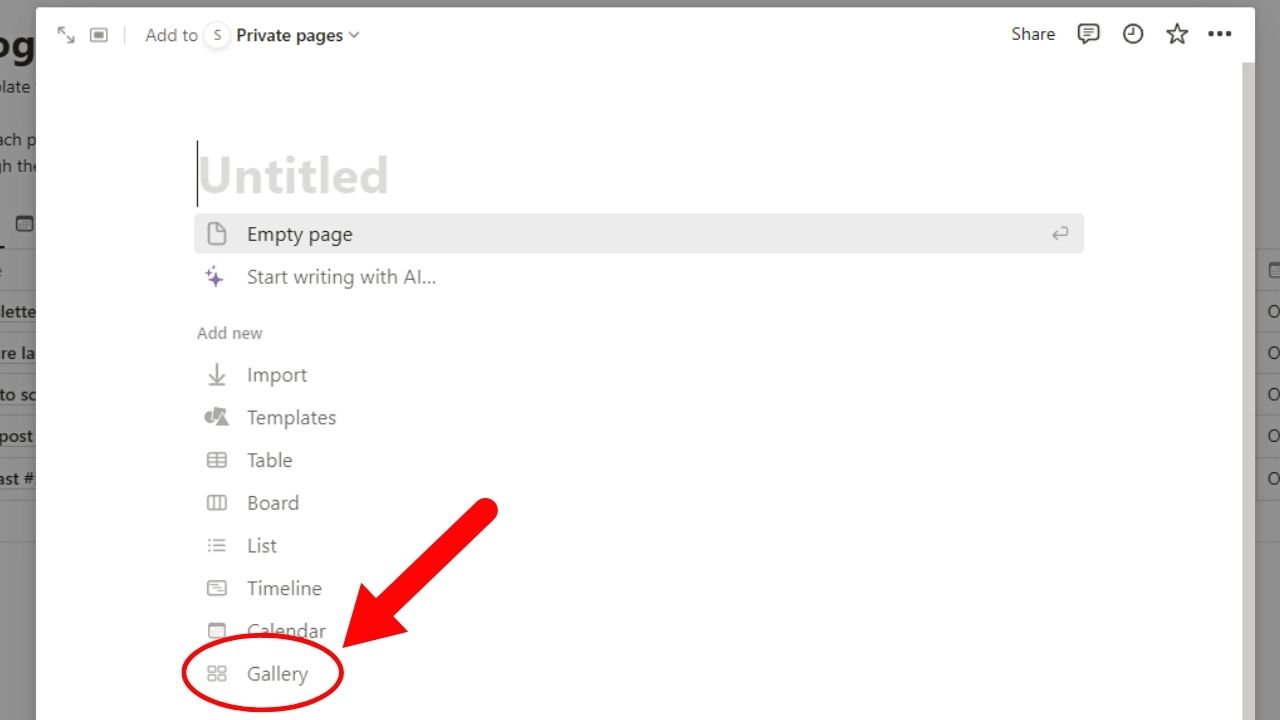
This is the last option on the menu after “Calendar.” Since the gallery is one of the six views available for databases, you’ll be asked where the data will be sourced from.
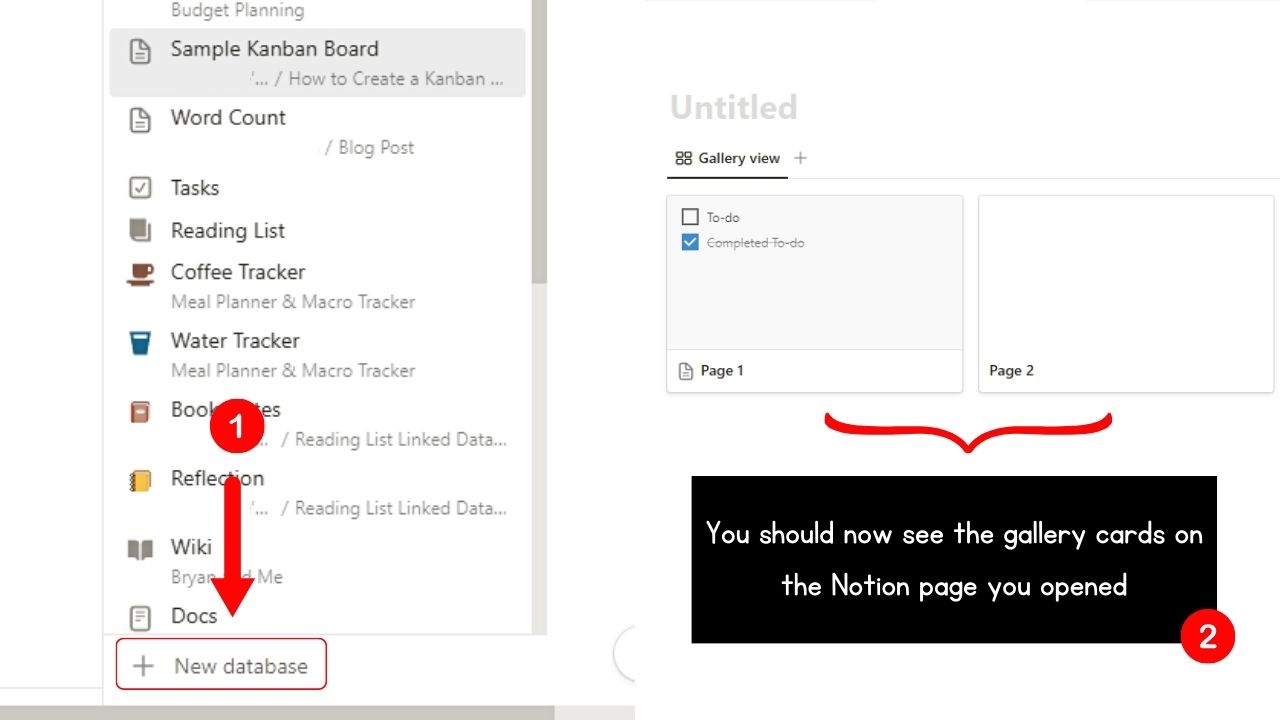
Since we’re starting from scratch, click “New database.” By now you should see the gallery cards lined up on the page.
3. Click the 3-dot icon on the gallery’s upper right corner.
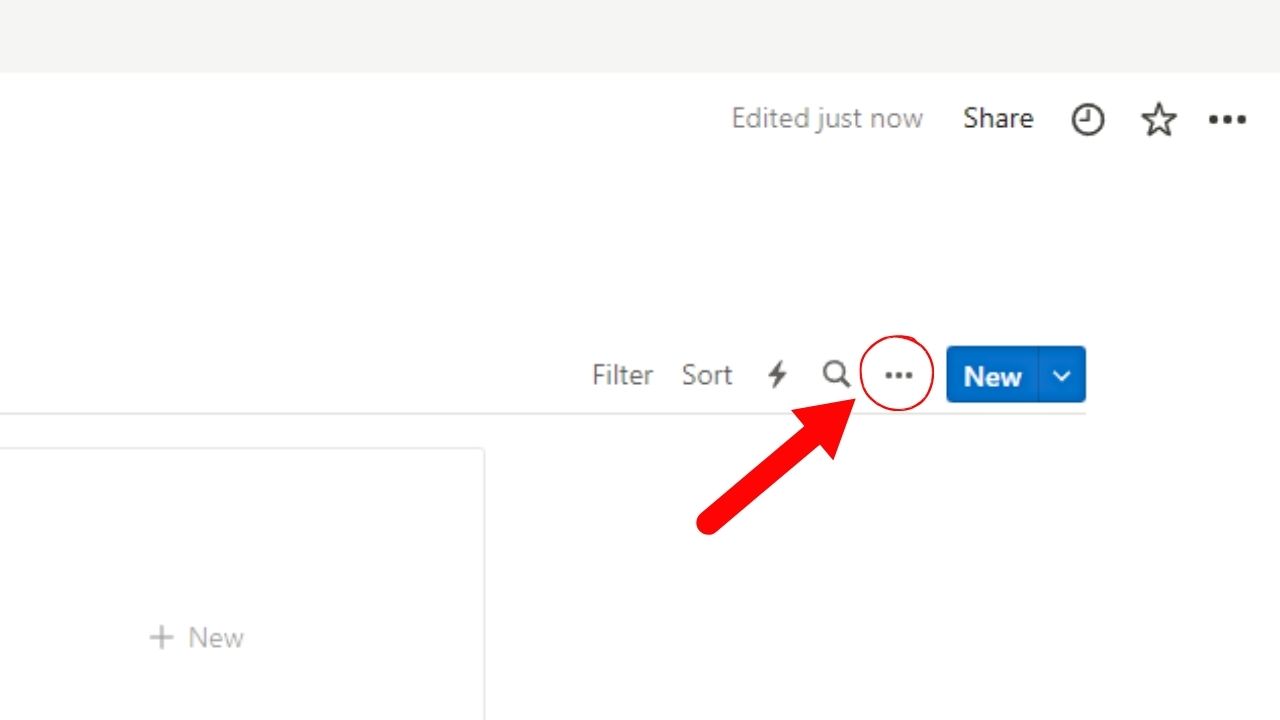
Do this step to ensure the gallery cards show images or pictures instead of just the page’s content.
The “View Options” pane then opens.
4. Select “Layout.”
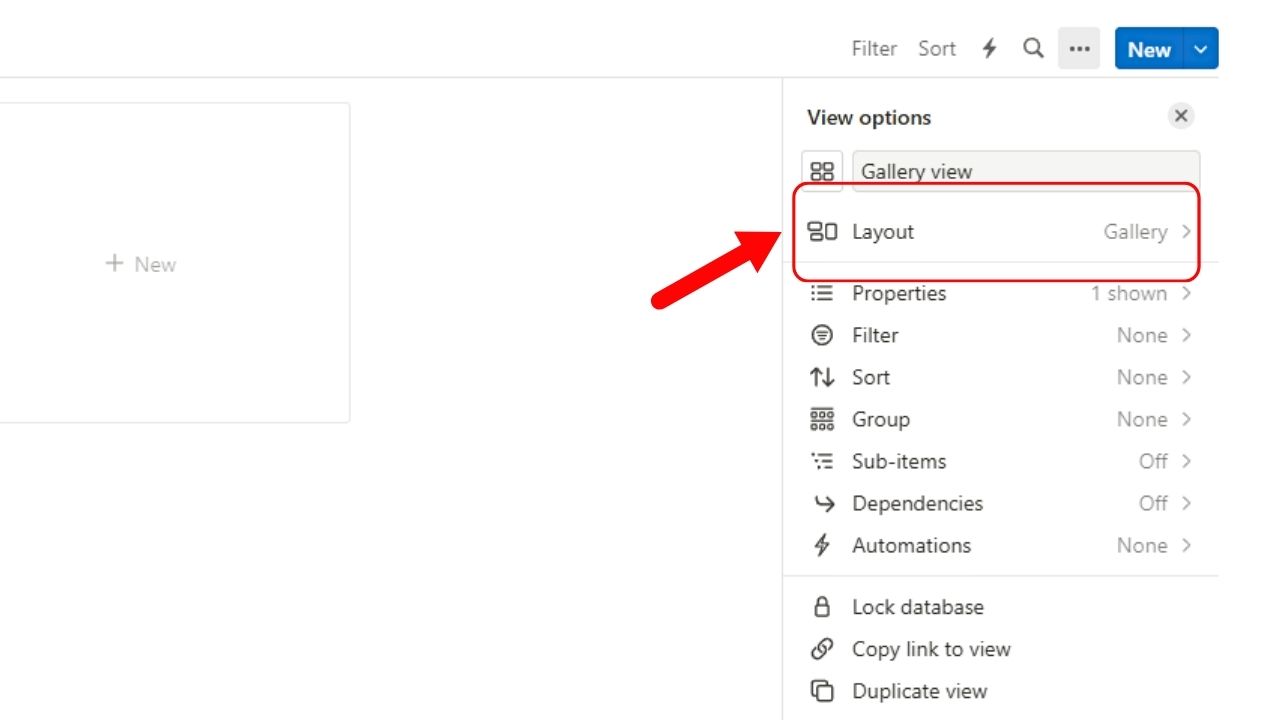
The “Layout” pane then opens. Since you selected “Gallery” earlier, you’ll see “Gallery” as the layout type selected.
5. Click “Card Preview” and select “Page Cover.”
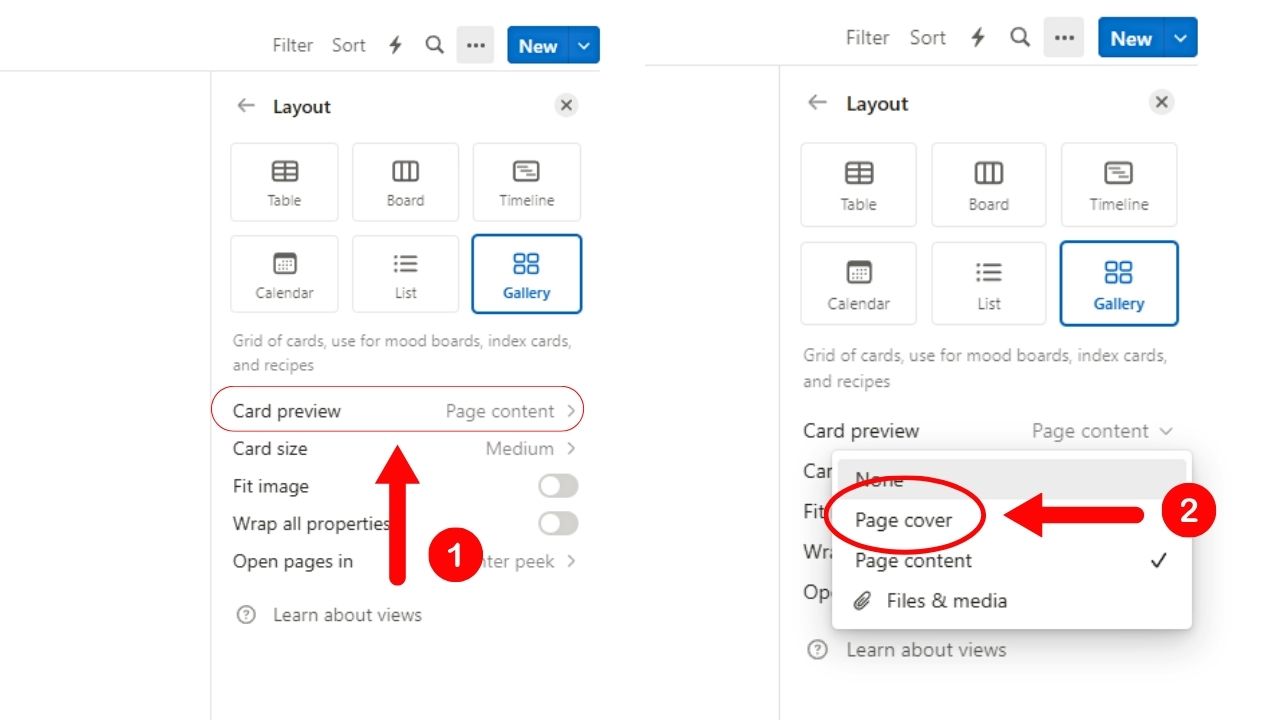
This is the first option under the “Layout” options menu. This then opens a dropdown menu showing the available card preview options.
- None – Images or content are not shown on the gallery card
- Page cover – The image set as the cover image will be featured as the gallery card’s cover
- Page Content – Content added to the gallery card will be featured
- Files & Media – Links, videos, or images added are shown as the gallery card’s cover
Since we want an image to become the gallery card’s cover, click the “Page cover” option.
If you have already added a cover image to the gallery card, the picture should now be featured as that card’s cover.
6. Edit how the gallery cards look.
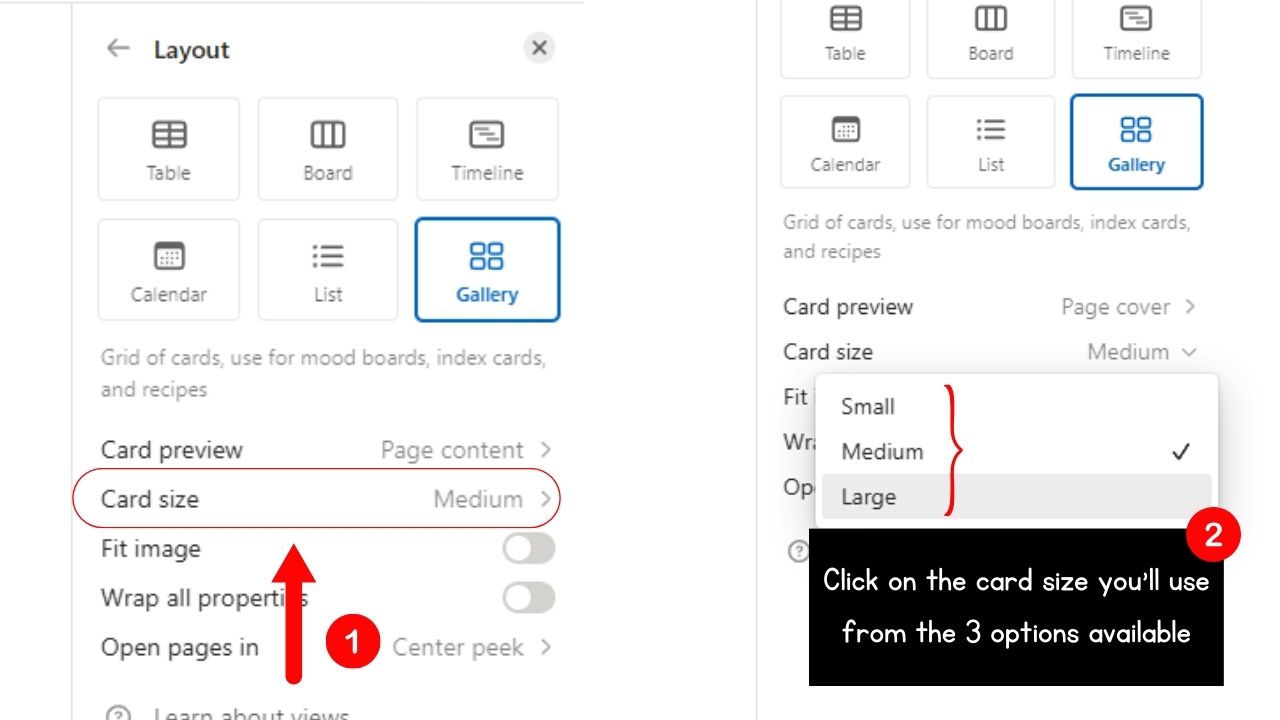
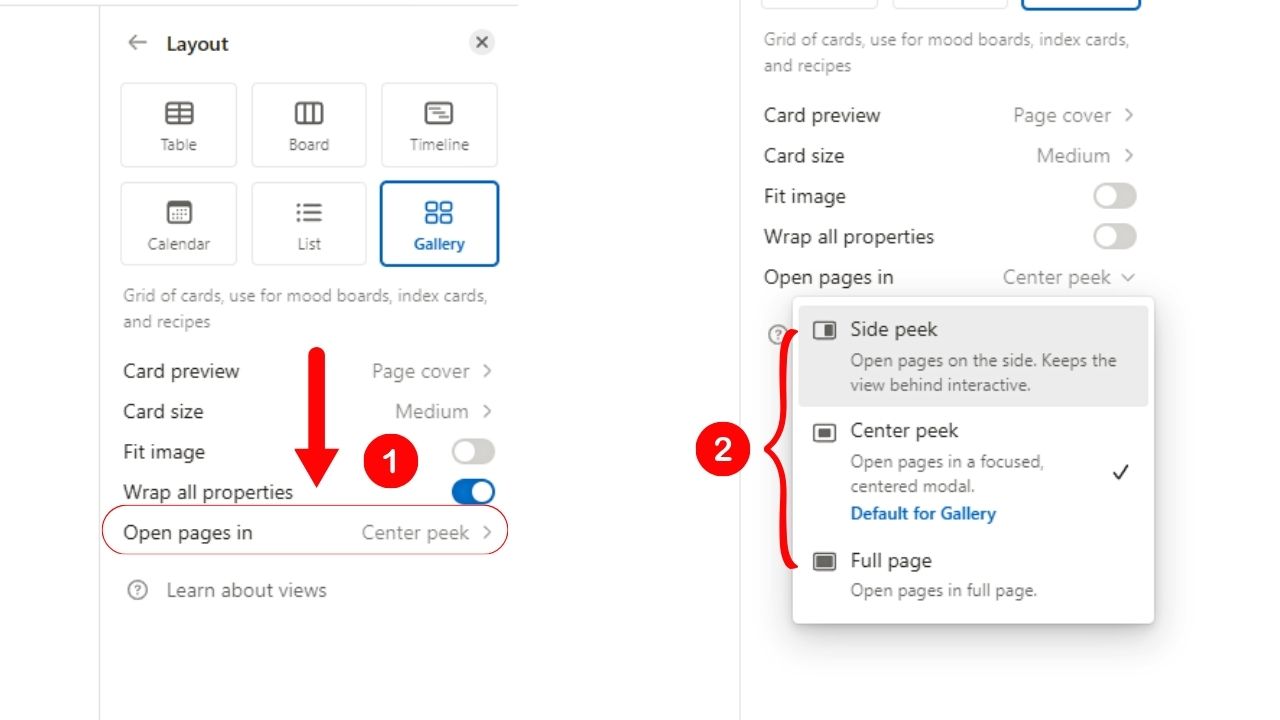
While you’re in the “Layout” pane, you can click on “Card Preview” to tweak the size of the gallery cards.
You can even wrap the text in the gallery card’s properties by clicking the toggle for “Wrap all properties.”
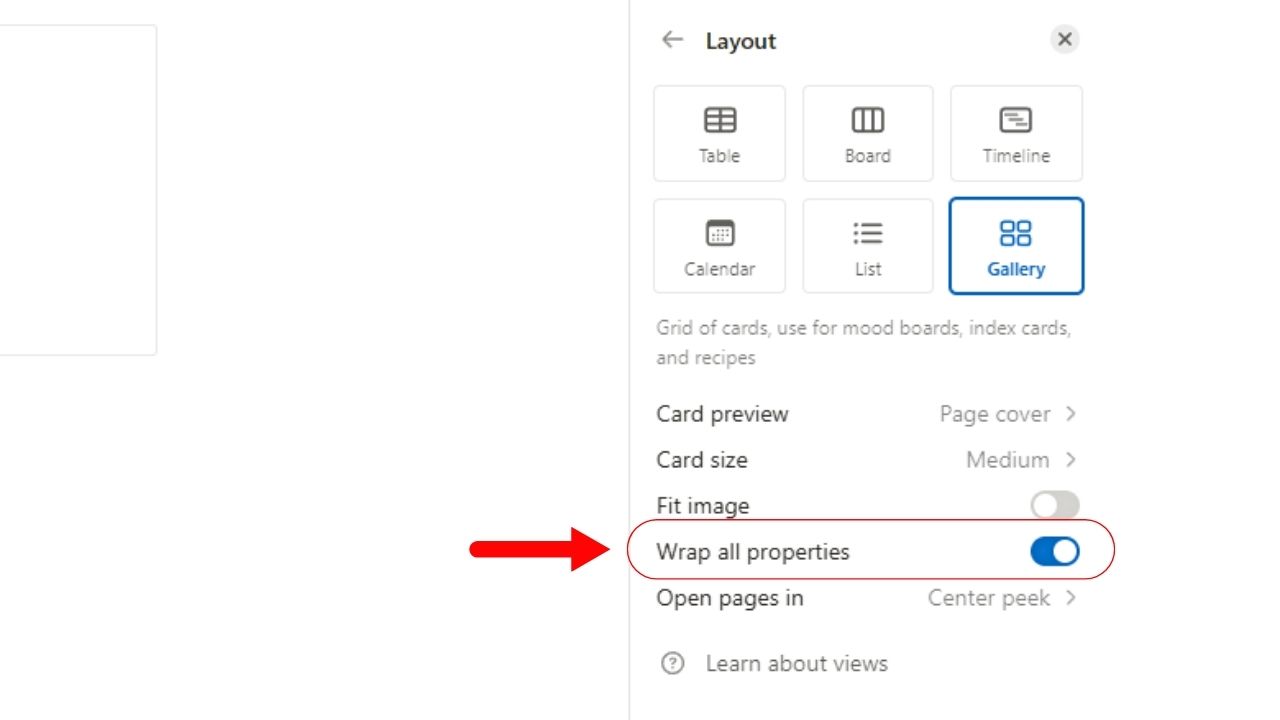
And, if you want to change how the gallery card opens, select “Open Pages in” and click on a new view.
7. Click the “Close” button.
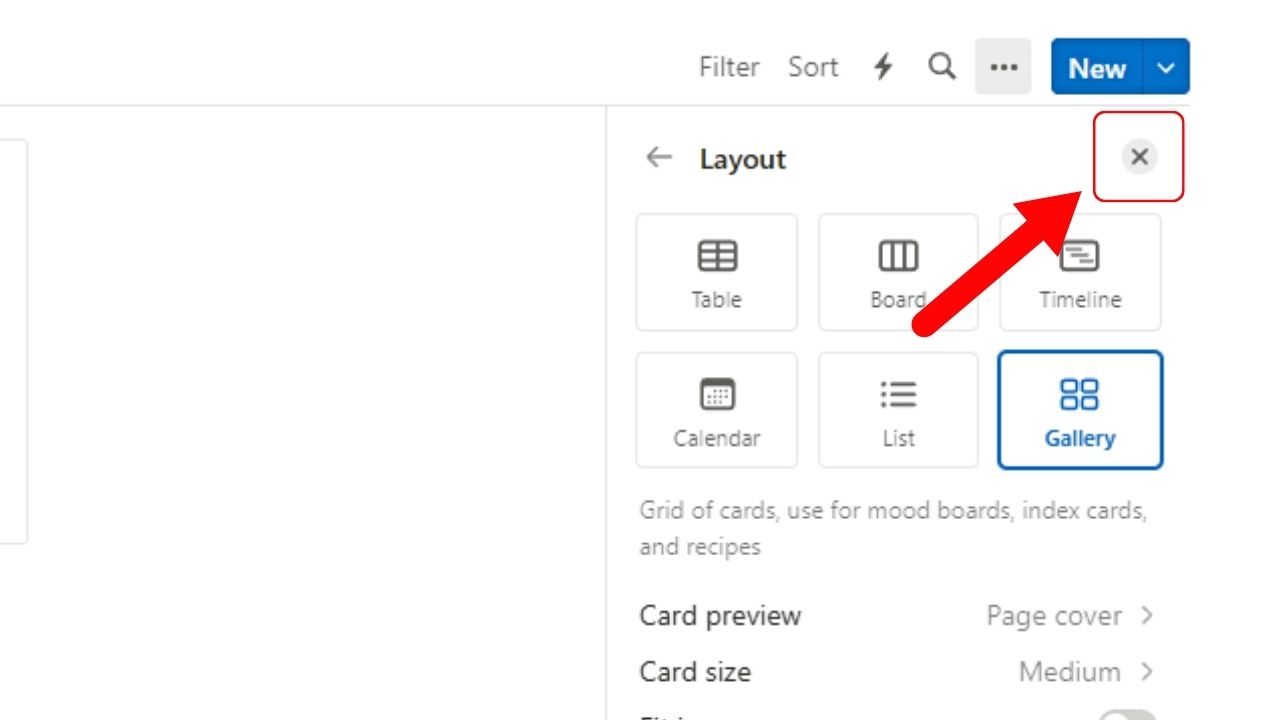
This closes the “Layout” pane for you to edit the gallery cards.
8. Select a cover image for the gallery card.
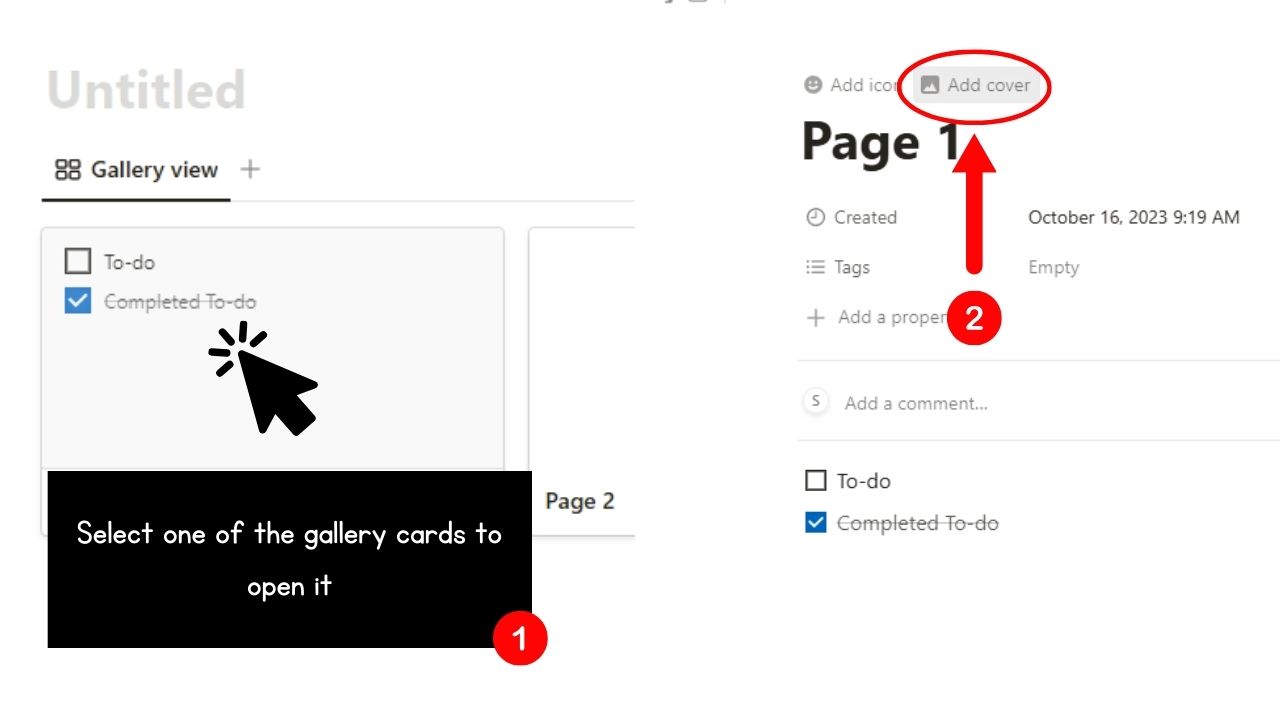
Proceed with this step if you haven’t added a cover image to the gallery card. Start by clicking on that card.
Then select the “Add cover” button.
If you don’t like the image featured, click “Change cover.”
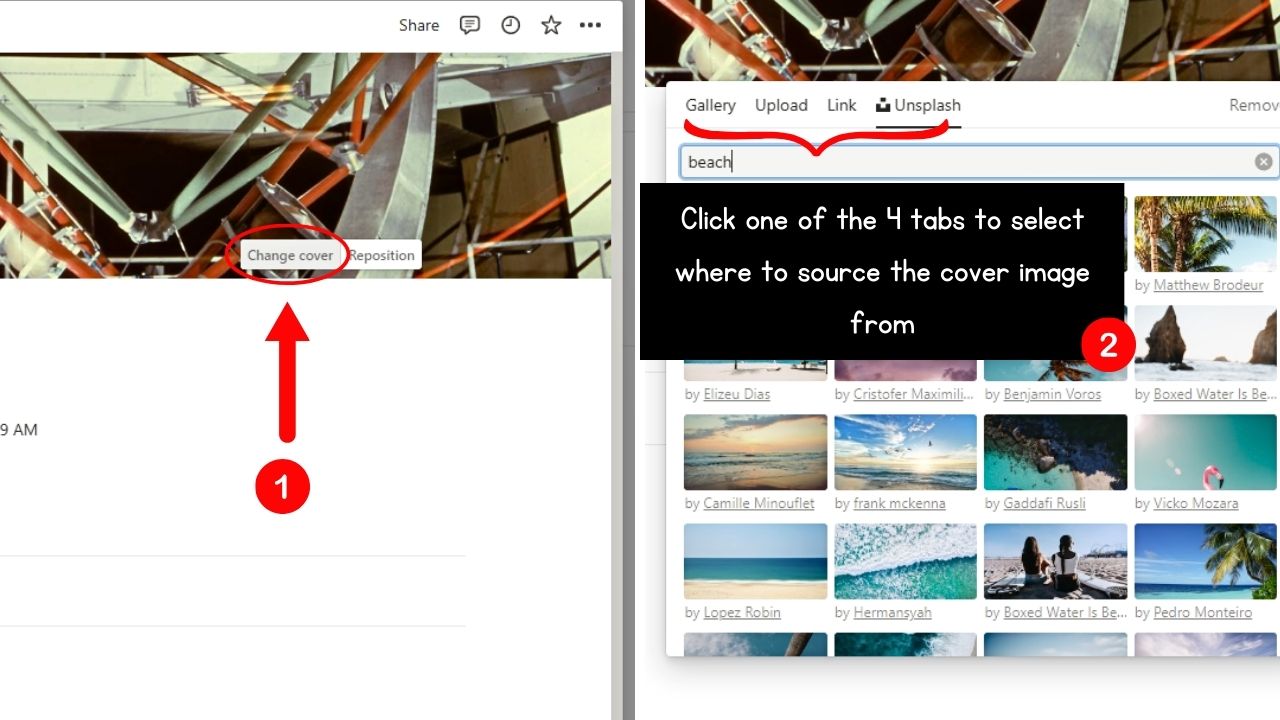
Then select whether you’ll source the picture from the “Gallery,” “Upload,” “Link,” or from “Unsplash.”
Whichever you select, reposition the image in the cover area before clicking “Save position.”

Once done, add new details to the card, including adding new properties, before you click anywhere outside the gallery card to exit it.
How to Make an In-line Gallery in Notion
Now if you want to insert a gallery view to a template or workspace in Notion, an in-line gallery would suffice.
In-line galleries work the same way as full-page galleries. It’s just that you’re adding a gallery inside another page and not as a standalone.
For sample purposes, I’ll use one of the free Notion mood tracker templates I added to my workspace.
To make an in-line gallery in Notion, do the following after opening the Notion page:
1. Type the “gallery view” slash command in a blank space.
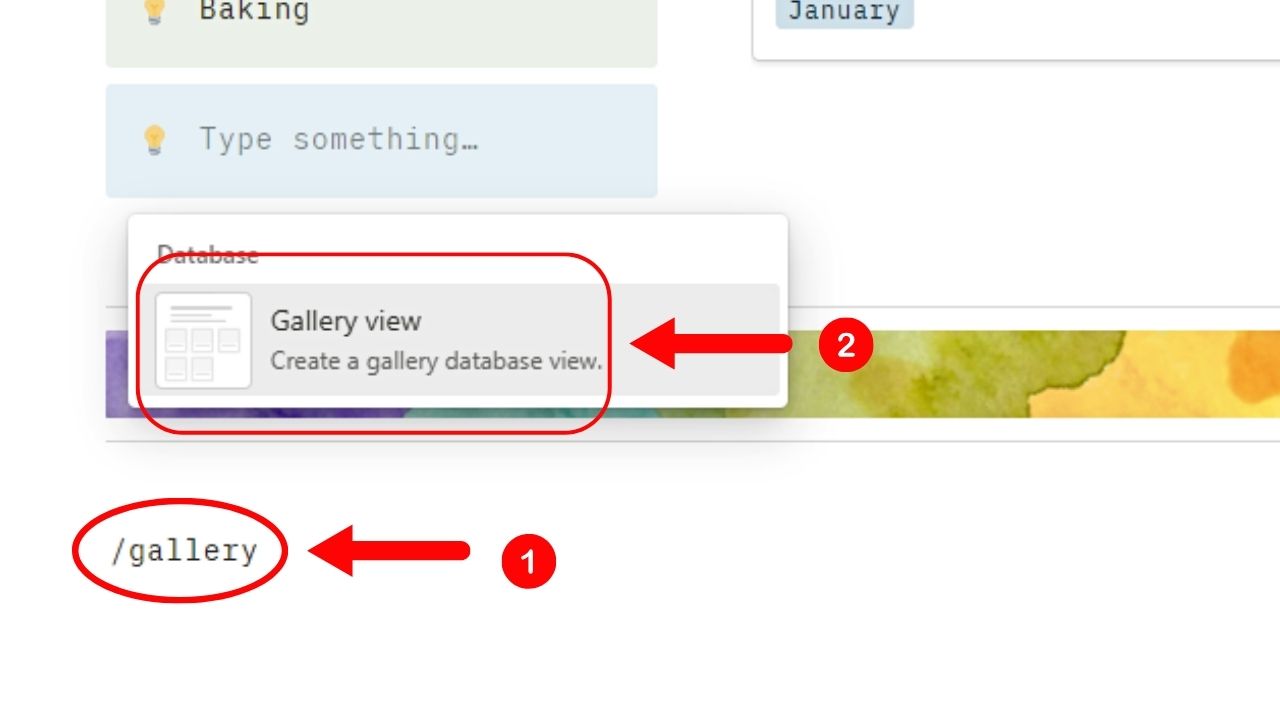
Then select “Gallery view” in the dropdown menu.
2. Select the source database.
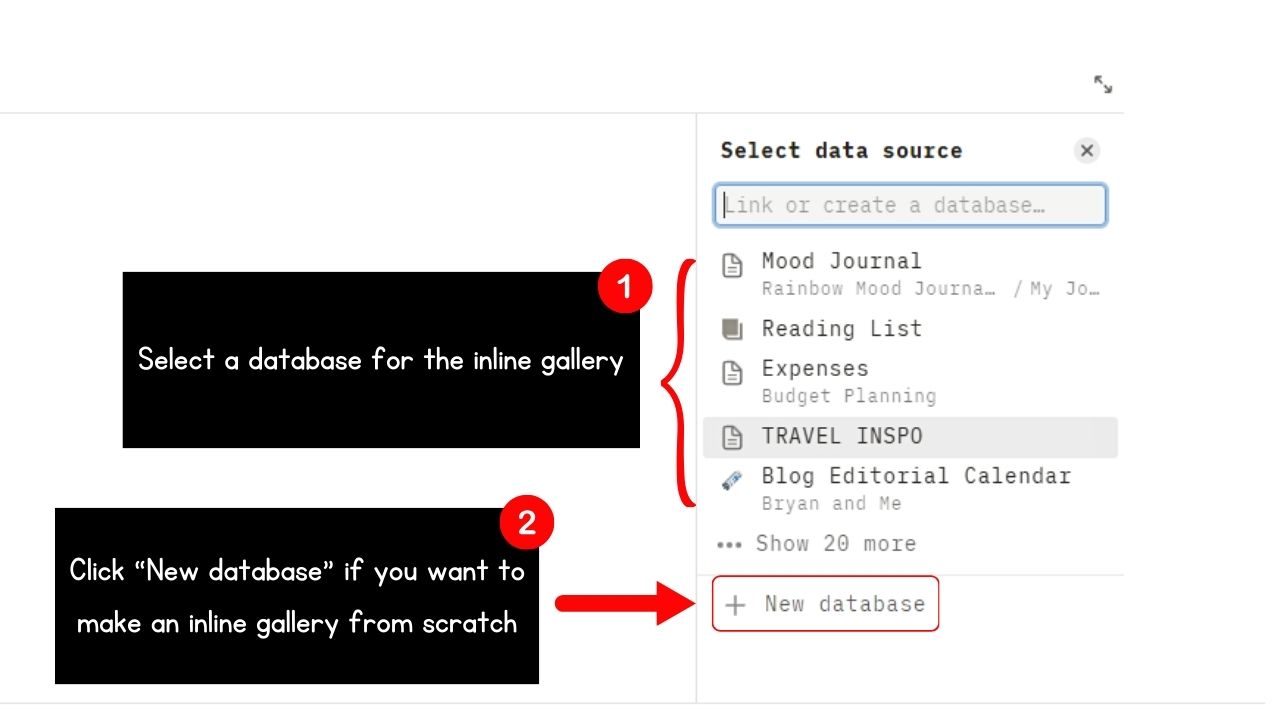
If you want to start creating the gallery from scratch, select “New Database.” But if you want to link a database to it instead, then select one of the databases shown in the “Select data source” pane.
You should now see the sourced database in the gallery view on the page where it was inserted. Then click “Close” to exit the “Copy an existing view” pane.
3. Click the 3-dot icon on the top-right of the database.
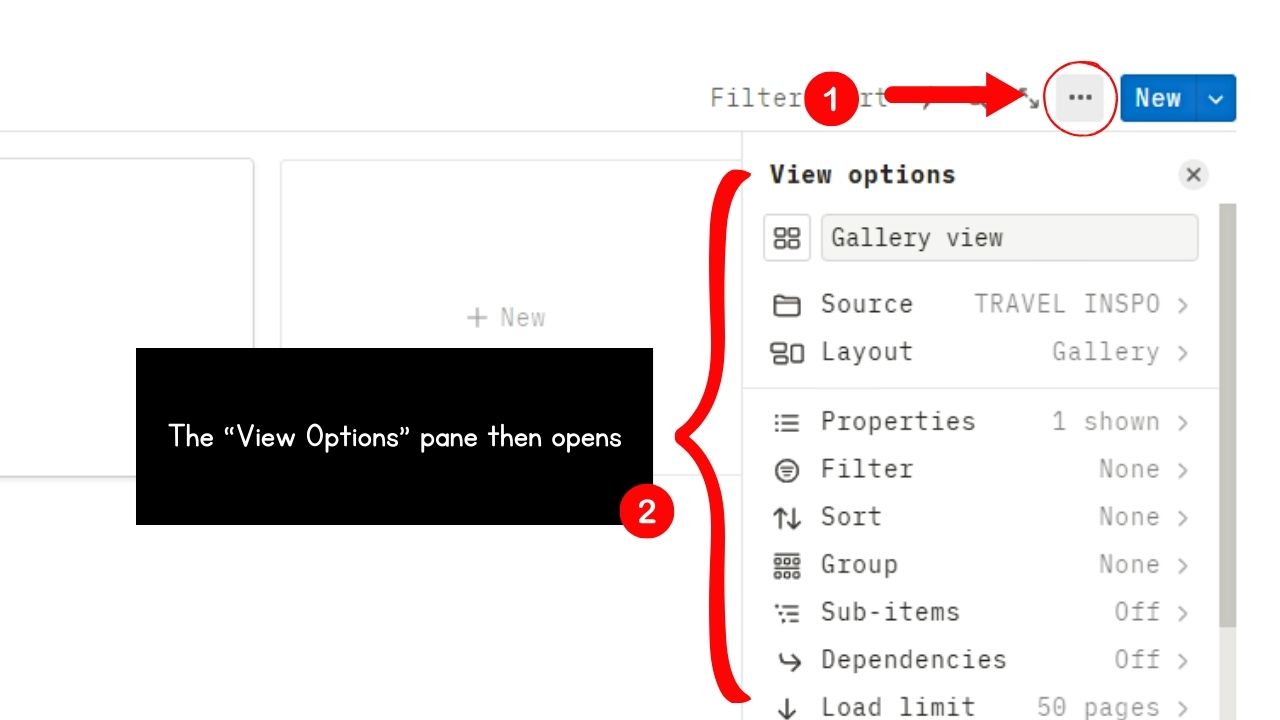
This then opens the “View options” pane.
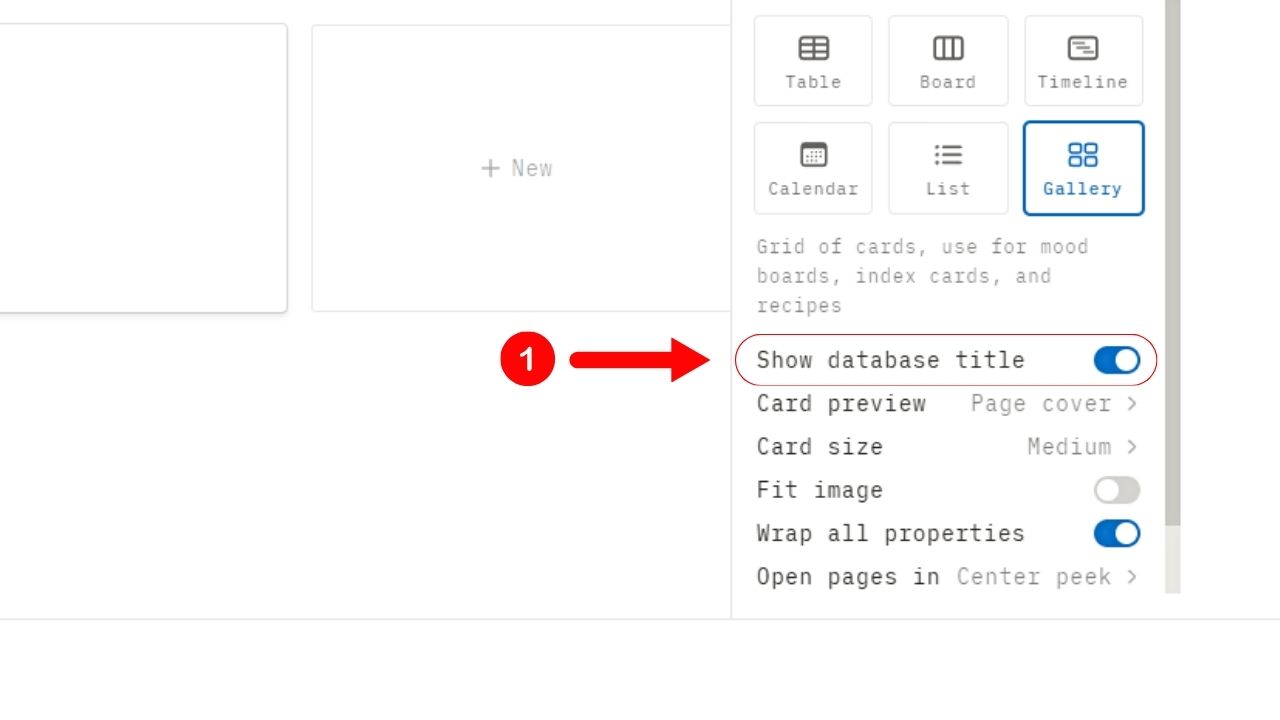
4. Select “Layout” and “Card Preview” to make the images show on the gallery cards.
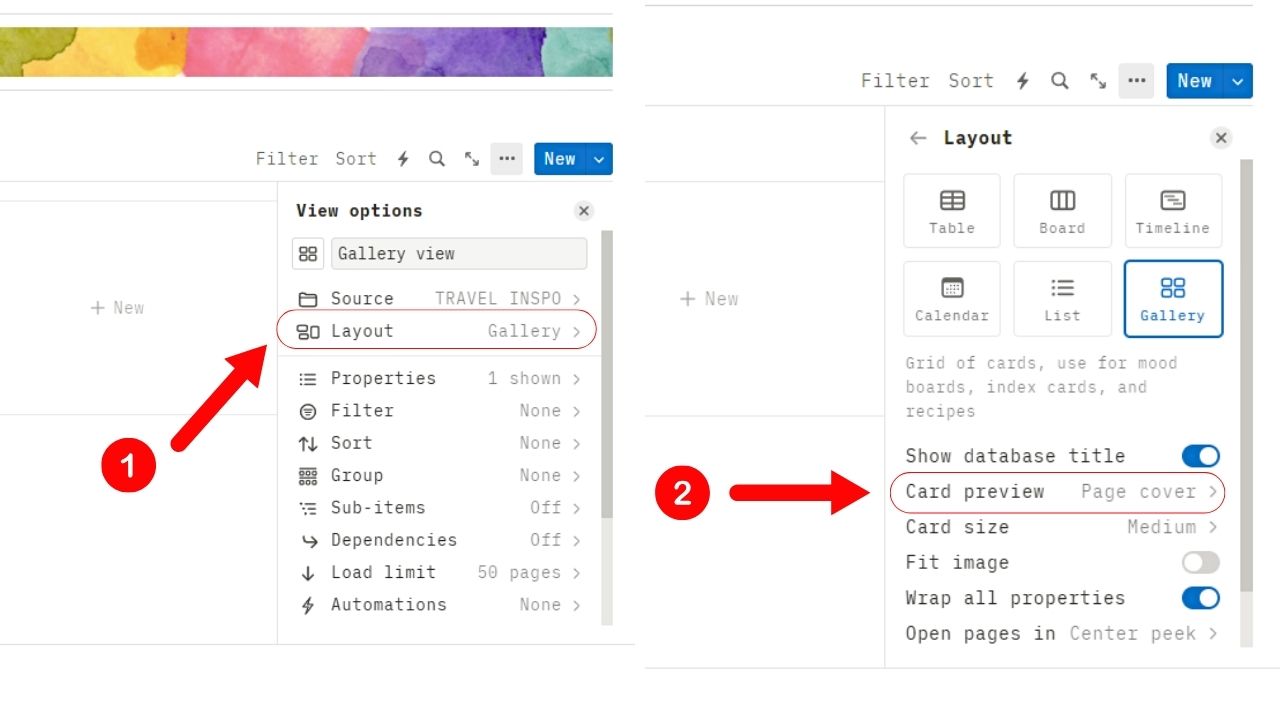
By default, “None” is the option selected in the “Card Preview” section.
Clicking on this option allows you to change the setting to “Page Cover” so that the image on the gallery card can be previewed.
You should now see gallery cards display the images as their covers.
You can also click the “Show database title” toggle if you want to show the title of the source database. Turn it off if you don’t like the title to be shown.
5. Select a cover image for the gallery card.
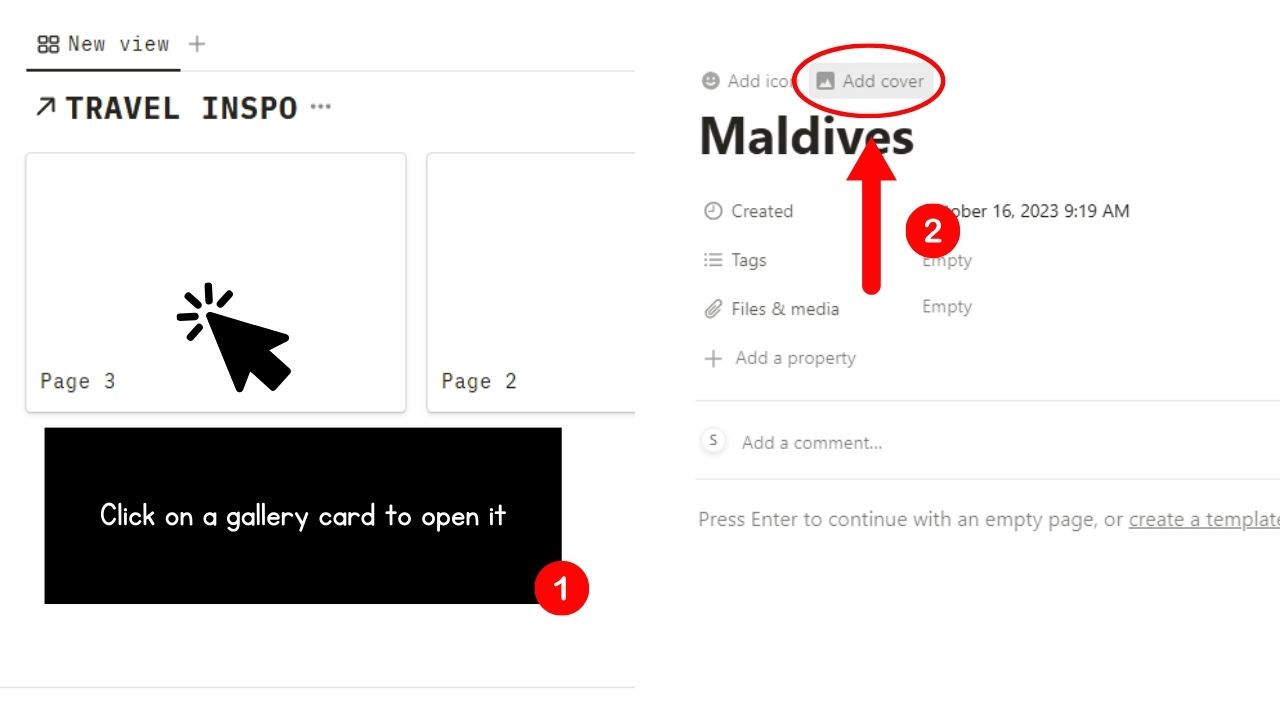
Do this step only if you haven’t added a cover image for your gallery cards.
Simply select a gallery card, click the “Add cover” button, and select where the image will be sourced from.
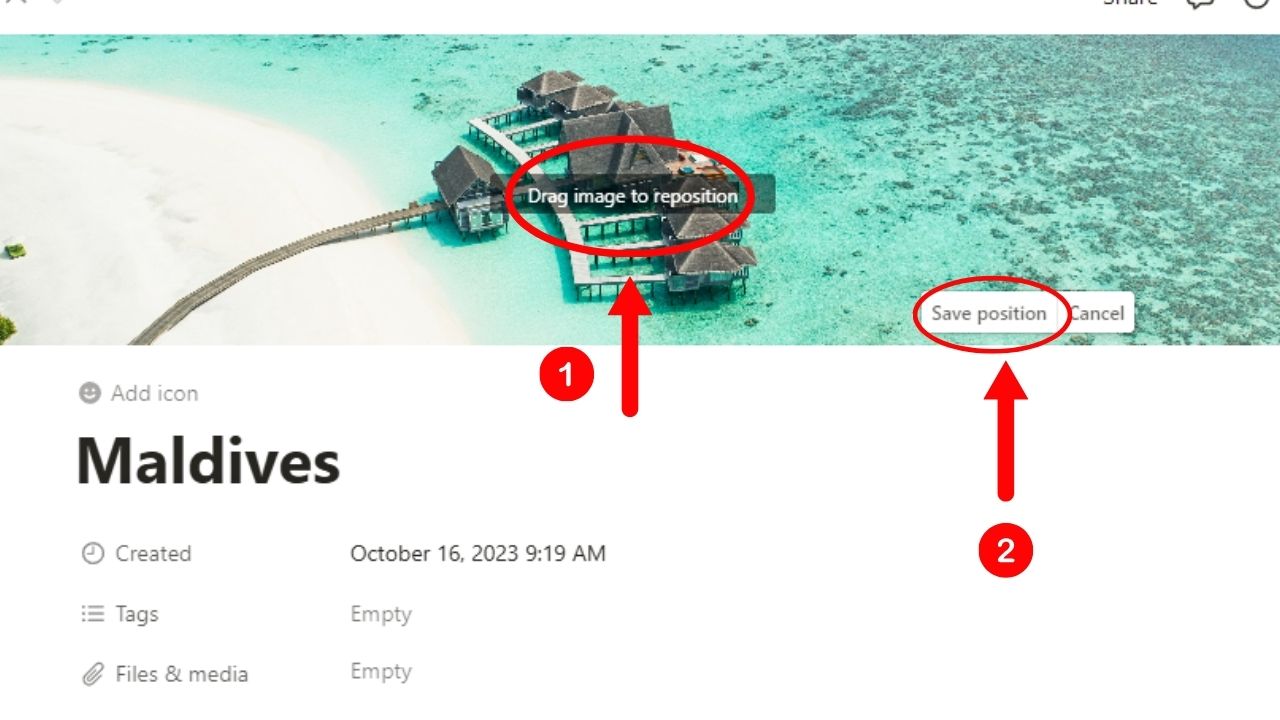
Then select “Reposition” to adjust the positioning of the picture in the cover area. Click “Save Position” before editing the gallery card further or exiting.
How to Add Gallery View to a Database in Notion
If you don’t want to create a gallery from scratch or insert one into another Notion page, add a gallery view to an existing database.
The process is like how you create a Kanban board. For this purpose, I’ll use the “Blog Editorial Calendar” as a sample.
1. Click the “+” button.
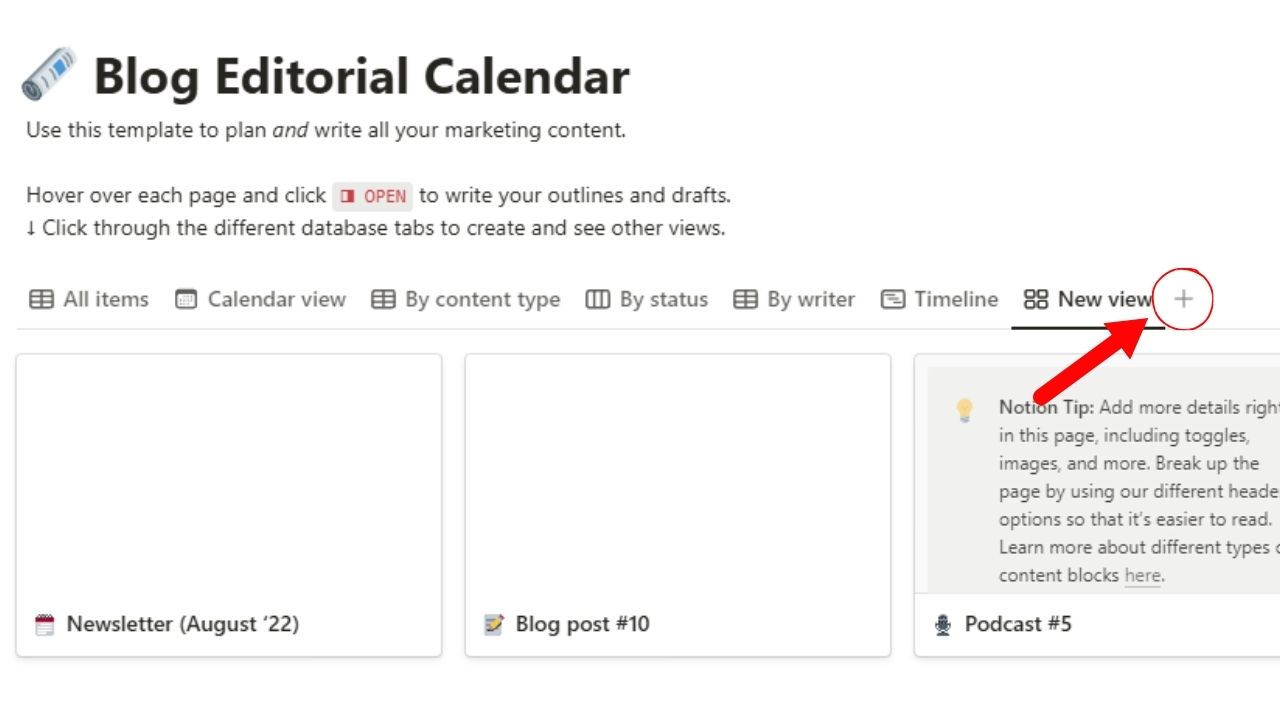
You’ll see this button after the last view tab of the database. The “New view” pane then opens.
2. Select “Gallery.”
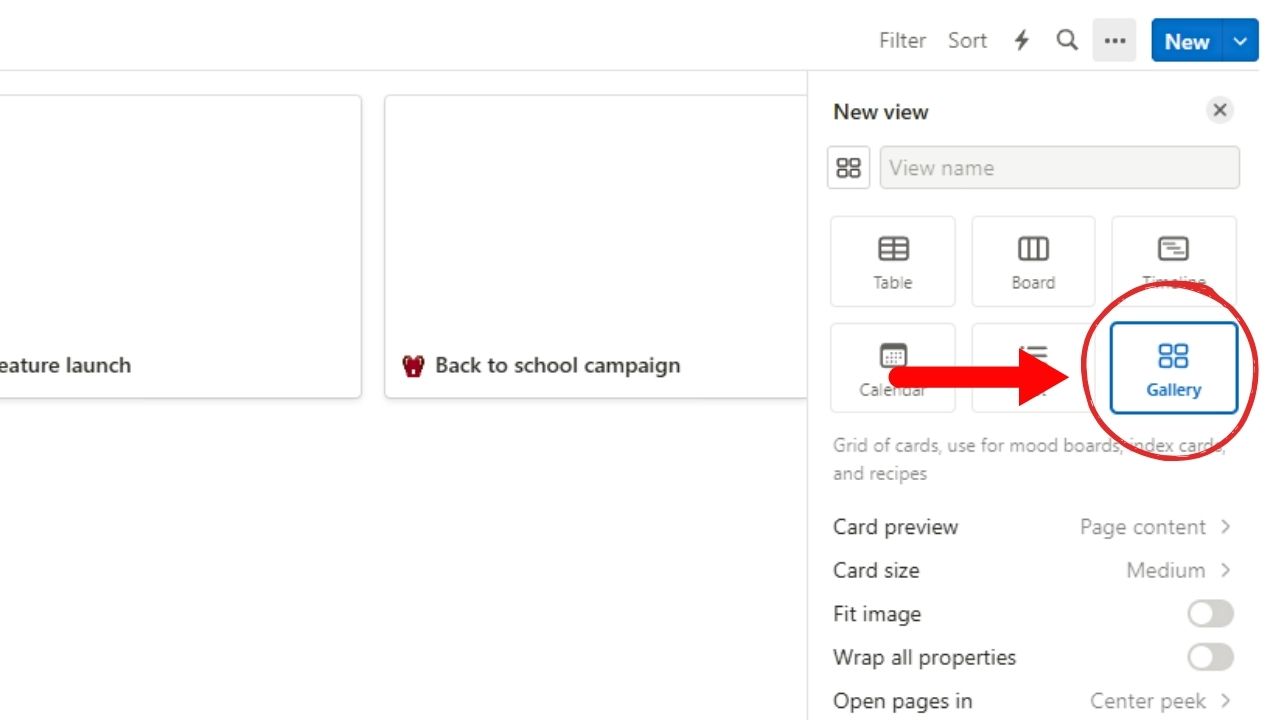
This is the 6th view option available. You will then see the editing options available for the gallery view under it.
3. Edit the display options of the “Gallery” view.
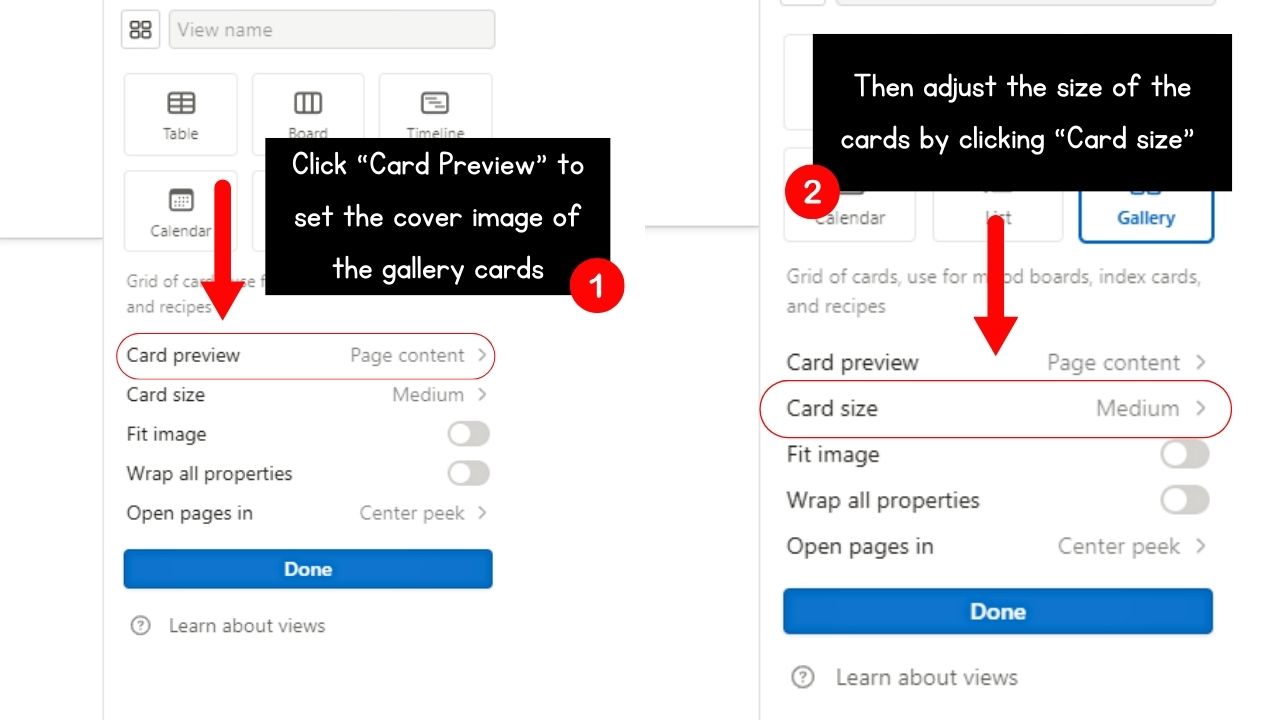
Click the “Card Preview” section if you want to set the “Page cover” or the “Page content” as the cover image of the gallery cards.
You can also change the size of the gallery cards to “Small,” “Medium,” or “Large” in the “Card size” section.
You can also click the toggles for “Fit image” and “Wrap all properties.” These make the cover image fit the size of the gallery card and have a polished look of the text in the properties.
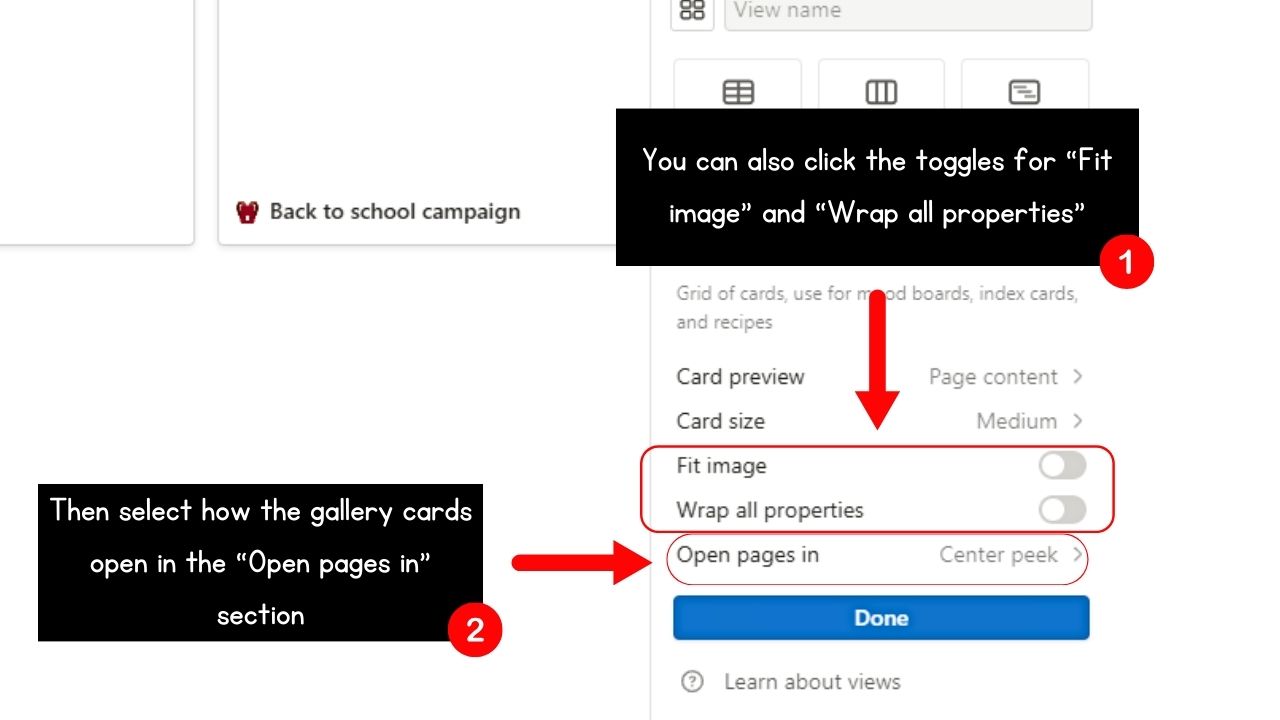
You can also change how the gallery card will open in the “Open pages in” section.
4. Add the title of the gallery view you added.
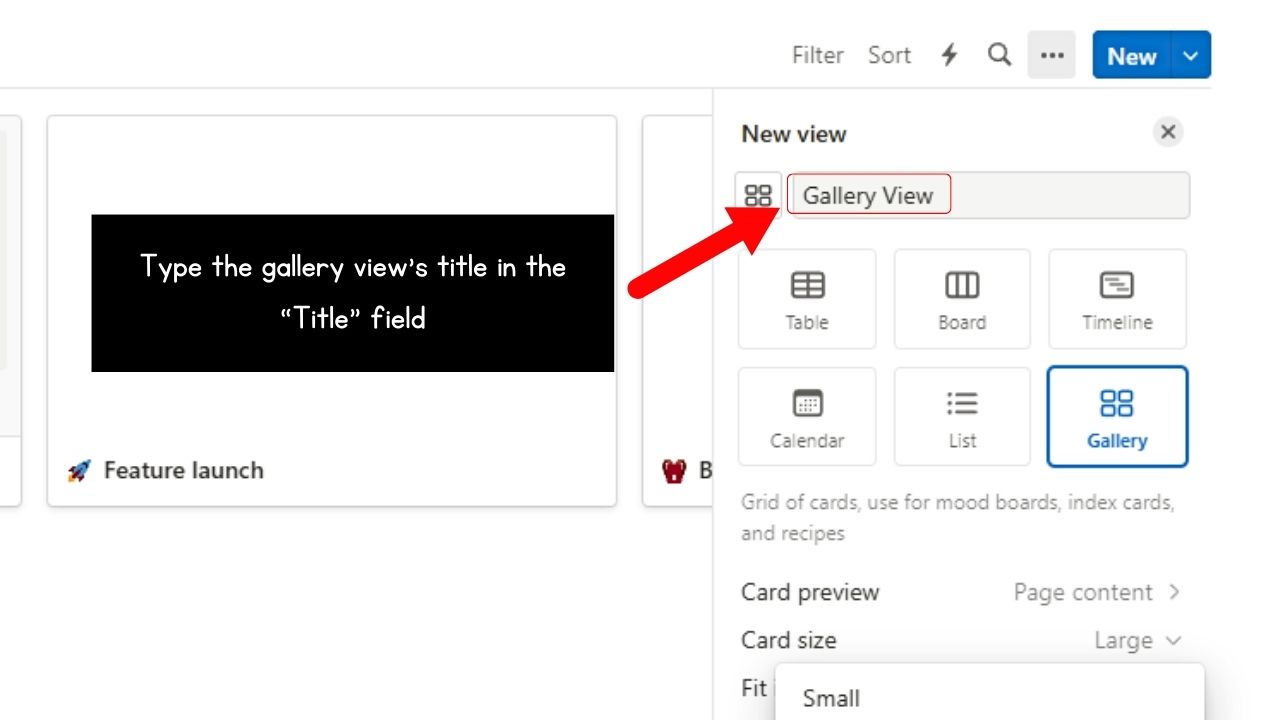
Simply type in the title field of the “New View” pane.
5. Select the “Done” button.
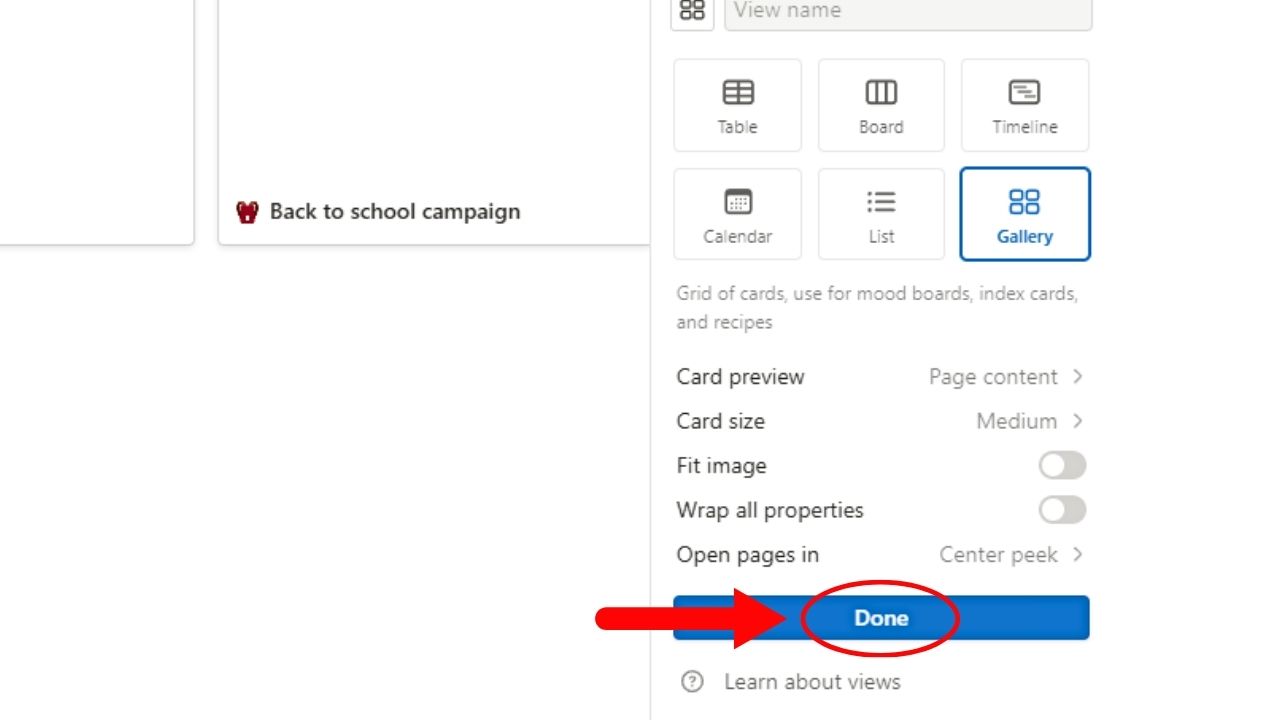
This is the blue button you’ll see at the very bottom of the “New View” pane. Do this if you’re done editing how the gallery cards will look.
Then you can proceed with editing the content of the individual gallery cards and add new properties and a cover image to them.
How to Make Gallery View Smaller in Notion
By default, the gallery view in Notion stretches out to the full width of the page. If you prefer that the gallery view becomes smaller than its usual size, follow these steps:
1. Click the 3-dot icon of the gallery view.
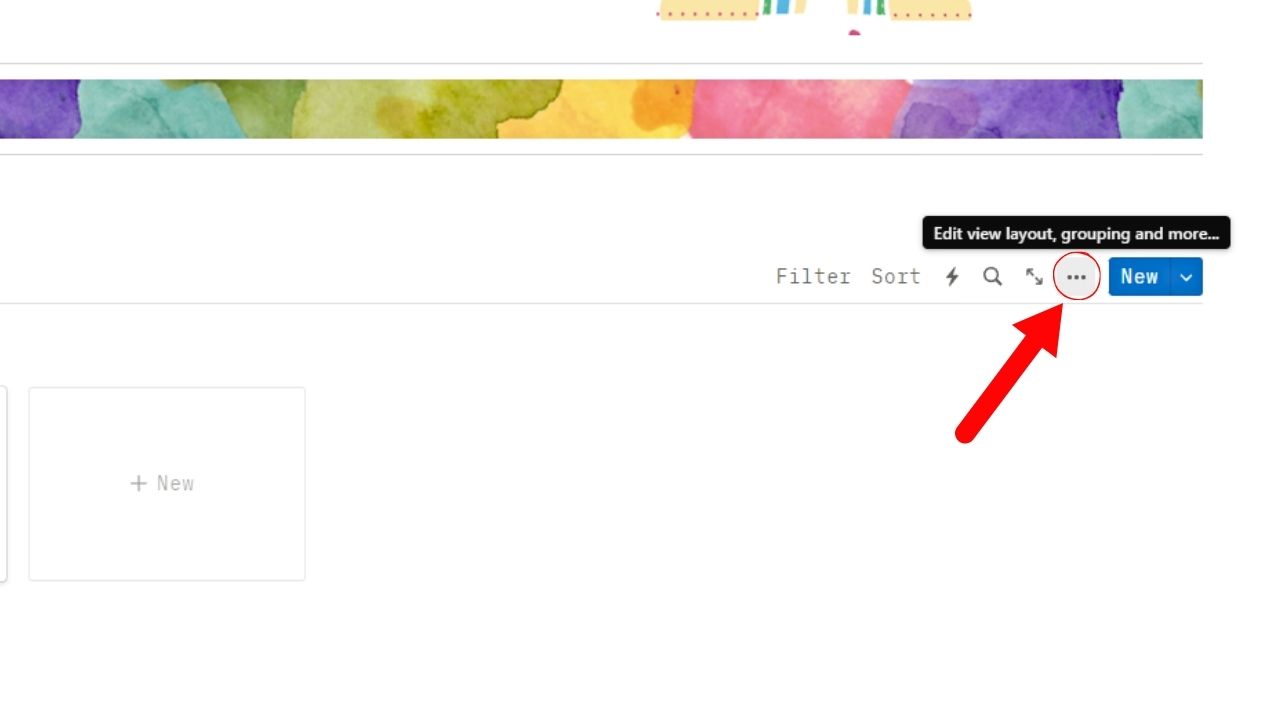
You’ll find this on the upper right corner of the gallery view, between the “Open full page” and “New” buttons.
The “View options” pane then opens.
2. Select “Layout.”

This is the second option on the “View Options” pane after “Source.”
3. Click the “Card Size” option.
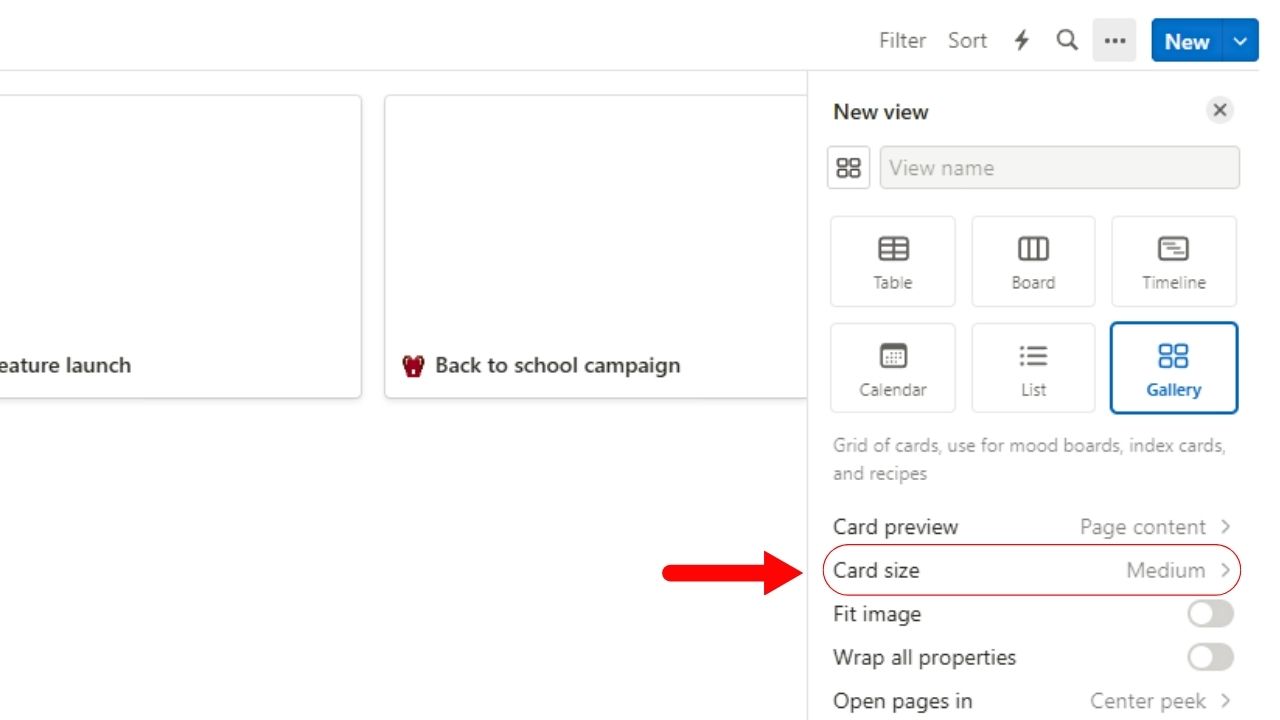
You’ll find this after the “Card Preview” option in the “Layout” pane.
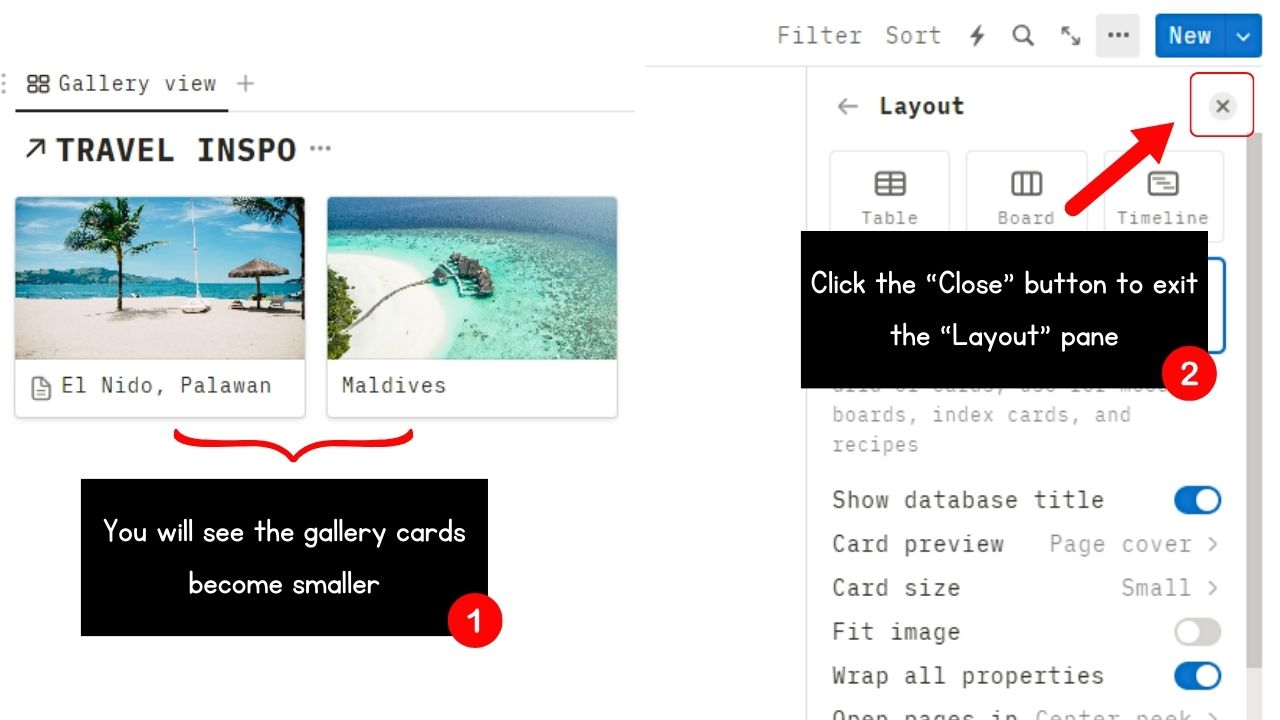
4. Select “Small.”
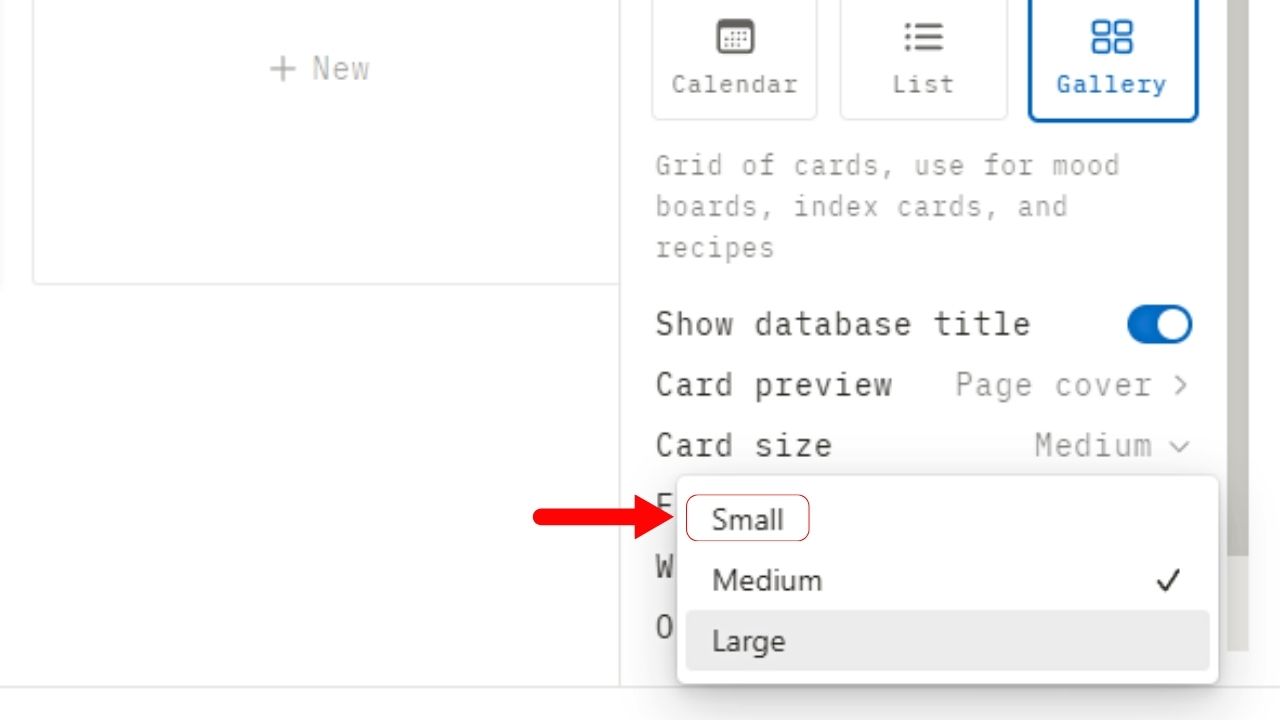
Again, there are three sizes available for the gallery cards: “Small,” “Medium,” and “Large. By default, “Medium” is selected.
But since you want to make gallery view smaller, then select “Small.” The cards then automatically take the “Small” card size.
Then click “Close” to close the “Layout” pane.
5. Click and drag the gallery beside other blocks on the page.
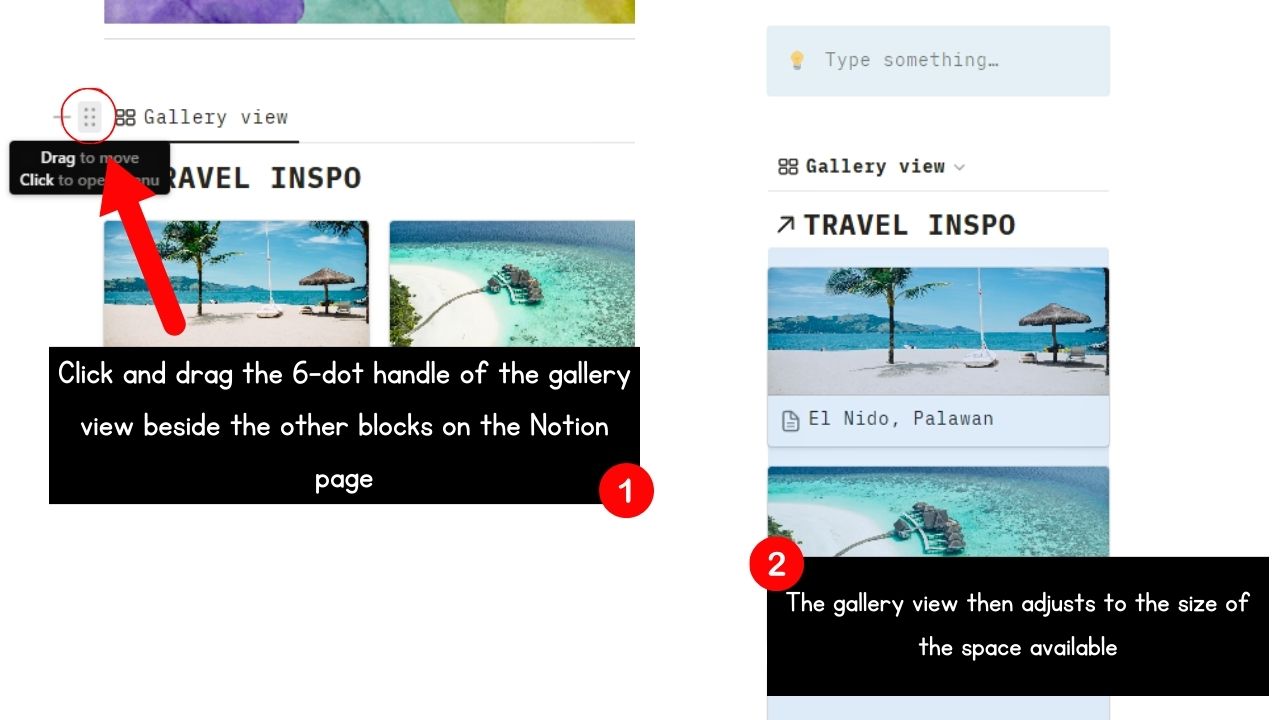
This allows you to place the gallery side-by-side with the other blocks on the page. The size of the gallery cards then adjusts to the size of the space available.
In this way, your Notion workspace will have a more finished look.
Conclusion
Learning how to make a gallery view in Notion is a fun way of transforming your data in Notion into a visual masterpiece. Making an engaging display is now easier, whether you’re adding views to a database or creating a travel journal template.
Improve your productivity in any Notion workspace without sacrificing good looks by using the gallery view feature.
