You might have noticed the Notion dashboards that you can access as a website. If you’re new to Notion, you’ll be surprised that you can host a free custom domain in it.
Plus, you can pair it up with Cloudflare for extra protection. If you want this seamless integration while building your online presence, follow the process below.
Table of Contents
How to Host a Free Custom Domain in Notion (with Cloudflare)
If you’re looking for habit tracking templates or tracking book reading progress templates, you can find some on Notion websites.
Aside from being a productivity tool, you can also turn your Notion dashboard into a website. Yet you’ll only get a generic URL that won’t do well if you’re building your online presence.
Add that you need to buy a domain to customize your Notion website’s URL. But you can create a free custom domain in Notion with Cloudflare.
1. Share your Notion page as a website.
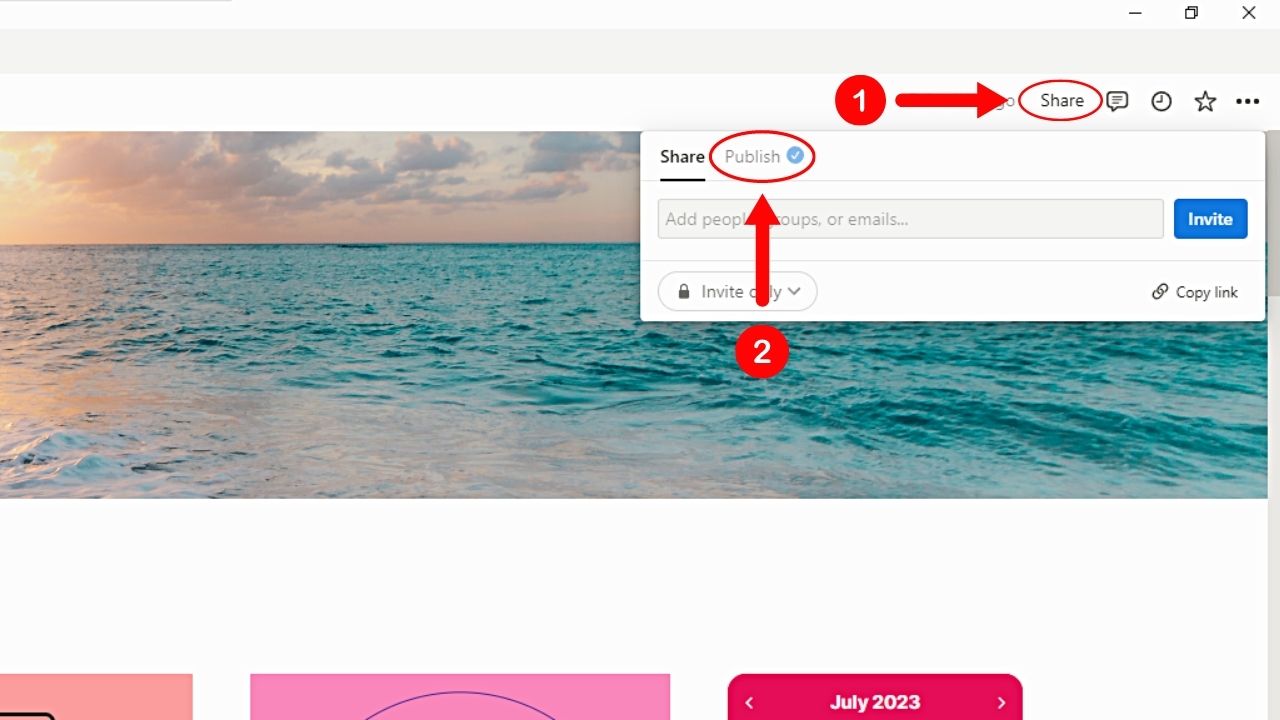
To do this, click “Share” on the upper right corner of your Notion dashboard. Then select the “Publish” tab.
From there, you can click the toggles for the various options on how you want to publish your website.
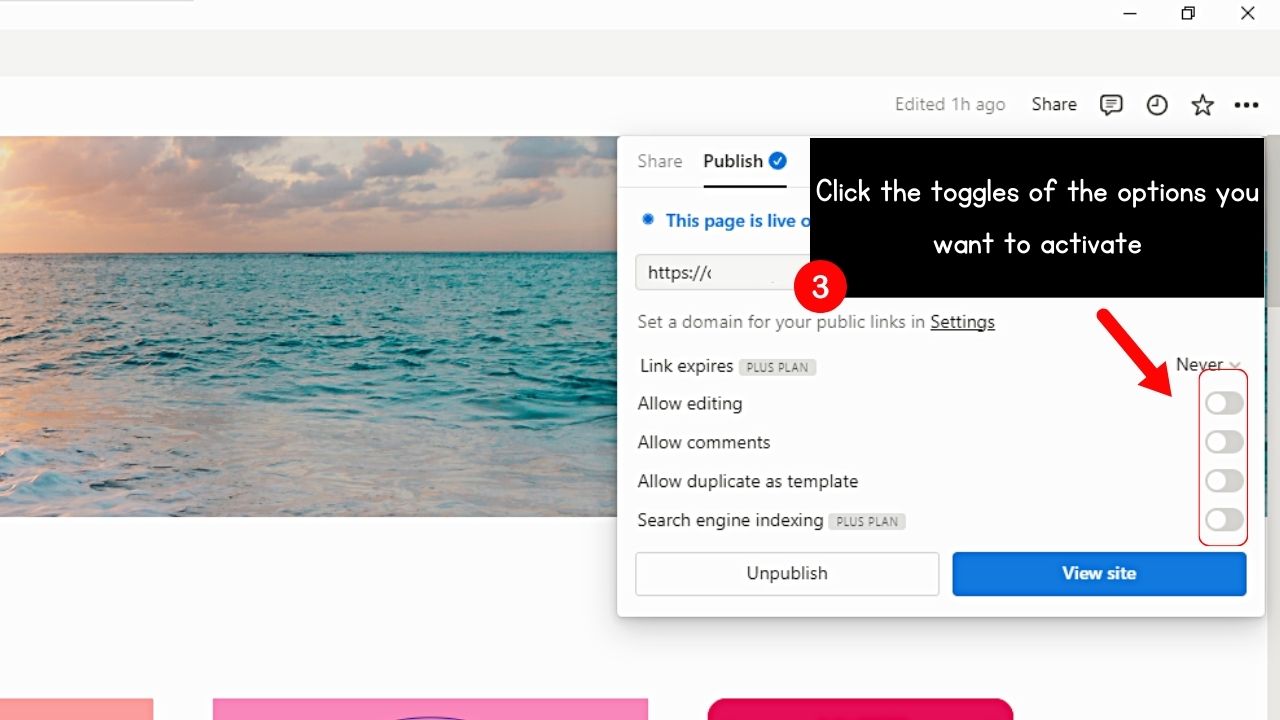
Take note though that the “Link expires” and “Search engine indexing” options are only available to those who avail of the “Plus Plan.”
2. Click “Copy Web Link.”
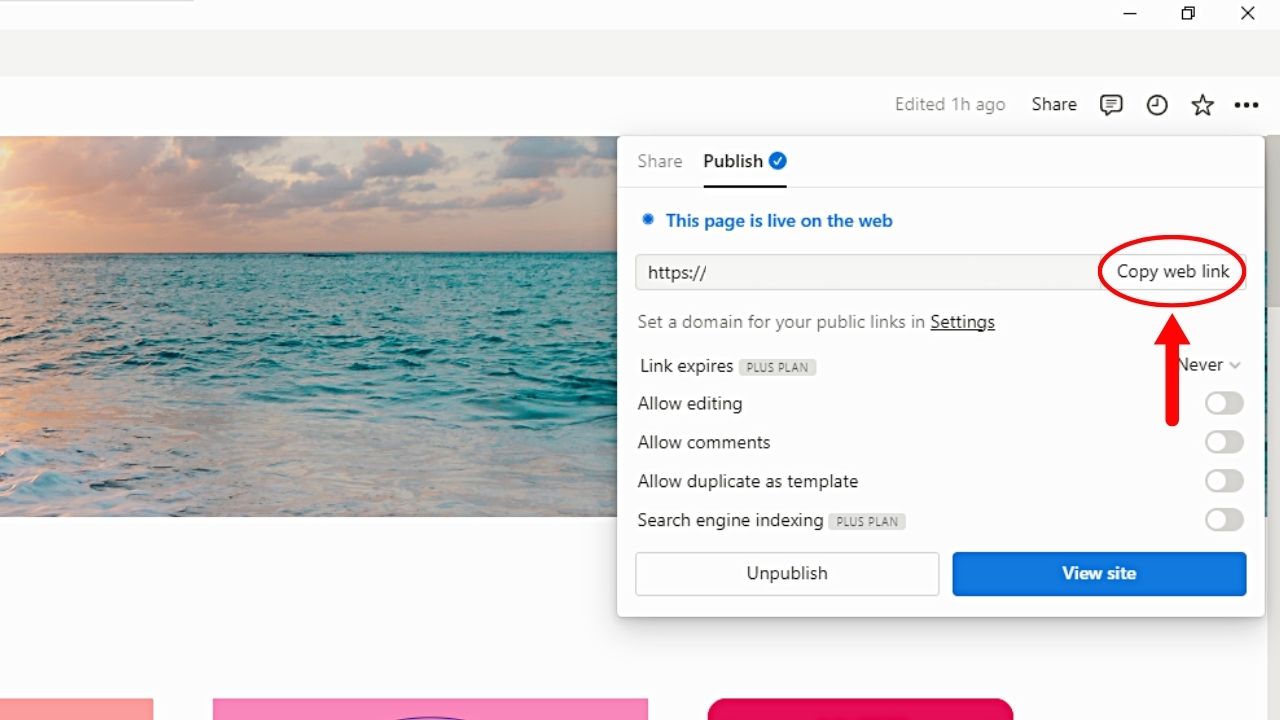
This button is beside your Notion’s web link. Then paste this web link temporarily on a safe document, sticky notes, or text file.
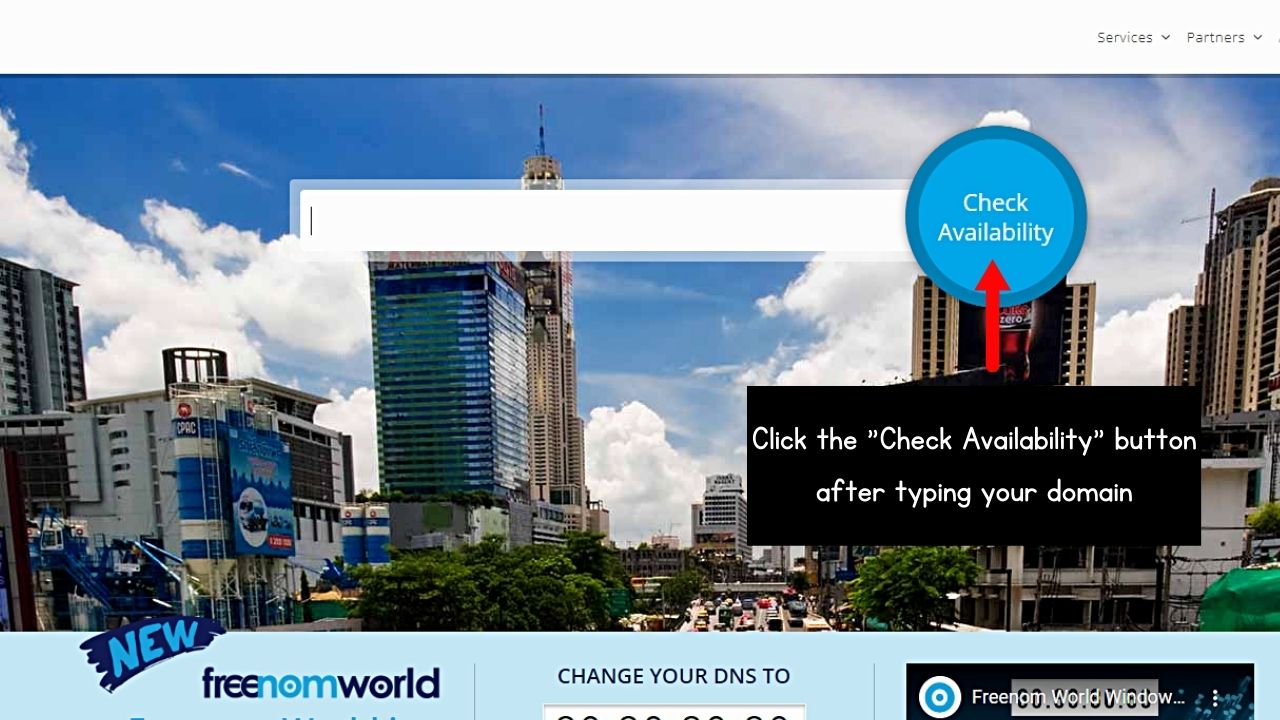
3. Go to freenom.com and check the availability of your website domain.
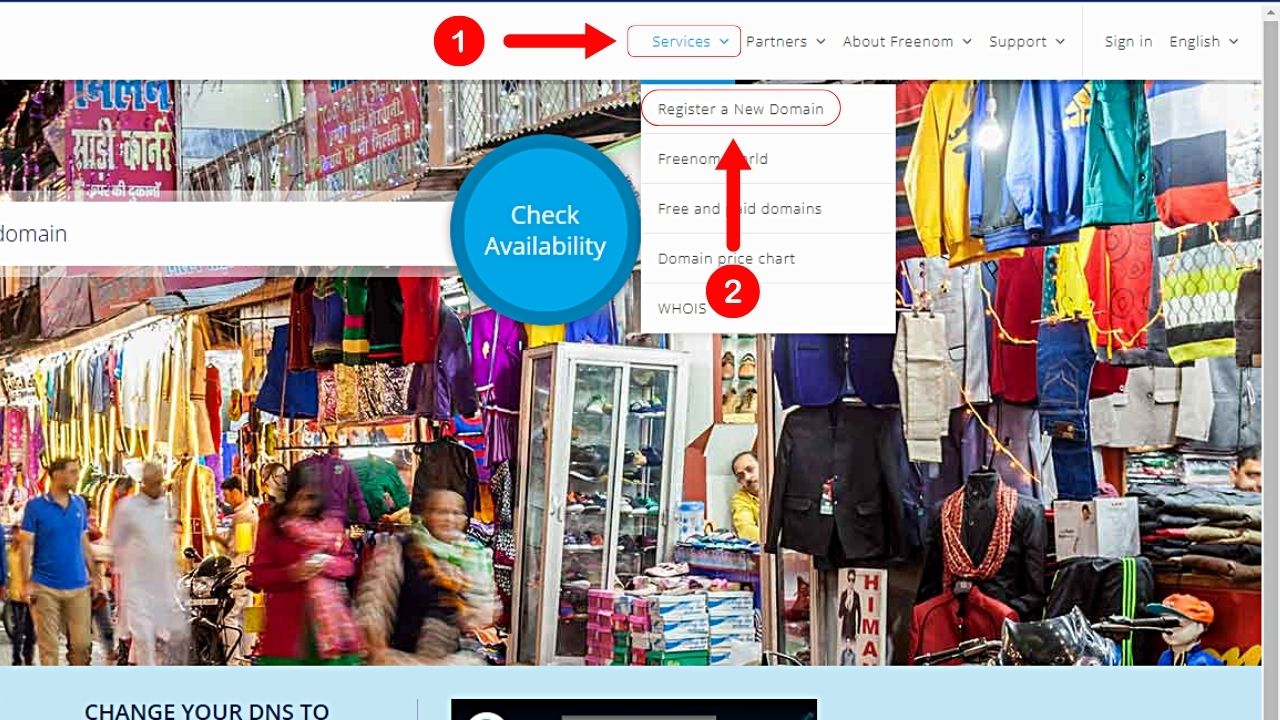
After creating an account on Freenom, select “Partners” > “Register a New Domain.”
Then click “Check Availability.”
Keep in mind that Freenom still owns the domain, thus, you can’t transfer it to anyone freely or sell it.
4. Choose your new domain.
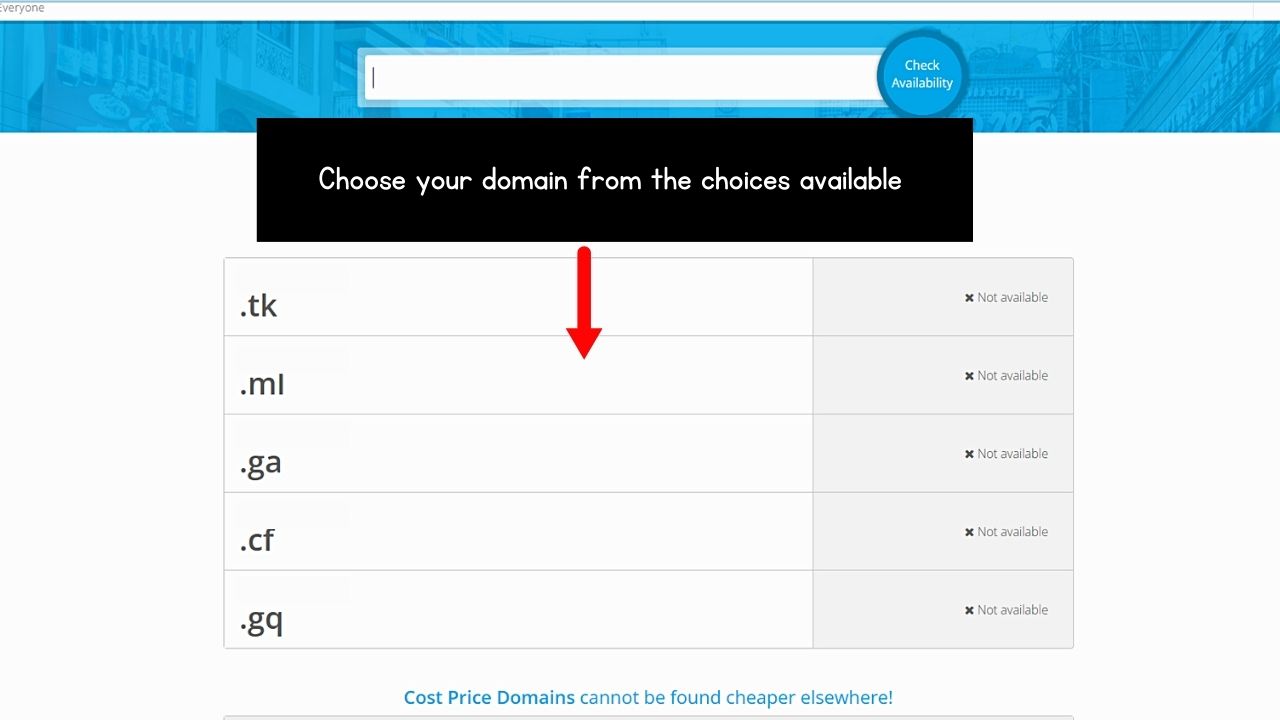
Since you’re looking for a free domain, ensure the price tag appears as “USD 0.00.” Then click the blue “Get it now!” button.
Then choose a plan (usually a free trial). Select the “12 Months @ Free” option. Then click “Continue.”
You should see your new domain under the “Services” > “My Domains” page. Wait for your domain to be activated, which usually takes a few hours.
You’ll know as an “Active” tag is seen in the “Status” column.
5. Go to Cloudflare and add your website domain.
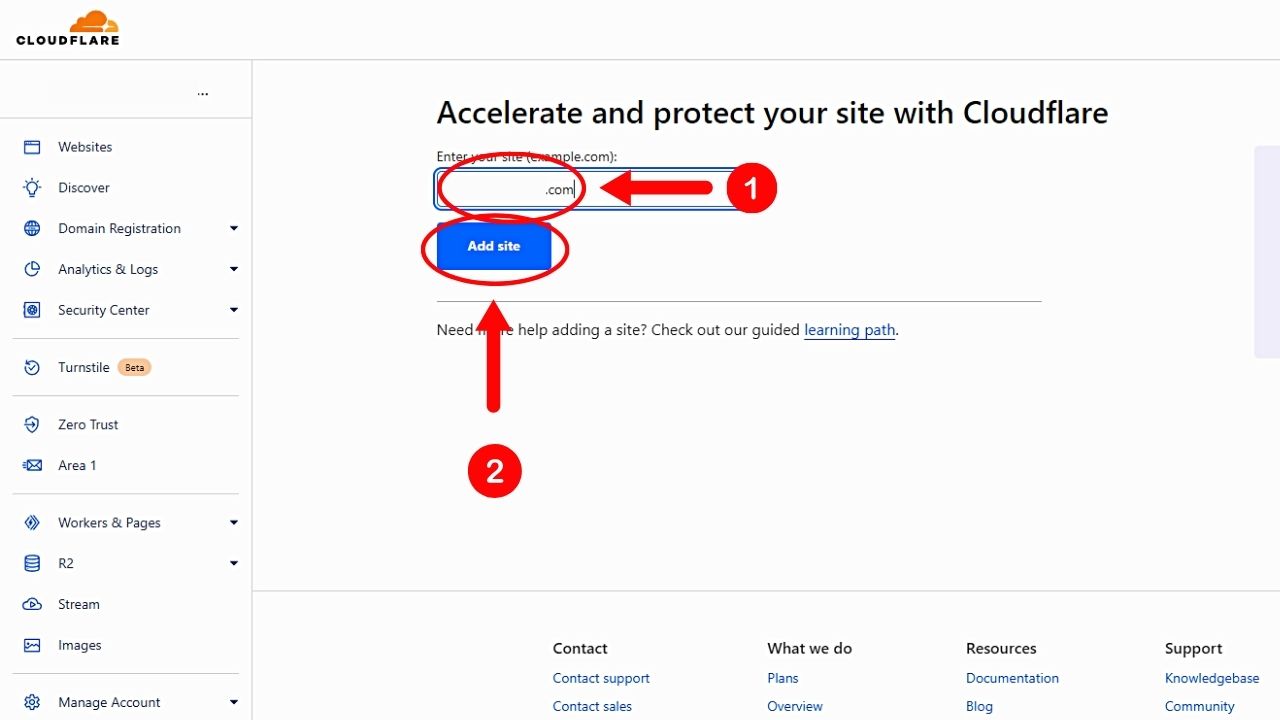
Once you have made your Cloudflare account, add your Notion custom domain and select “Add site.”
You’re then redirected to the “Options” or “Plans” page.
6. Select the “Free Plan.”
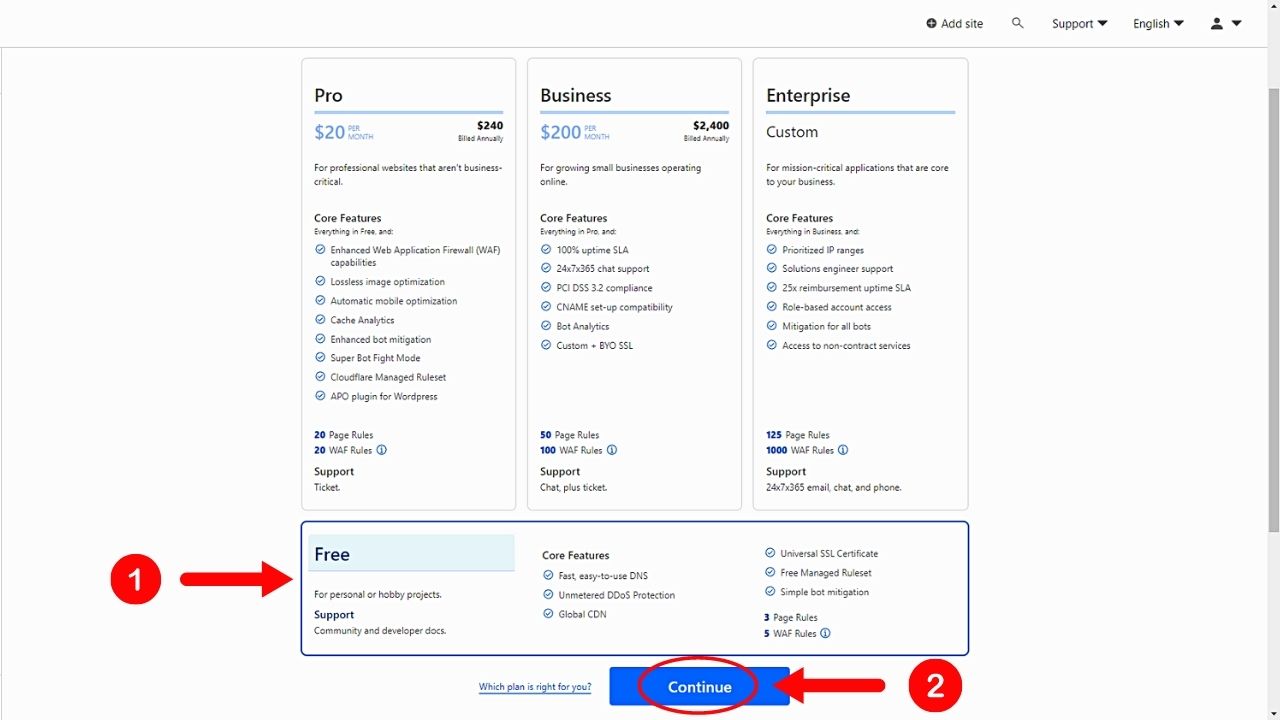
This option’s found on the last part of the “Plans” page. Then click “Continue.”
Wait for Cloudflare to do a quick scan of the DNS records of your website.
7. Go back to freenom.com and change the nameservers of your domain.
Select “Manage Domain” (right of the domain). Then click “Management Tools” > “Nameservers.”
8. Tick the “Use custom nameservers (enter below)” option.
9. Copy the nameservers from Cloudflare and paste them into the nameservers section in Freenom.
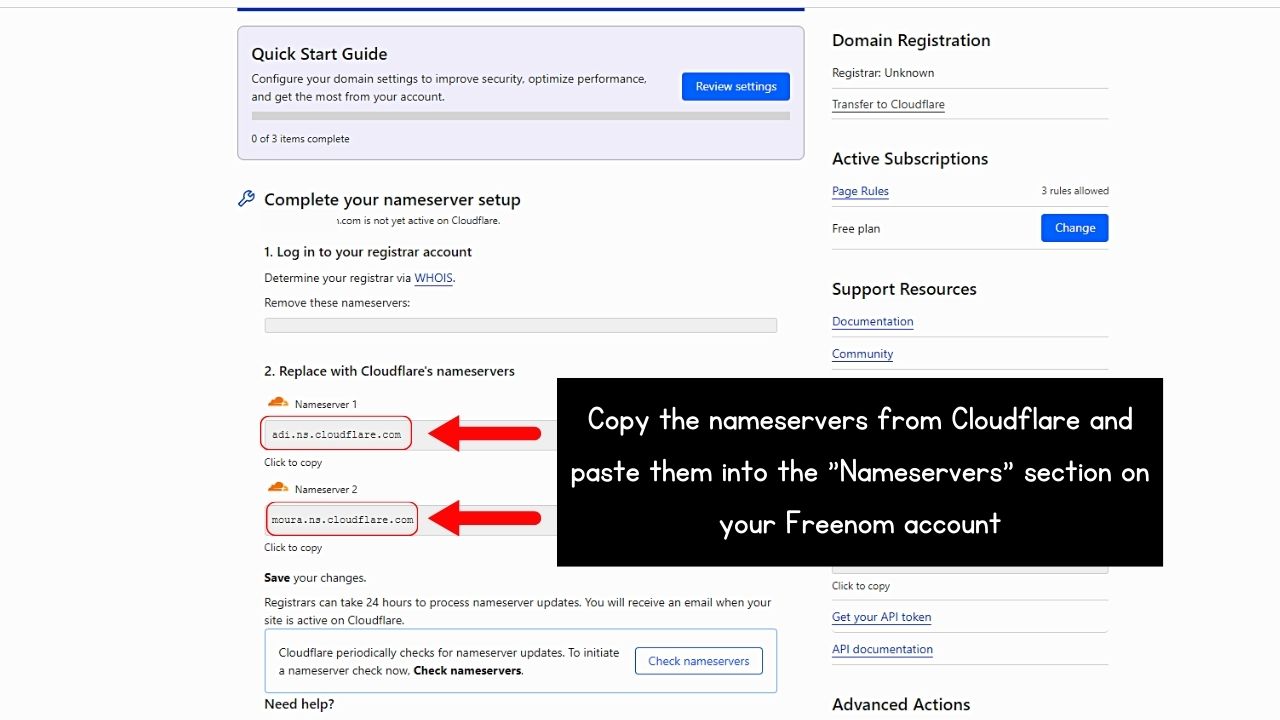
To do this, select “Continue” and click the “Nameservers” hyperlink in the header section.
Select “Change nameservers.” Then wait a few hours for the new nameservers to be reflected on Cloudflare.
Check that the nameservers are changed already in Cloudflare.
10. Click “Apply recommendation” for “Enable Auto Minify” and “Enable Always Use HTTPS”.
Then check again whether the nameservers for your domain are already changed. Once they’re good, proceed with the next step.
11. Connect your Notion website with Fruition.

Fruition is an open-source and free toolkit used for building websites using Notion. You’ll find on the “Home” page detailed instructions on how you can create a Cloudflare account.
12. Go to your Cloudflare account and click “Workers Routes.”

This option is on the left-side panel of your Cloudflare dashboard between “Caching” and “Rules.”
13. Click “Manage Workers.”
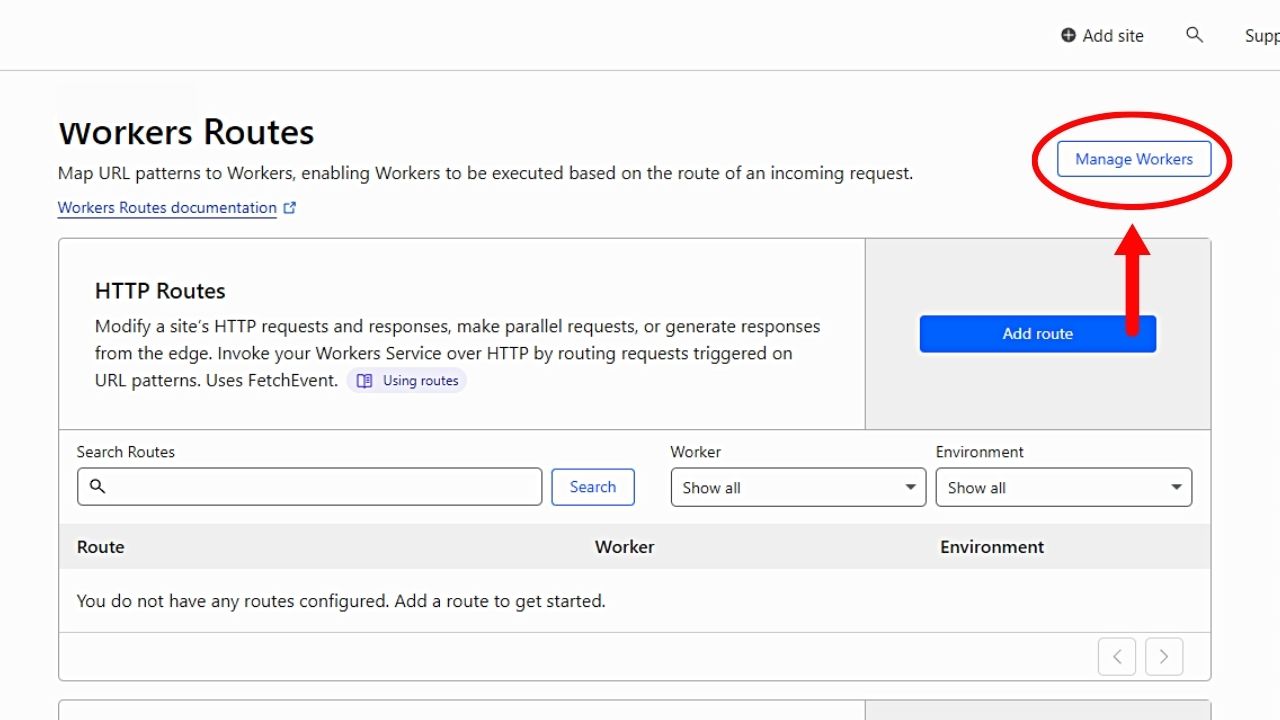
You’re then redirected to the “Setup” page. Then click “Set up” found at the bottom part of this page.
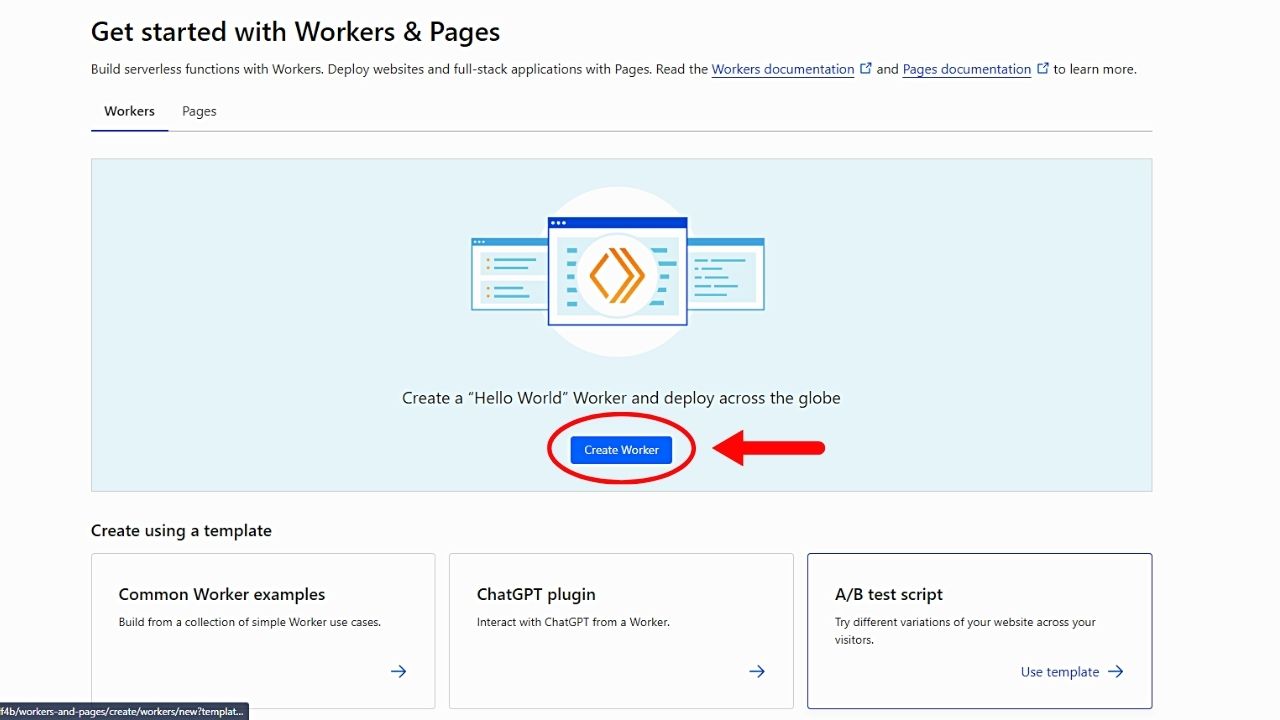
Click the “Create worker” button instead if you’ll set it up for the first time. These workers will facilitate the redirect.
14. Choose the “Free” plan.
Then wait for Cloudflare to send you a verification email.
15. Create a new service.
This option is under the “Worker Routes” > “Manage Workers” section.
Either change the name of the service or leave it as it is before clicking the “Create a new service” button.
16. Click “Quick Edit” and paste the code from Fruition.
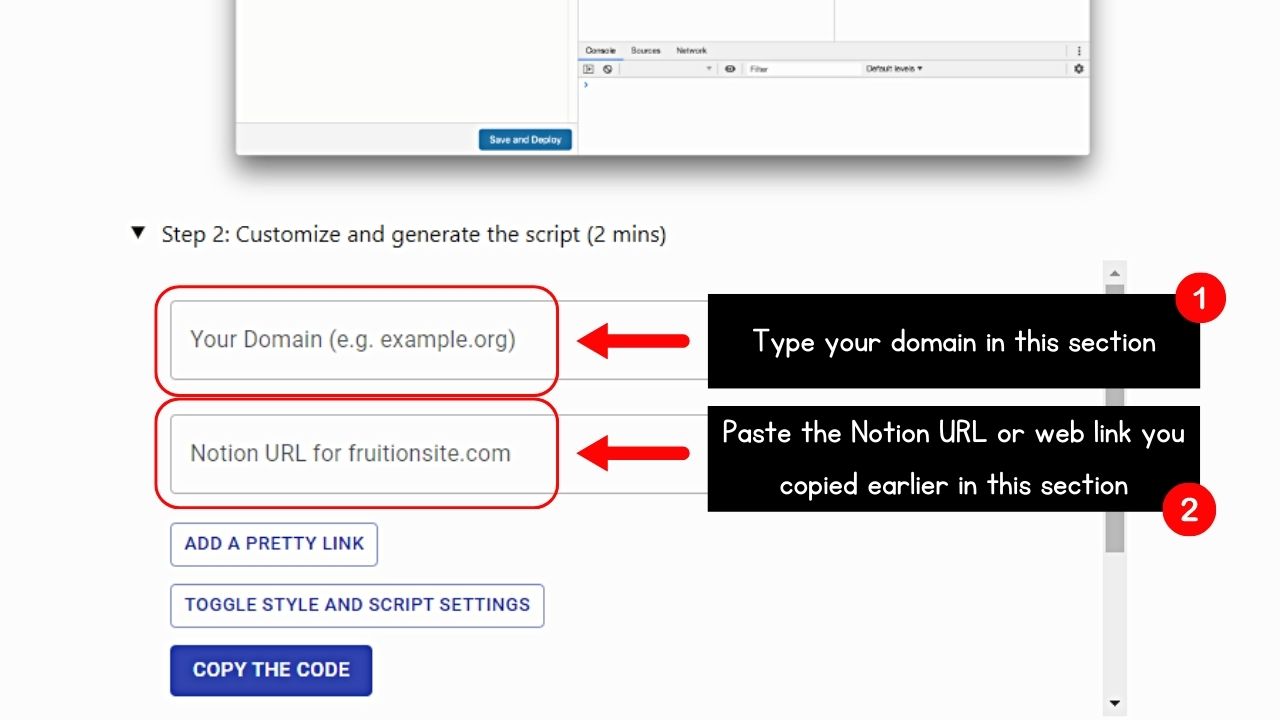
To get the code from Fruition, go to the second step (customizing and generating the script) and type your domain name.
Then paste the Notion website URL you have previously saved on a document or text file.
17. Select “Copy” and paste the new code into Cloudflare.
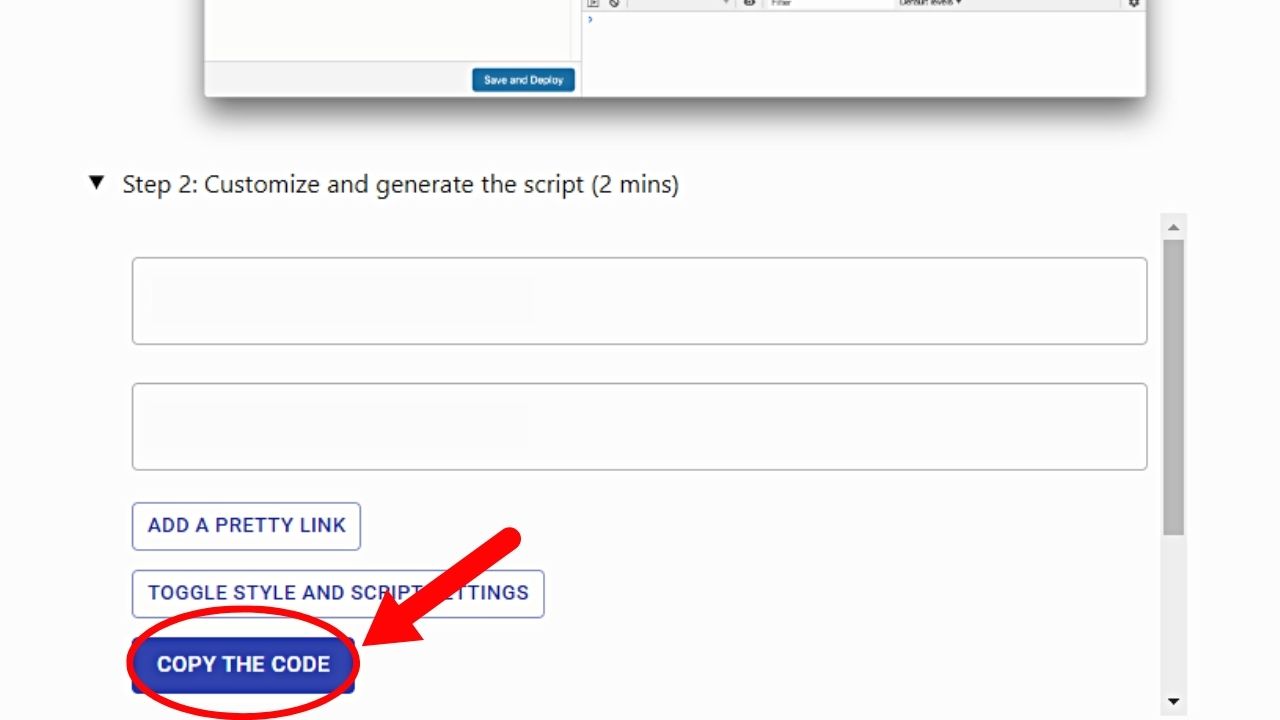
Just remove the default code inside the window and paste your website’s code.
Then click “Save and “Deploy” twice to confirm your action.
18. Go back to the “Services” page and add a route.
To do this, click the “Triggers” tab before the “Add a route” option. Then type this code in the “Add route” section: “*<domain name>/*”
The asterisk (*) symbol is important as the link would still work even if you add anything before or after the domain name.
Then click “Add route.”
You can then check whether your new Notion website is working.
Even on using a mobile phone, you can easily update your entries. Any changes made will then reflect on your Notion website.
How to Host Free with a Custom Domain in Notion (With Cloudflare)
If you have already purchased a domain for your Notion website, how would you host it with Cloudflare?
Technically, the process is the same. It’s just that you’ll have to copy the DNS records first from your website’s dashboard.
Usually, you’ll find the DNS code under the “Websites” or “DNS” tabs. If you’re using Simple.ink to launch your Notion website, the DNS setting is the same for all websites.
Once you find it, copy the DNS settings which usually include these details:
- Host/name
- Type
- Value
Then go to your Cloudflare account and click “DNS” on the left-side menu. Then click the “Records” option.
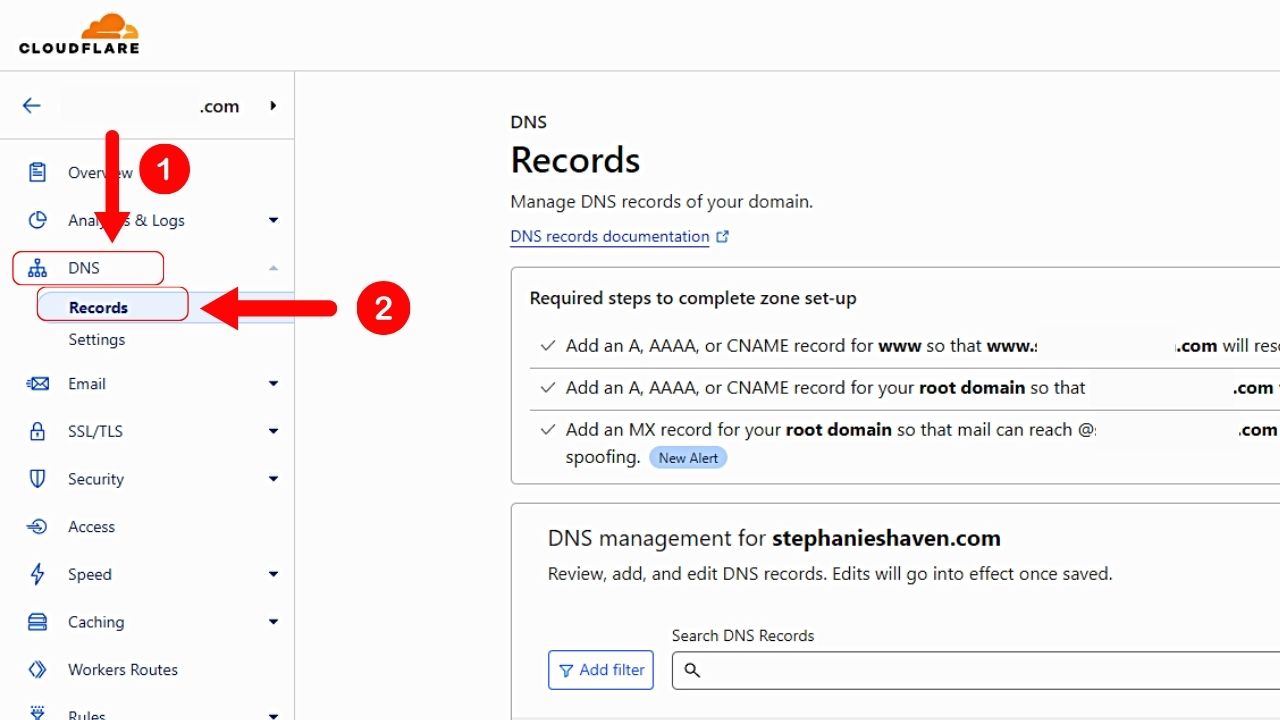
Then select the “Add record” button.

A new pop-out window then appears, allowing you to add the DNS settings you copied earlier.

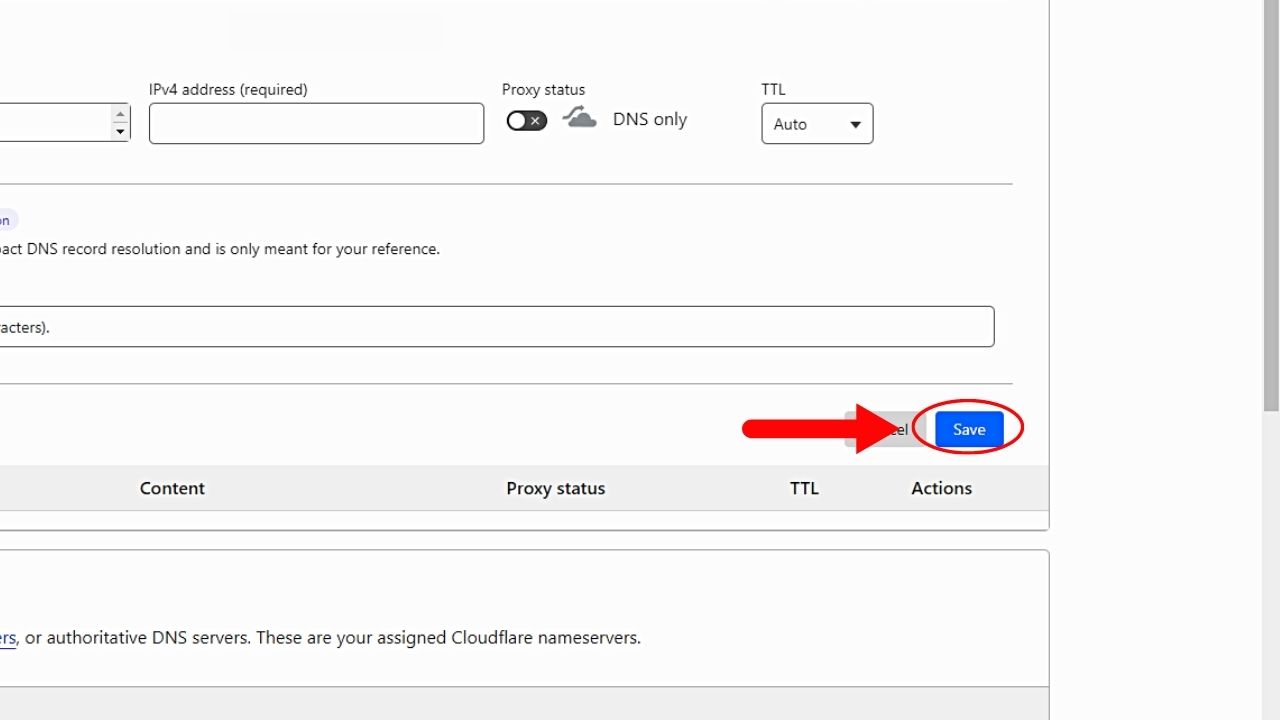
Then make sure to deactivate the “Proxy status” button, setting it to the “DNS only” state.

Then select “Save.” You’ve successfully connected your custom Notion domain with Cloudflare.
Conclusion
Now, you’ve mastered hosting a free custom domain in Notion with Cloudflare. Fully embrace having a personalized online identity with customized URLs.
This way, your brand’s identity is boosted and you can impress anyone visiting your website.
