Aside from being a productivity tool, Notion can also be used for collaborating with your workmates. But if you want to delete a workspace or team space in Notion you’re no longer affiliated with, you quickly can do so.
Not to worry as you can delete a workspace or team space in Notion with just a few clicks.
Table of Contents
How to Delete Workspace in Notion
Creating a shared workspace helps in ensuring that you can work seamlessly. No need to switch apps just to communicate, thereby increasing your productivity.
You can even embed a calendar in your workspace to easily plan events or projects. If you want, you can add checkboxes within that calendar so everyone knows which tasks are done.
But with changes in your work, you and your workmates will inevitably be reassigned to new teams. Hence, you need to remove yourself or delete the Notion workspace altogether.
This process only involves 3 simple steps after logging in to your Notion workspace.
1. Select the “Settings & members” option.
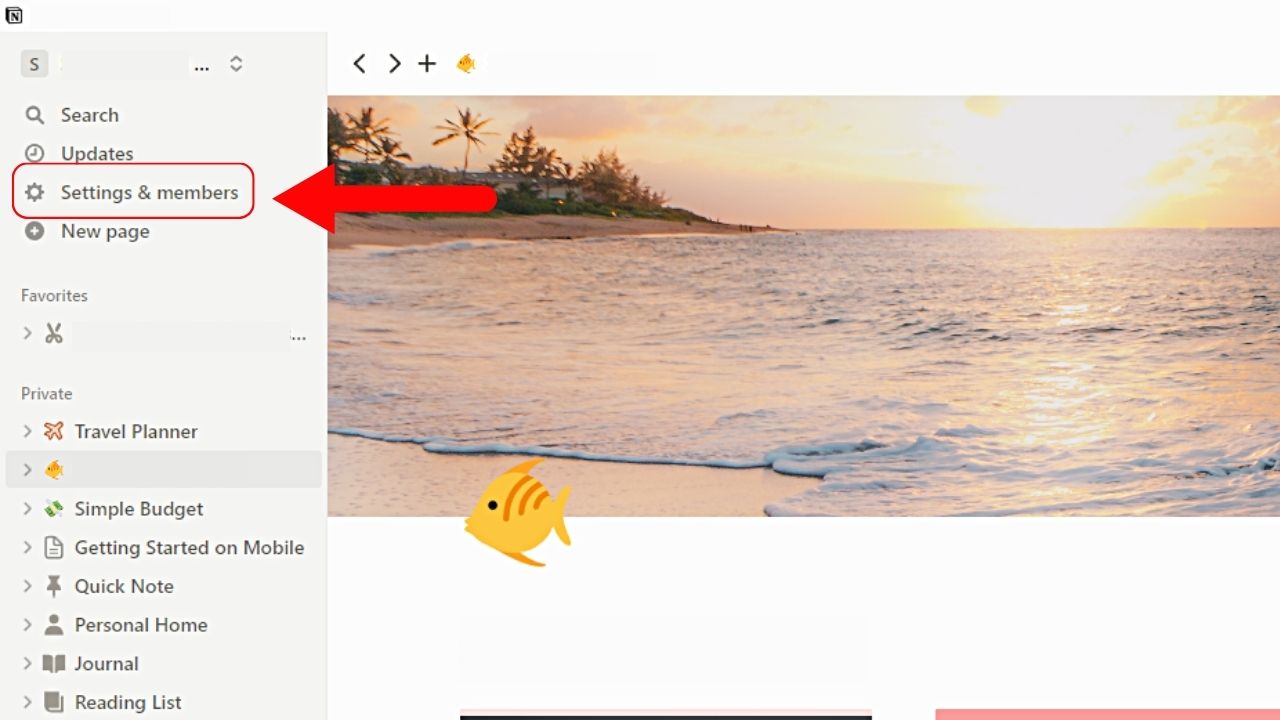
This option is found on the Notion workspace or teamspace’s left-side panel. This is between the “Updates” and “New page” options.
2. Click “Settings.”
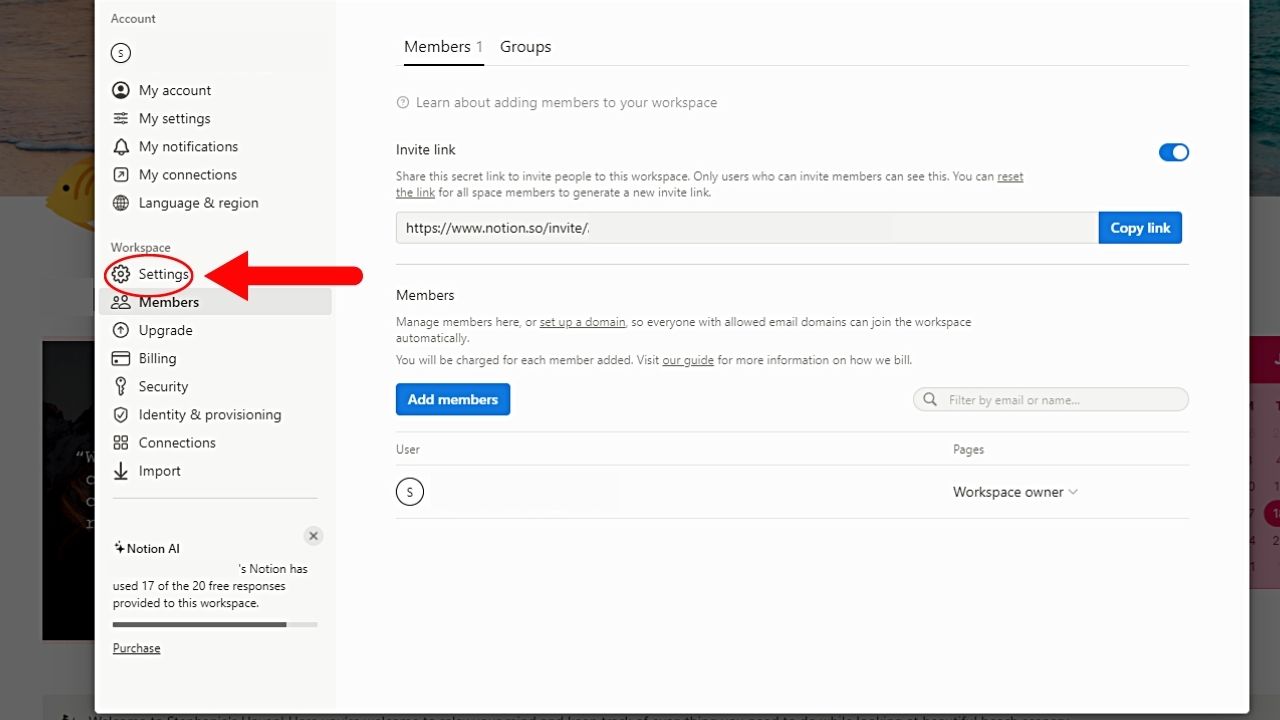
You’ll still find this option on the left-side panel. This time, it’s the first option under the “Workspace” section.
3. Scroll down and click the “Delete entire workspace” button.
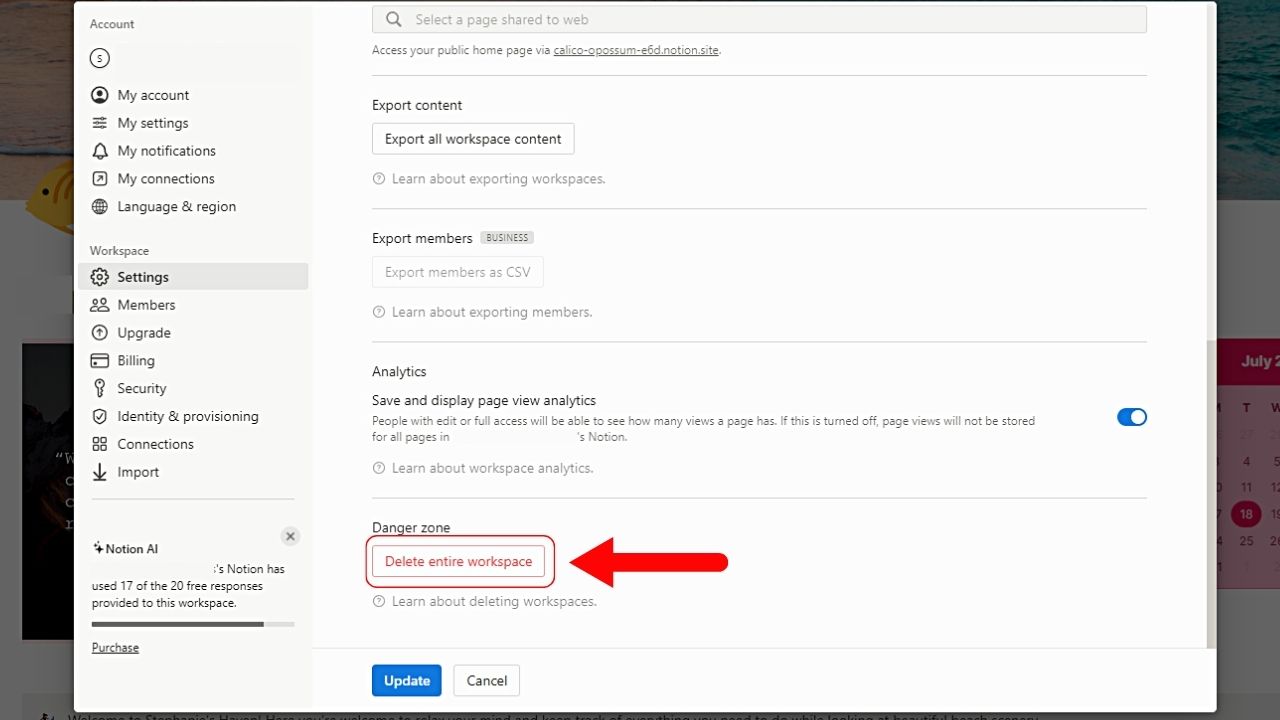
You won’t miss this option as the “Delete entire workspace” button itself is surrounded by a red rectangle. The text itself is red as well.
4. Type the name of the workspace and select “Permanently delete workspace.”
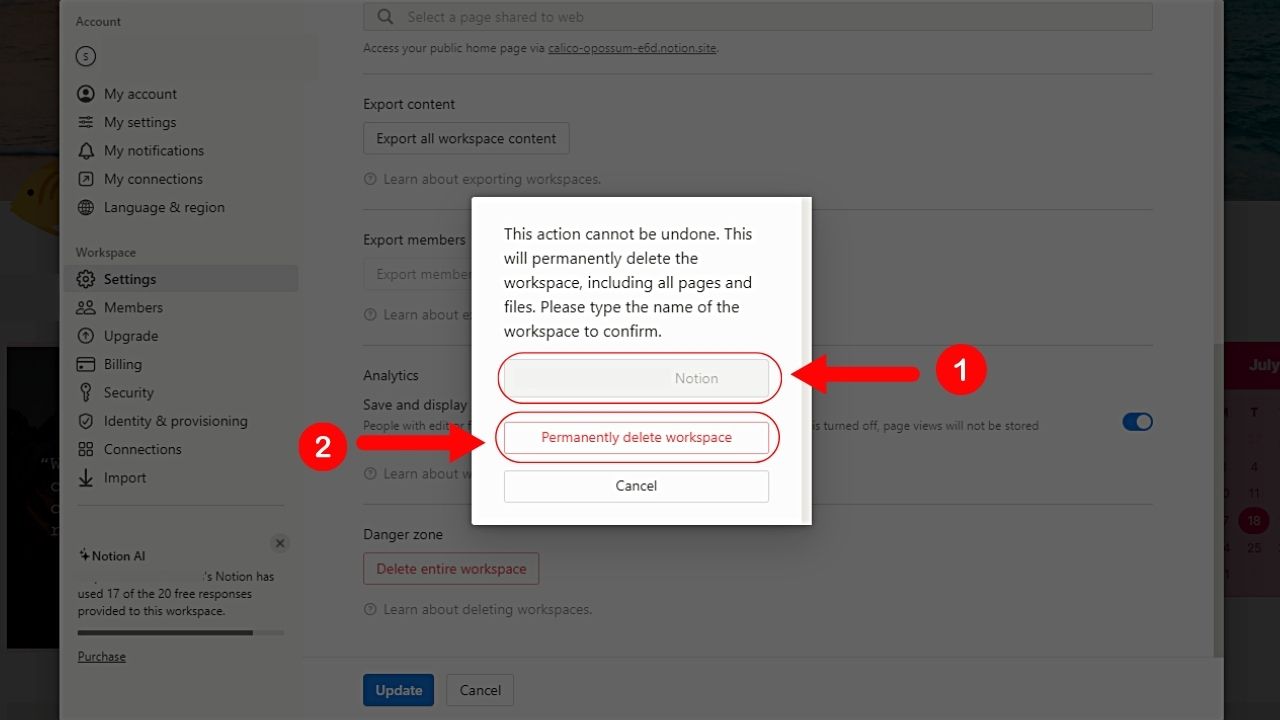
But before you do any of these actions, you’re reminded that deleting your workspace is a permanent action and that it can’t be undone.
Hence, if you accidentally selected “Delete entire workspace,” click “Cancel” now. Otherwise, type your workspace’s name for confirmation before clicking “Permanently delete workspace.”
How to Delete Workspace in Notion on iPad and Mobile
If you’re accessing your Notion workspace through an iPad or mobile phone, the process is the same. It’s just that the interface is different as you’re working with a smaller screen area.
Once you’re inside your Notion workspace, follow these steps:
1. Press the 3-dot icon.

Otherwise known as the ellipsis or meatballs menu, this button is found on the screen’s top right corner.
A dropdown menu then appears.
2. Choose “Settings.”
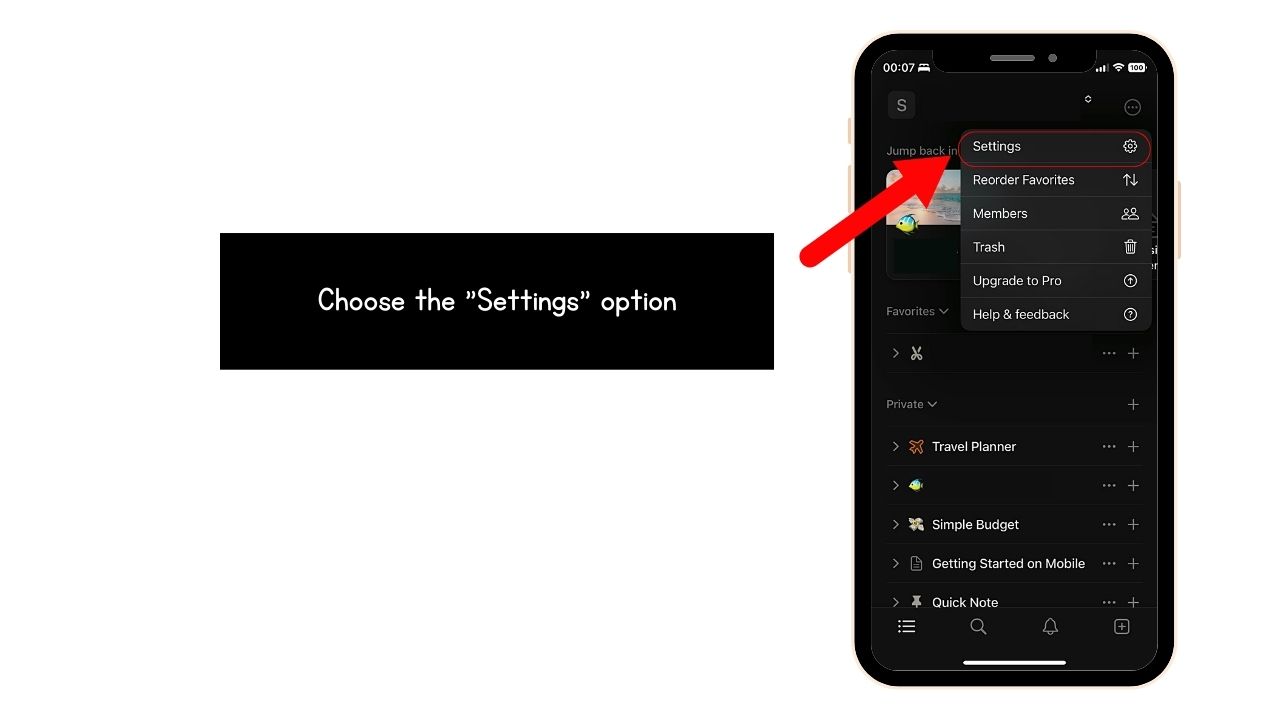
This is the first option appearing in the dropdown menu. Its icon takes the shape of a gear.
3. Swipe up and press “Delete my account.”
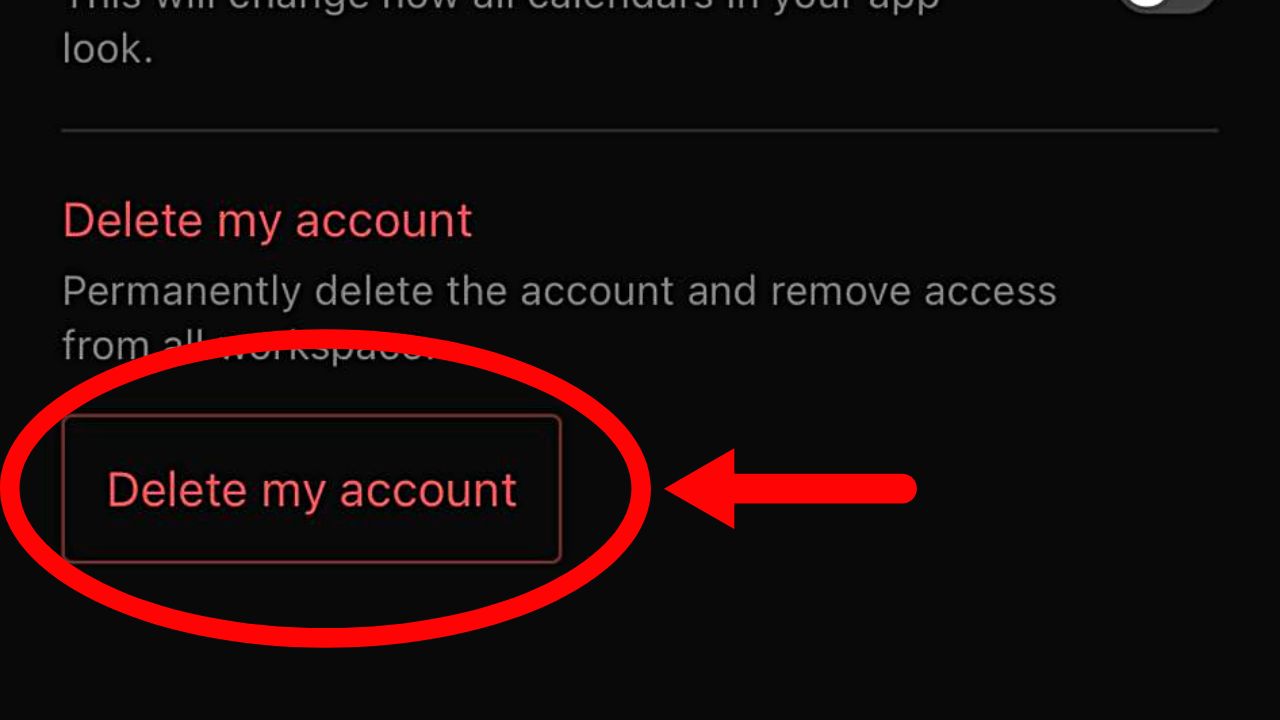
Like in the desktop version, this button is surrounded by a red rectangle, with the text in red color as well.
4. Type your email and press “Delete account & [number] workspace.”
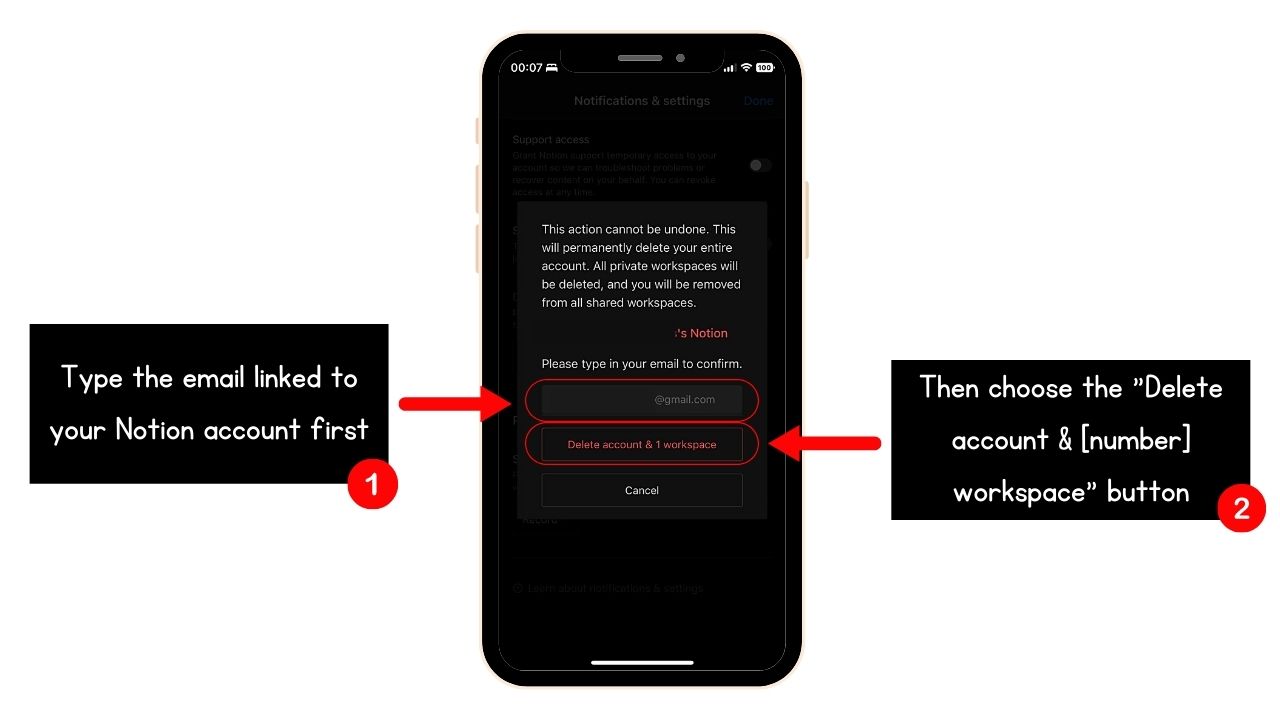
Unlike in the desktop version wherein you’ll encode your Notion workspace’s name, you’ll type the email linked to your Notion account instead. Again, as you’re warned that pressing the “Delete account & [number] workspace” cannot be undone, tap “Cancel” to exit the pop-out window.
Otherwise, type your email and tap “Delete account & [number] workspace.”
How to Delete Teamspace in Notion
You’d probably wonder how a workspace and teamspace in Notion differ. By default, a workspace is your default teamspace where all your co-workers are added.
But if you want to create a dedicated area for each team, then Notion’s newest feature — teamspaces — can be added.
Note: Adding members to your workspace or teamspace is billable. You’ll be charged a fee for every member added.
Yet, if a certain team in your company has been dissolved, you might want to delete it. This process also involves 2 methods to achieve it.
Long Method: Accessing Teamspace Settings to Delete a Teamspace in Notion
1. Hover your cursor beside the teamspace name and click the ellipsis icon.
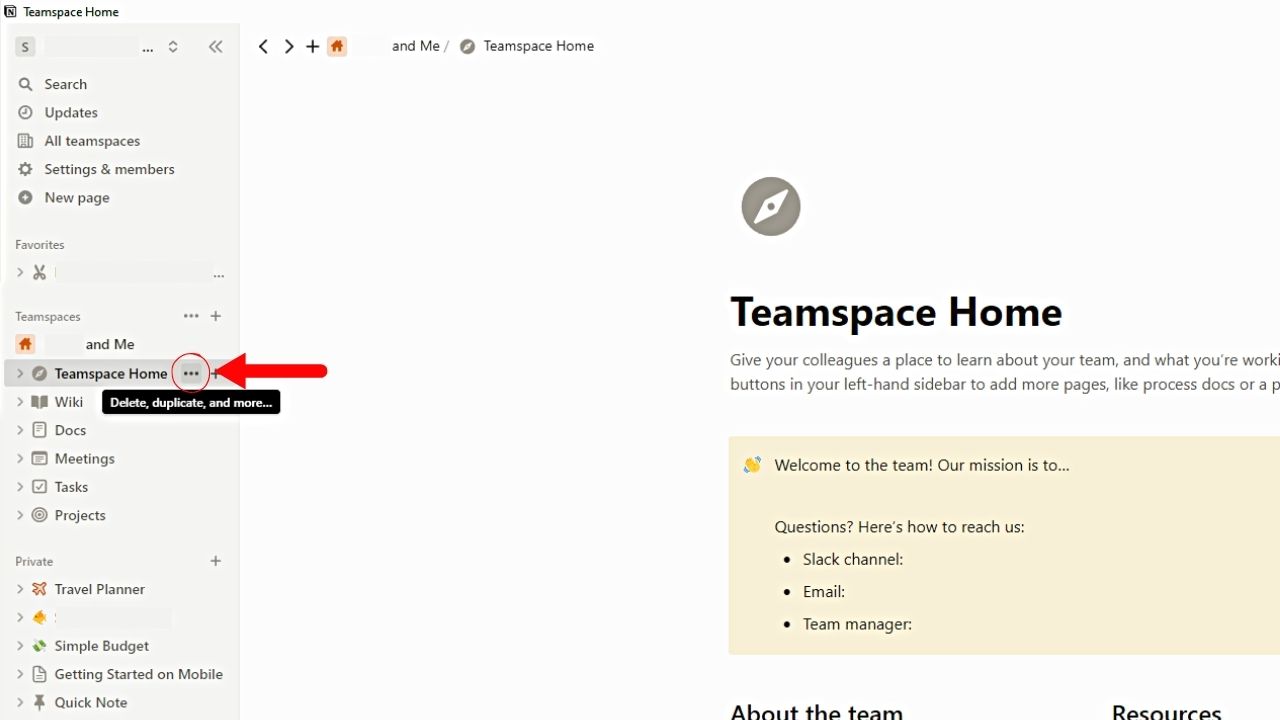
This is the 3-horizontal dot icon or meatballs menu you’ll see to the right of the teamspace name.
2. Select “Teamspace Settings.”
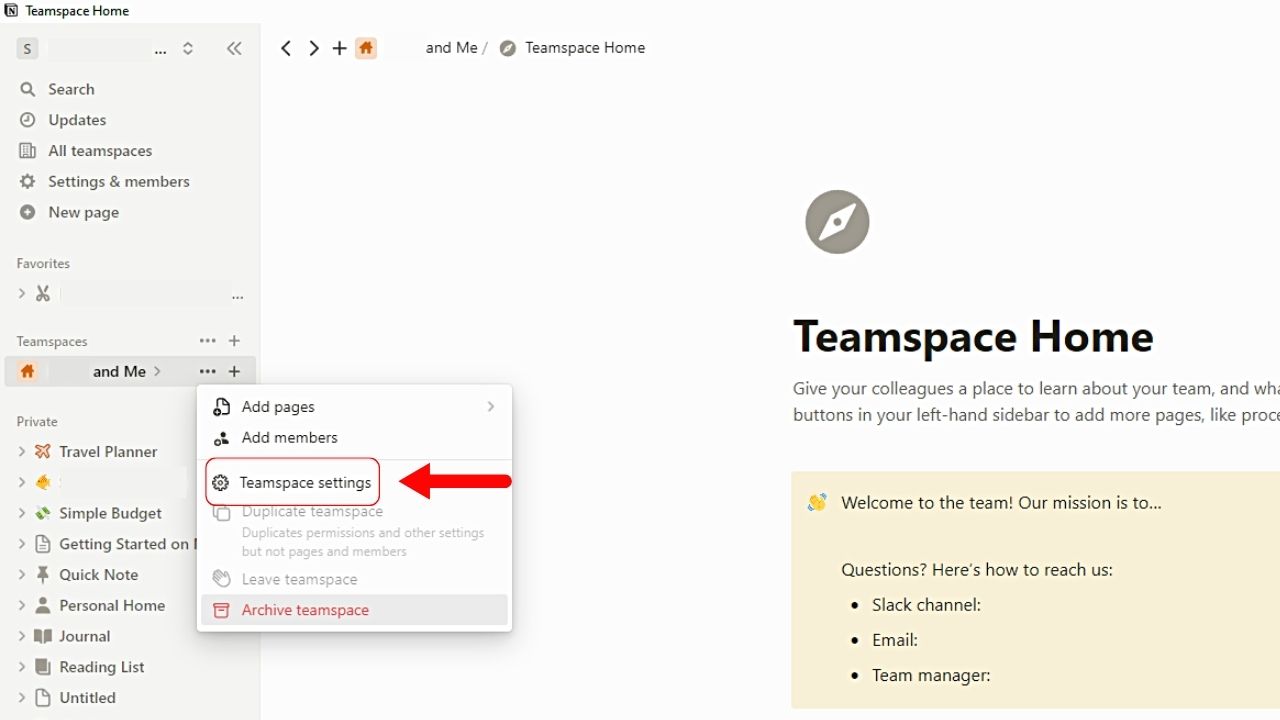
This is the third option in the dropdown menu that opens, between “Add members” and “Duplicate teamspace.”
3. Click the “General” tab.
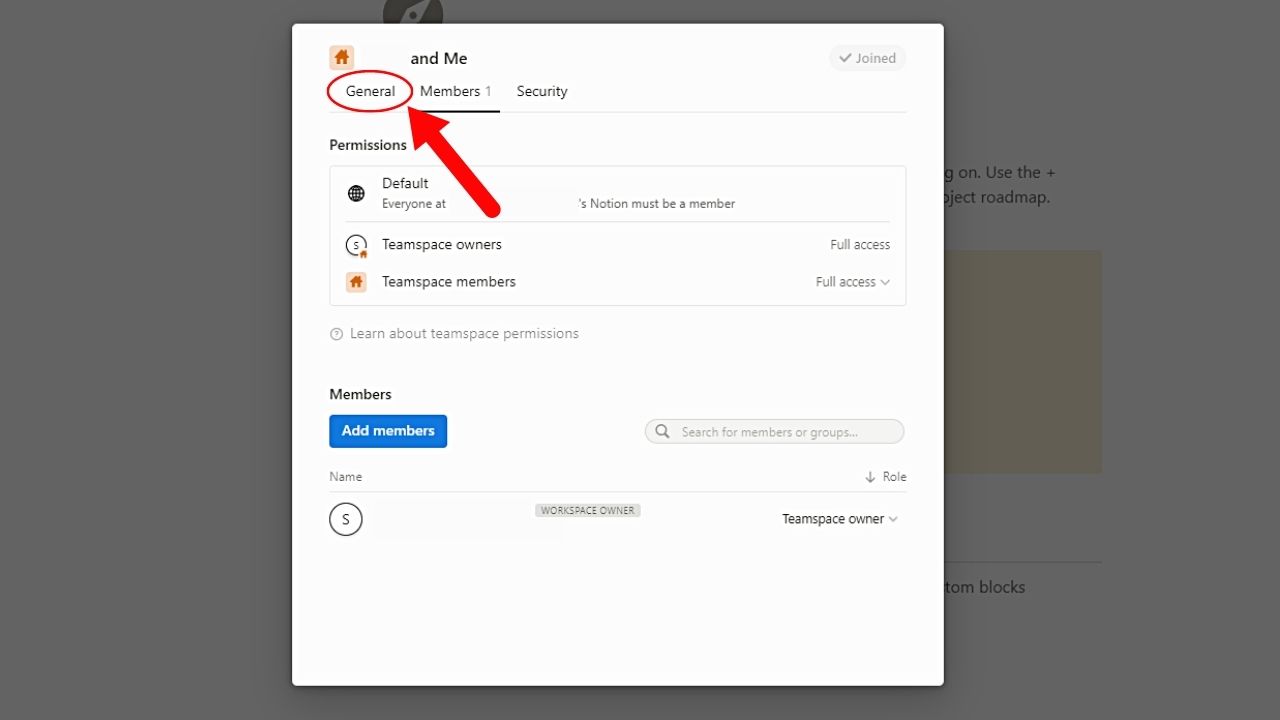
By default, the “Members” tab is what appears first after selecting “Teamspace Settings.” You’ll find “General” to the left of the “Members” tab.
4. Scroll down and click “Archive teamspace.”
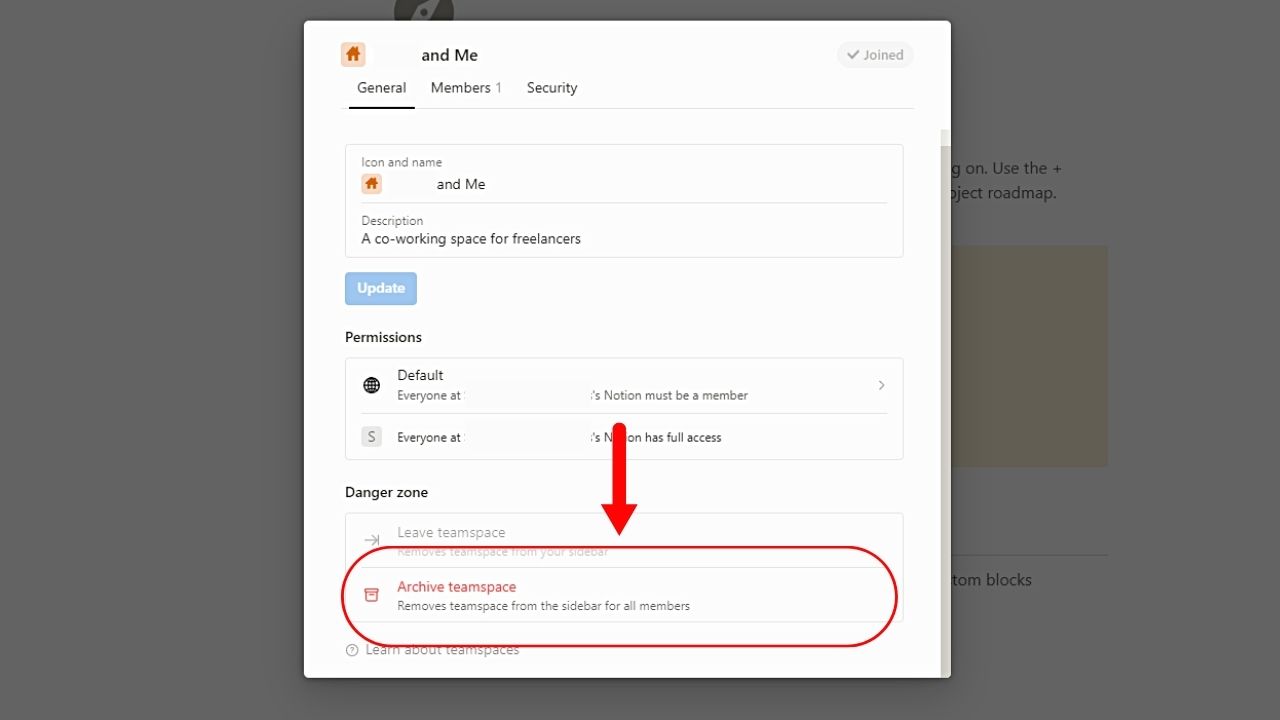
This is the second option in the “Danger Zone” section.
5. Type the teamspace name and choose the “Archive teamspace” option.
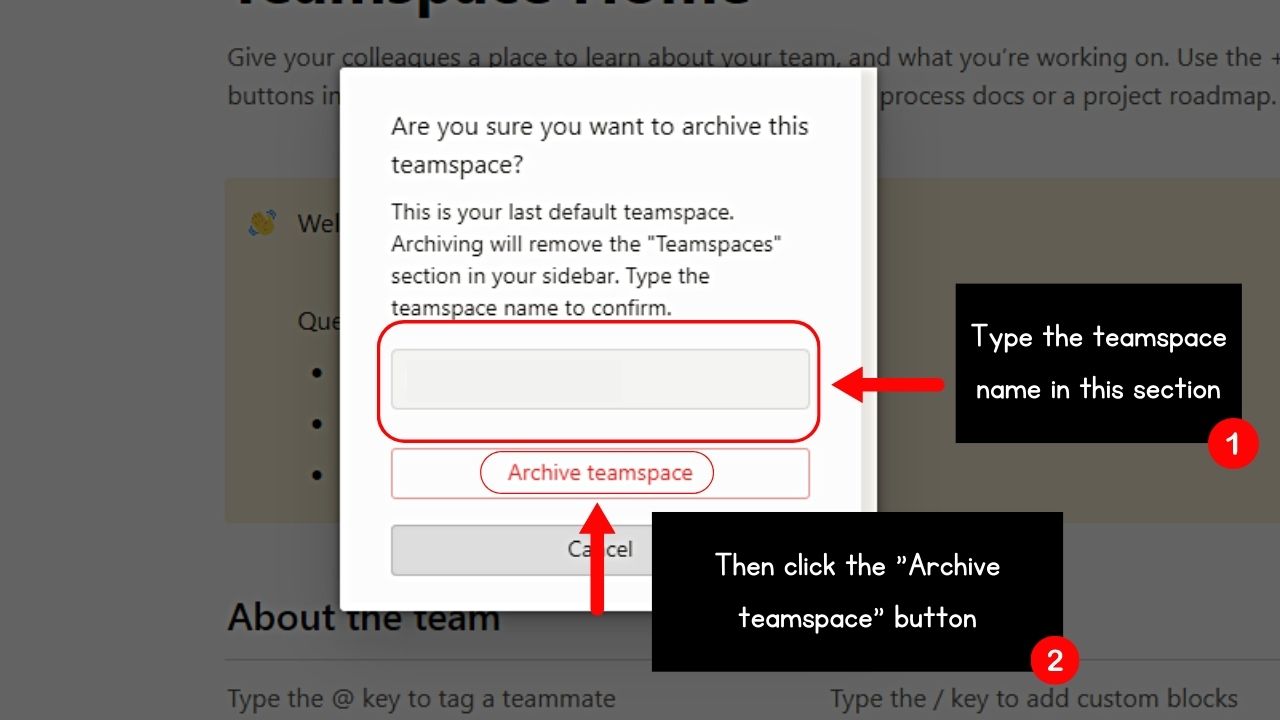
Typing your teamspace allows Notion to verify your identity as a team owner. If you want to delete the teamspace, select the red “Archive teamspace” option.
Otherwise, select “Cancel.”
6. Choose between “Move pages” and “Proceed without moving pages.”
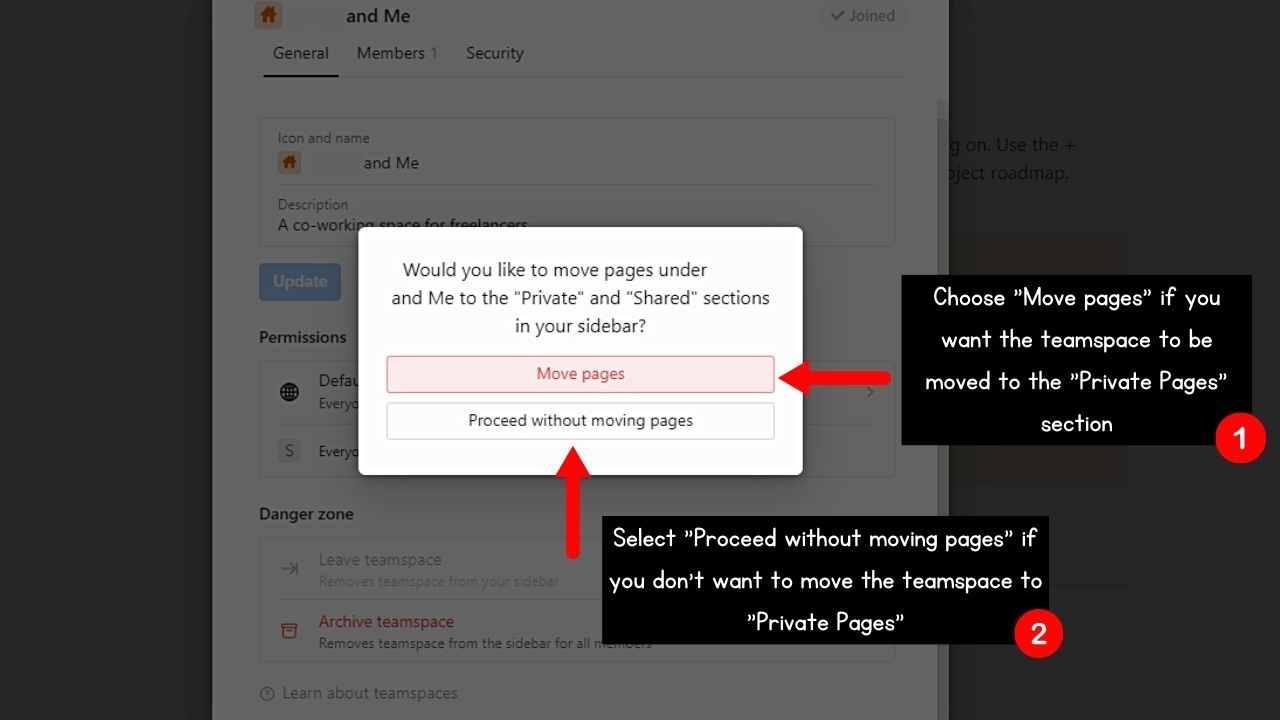
If you want to archive the Notion teamspace and move it to your “Private Pages” section, click “Move pages.” If you don’t want to duplicate the teamspace, select “Proceed without moving pages” instead.
But if this process is cumbersome, there’s a more direct method.
Short Method: Clicking “Archive Teamspace” to Delete a Teamspace in Notion
1. Click the 3-dot icon beside the teamspace name.
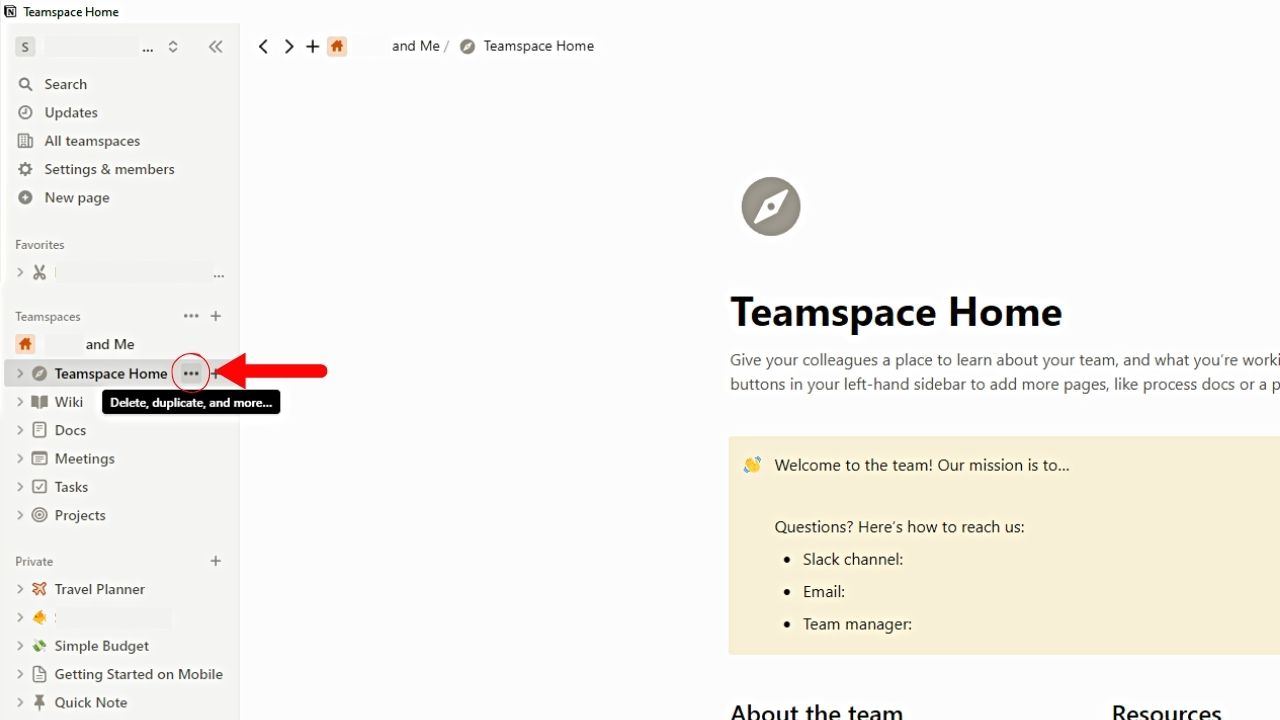
You’ll find this button if you hover your cursor on the right side of the teamspace name.
2. Select “Archive teamspace.”
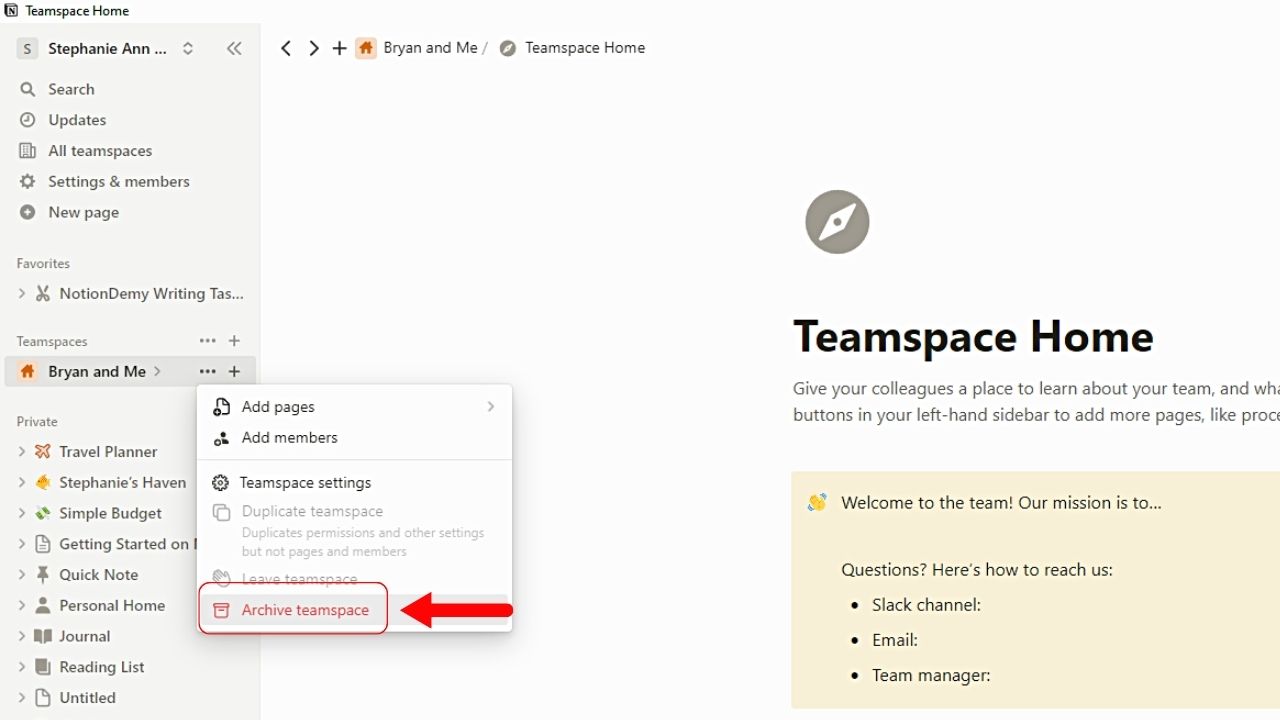
This option is the last and the only option in red on the dropdown menu that opens.
3. Type the teamspace name and click “Archive teamspace.”
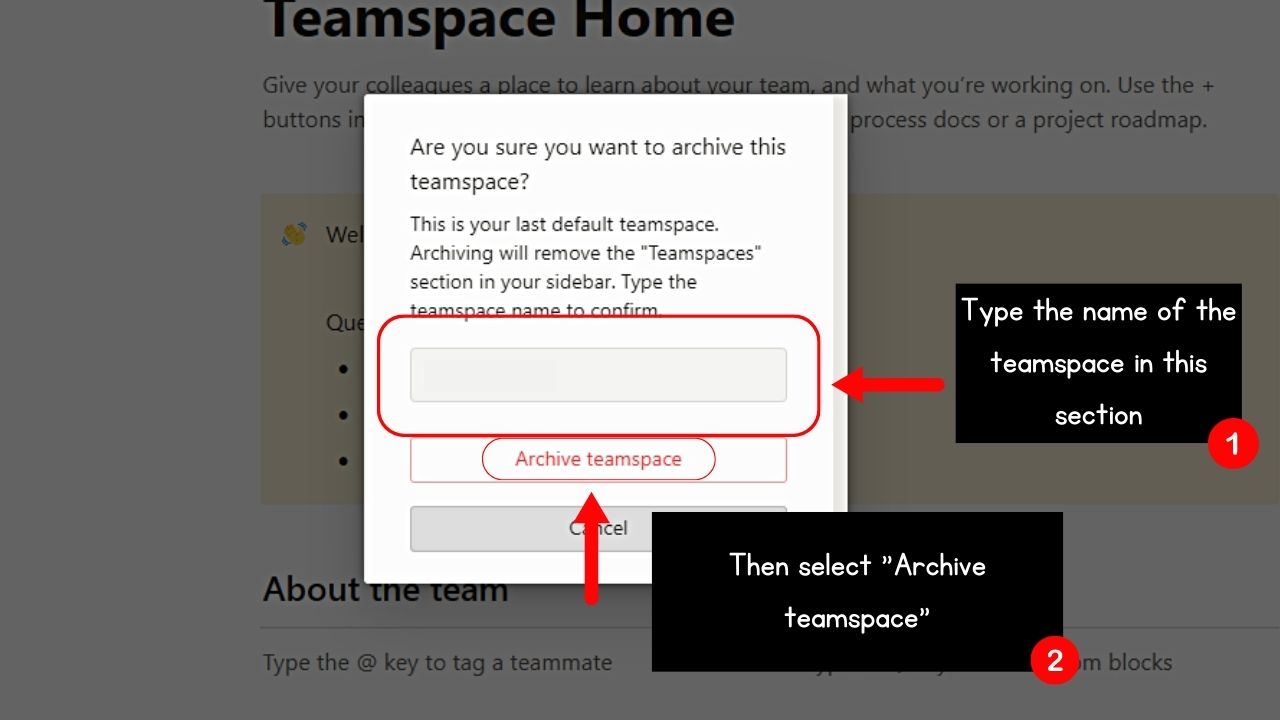
4. Choose between “Move pages” or “Proceed without moving pages.”
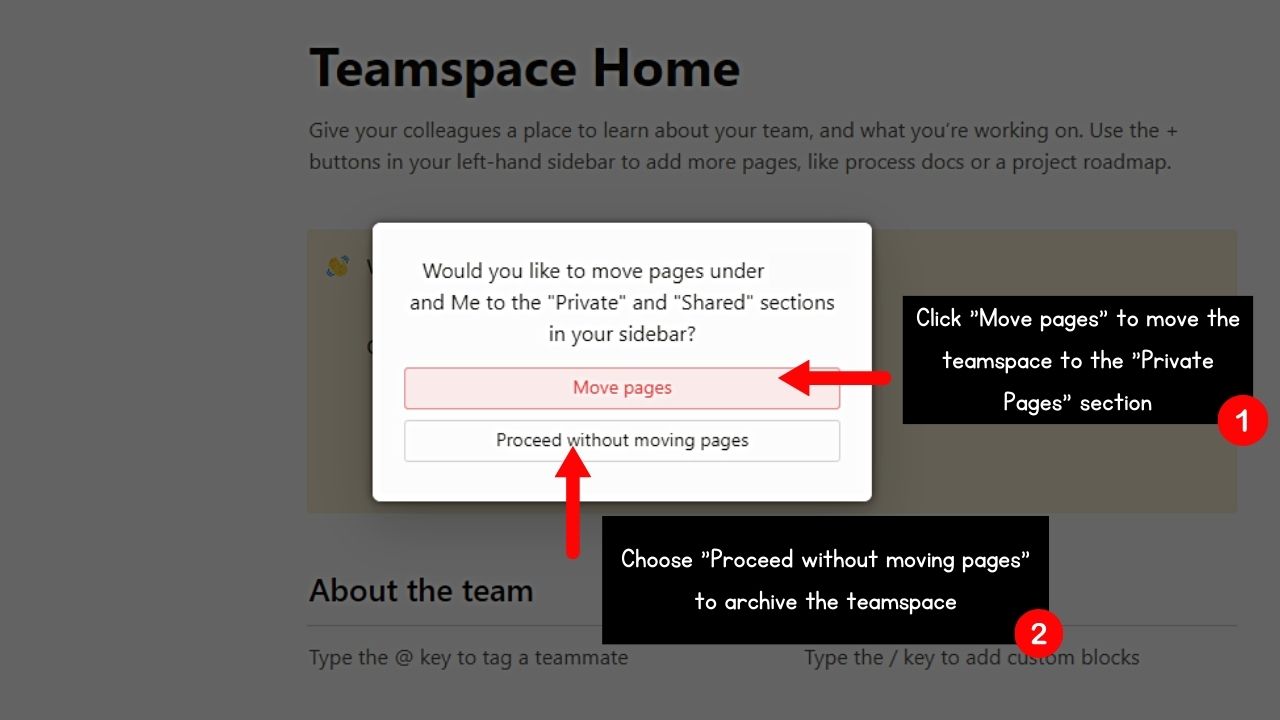
Archiving a teamspace in Notion isn’t permanent compared to deleting an entire workspace.
You can still restore a teamspace by clicking “Archived” > “3-dot icon” beside the archived teamspace name. Then select “Restore teamspace.”
Once done, all the members of that teamspace will see the teamspace and all its content on their sidebars.
Conclusion
You can easily delete workspaces and team spaces in Notion with the straightforward steps outlined above. Though the process is easy, practice caution as this action is irreversible.
No matter the reason for deleting your Notion workspaces, this action helps maintain a clutter-free and organized experience with this tool.
